

Interior Design
Not a Decorator
Getting My Design On
People always ask how I got into design but it’s really been a part of my life for as long as I can remember. My dad is an ex medical student turned explosives engineer, eventually getting into airbags at General Motors but all along, he’s been a builder and a creative. He’s designed and built additions to almost all of our homes and built kid-friendly toys like zip lines, go carts and even a full size halfpipe. Recently, he set his sights on a four person Cessna, taking flight whenever the mood strikes. Stating that the smell of sawdust is what I remember most about my childhood, would be an understatement.
Then, there's my four younger brothers. Brandon started his own wood working and home goods company called Well Made, which has been a huge success and even seen products in Target. Jay dove into aeronautical engineering with stints at NASA and is now transitioning into the architectural field. Jon formed his own tree trimming company called Big Twigs, which he sold a few years back and has since started Decked Out. And Tim, he’s been doing mechanical and metalwork for years, starting his own company, Knowlden’s Garage.
Me, I’ve always been more interested in the pretty side of design, focusing on aesthetics, the look and feel of an object or space. As an adolescent, I’d rearrange my bedroom time and again, creating new configurations and layouts, rolling on fresh coats of paint in my new favorite color and testing out my first credit card at Pier 1 Imports. Years later, my Bachelor’s degree in Marketing wasn’t cutting it, so I moved to South Korea to try my hand at teaching English, another creative outlet. Eventually, I decided it was time to head home and try my next pursuit. Without much hesitation, I landed on design and because I knew I was already behind the curve age-wise I opted for a two-year Master’s program instead of spending another four years getting a Bachelor’s.
Master of Fine Arts in Interior Design
After researching Master’s Programs throughout the world, I learned there weren’t many options with two year programs: one in Canada, another in Florence, Italy and the last, Chicago, Illinois. Sadly, I wasn’t able to swing loans for schooling in Florence, so I ended up in Chicago at Harrington College of Design, which has since closed and merged with Columbia College. Added bonus, I’d be closer to family in Michigan and brother living in Chicago.
My two-year Master’s Program was wildly intense and fast paced. Overall, we mostly focused on the theory of design and less on actual daily work as a designer, which made getting started in the industry fairly challenging but I suppose that’s the nature of a two year program when changing industries, especially a technical one. The classes offered included those on the history of interiors and architecture, basic drafting techniques, conceptual sketching, space planning, design process and construction, sustainable design and codes while learning various digital programs like SketchUp, AutoCAD, Rhino and Revit.
What Is Interior Design? (What It Isn’t)
Interior design is what gives a space an identity. It helps convey a mood or feeling. Does it feel warm, soft and inviting or is it sterile and cold? Does the space create a calm feeling or does it excite? Does it weave a story throughout its interior or it is purely functional? Among some of the most important design principles used to create these qualities are light and shadow, scale and proportion, color and contrast, pattern and texture, rhythm and repetition, and balance.
Within the interior design field there are two main paths designers can follow: residential or commercial. Residential focuses on the design of homes, apartments or condos, while commercial design is a bit more diverse. Commercial designers may work on projects in the following sectors: office space, healthcare, retail, hospitality, government or education. From there, sectors can narrow and get more specific or combine pieces from multiple types. For example, I work on many medical education spaces. These buildings not only combine education with pieces of healthcare but they also need office space and various amenities.
Beyond the shiny surfaces, though, is function. The function of a space is essential and helps to shape both the interior and exterior. Ultimately, if a space does not function properly, users will become frustrated and forced to make adaptations that are typically not aesthetically pleasing. In this way, interiors are shaped and molded by function where flow, adjacencies and proportions follow the principle of “form follows function.” “Form follows function” is an idea that the shape of a space or object should relate to its intended function or purpose. It was coined by Louis Sullivan, an American architect and mentor to Frank Lloyd Wright, who’s often referred to as the “father of modernism.”
More specifically, the design process involves coordination of all interior aspects of a space, mainly focusing on the aesthetic look and feel as it relates to its surfaces (floors, walls and ceilings), along with everything behind the scenes that influences these surfaces including plumbing, electrical, mechanical, lighting, audio visual, security, safety and accessibility and any other trade that might be involved in a specific project. Interior design excludes the core (exit stair, main restroom and elevator shafts) of commercial spaces, along with the exterior envelope or shell, which are typically designed by architects. However, to be successful a spaces do need a strong relationship between the interior and exterior; designers must work closely with architects.
All the while, these elements are carefully balanced alongside budget, schedule and client expectations. At times, either the budget or schedule won’t allow for certain changes, especially if drawings have already been submitted for approval. And depending on the client, it can be very challenging juggling the needs and wants of so many opinions. Typically, most projects have a general contractor who pulls in each trade (plumbing, electrical, mechanical, lighting, AV) and in turn quotes the project costs. These numbers are based on specifications (specific products), market, availability, labor costs, delays and so on.
For example, let’s say the tile a designer specifies is backordered in Italy for the next 16 weeks or the trade person responsible for laying the tile, is in shortage, lead time and cost will rise. Alternatively, the designer may need to select an alternate tile. Regardless, it’s the GC’s responsibility to track every element throughout the life of the project and make sure one trade doesn’t stall another, throwing off the construction process. In commercial projects, the final completion date is often not flexible; hospitals need to open, university classes need to begin or office leases need to be honored.
Finishes are what users see and touch in a space and what most assume interior design encompasses but there’s a lot more beyond the surface. Finishes like carpet, paint, glass, tile, terrazzo, fabric, wood and stone must not only work together color and tone wise but they must also seam together effortlessly (enter details, my personal nightmare). Finishes must also be on budget, not have extended lead times and adhere to certain safety standards depending on the space. They must be durable, available and sometimes, local.
FF&E (furniture, fixtures and equipment) includes all moveable or easily removable objects in a space. Depending on the project, an interior designer may or may not be responsible for selecting furniture pieces, or it may be outsourced to another. So, depending on who is doing the selecting, a designer may want to anticipate what might be placed inside the building and accommodate, as needed. Fixtures can include light fixtures, plumbing fixtures and decorative items like art, rugs or curtains. Equipment is generally reserved for tools and appliances such as electronic devices, kitchen equipment or unique pieces a client may need such as lab or medical equipment.
Depending on the scale and scope of a project, designers can be brought on at various phases of the design. In my opinion, interior designers need to be involved from day one, so they can help early on with layout and programming of the space, rather than when there’s only enough time or money to slap on a few superficial surfaces. Coordination efforts and planning details are almost endless and sadly, if a designer does not have the time, knowledge and care to fully coordinate each and every item, things can end up in the wrong place, wrong finish or missing altogether. Mistakes can also cost the client huge amounts of money and wasted time or they can be, just plain ugly. It’s an interior designer’s job to catch every detail and make sure they are thought through not only for function but also for beauty.
Questions a thoughtful designer might ask:
What makes sense for the overall flow and intention of the space?
What adjacencies are important, for spaces and items within spaces?
Which spaces need daylight? Which direction should windows be facing?
Are the materials and systems in use sustainable, safe and reliable?
How does the overall building height affect each floor and the spaces within?
What’s the entry and exit sequence, for the building, for each space?
Which sight lines are important, both for pleasure and safety?
What types of spaces are offered for various user needs (active users versus those who need a quiet place of respite)?
Do users prefer closed off private spaces or should the space feel open?
How important is flexibility and growth?
What spaces are acoustically sensitive and how do you treat them?
What light levels are required?
What technology needs to be incorporated (monitors, speakers, cameras, security)?
What about wall switches, electrical outlets, room schedulers, card readers, signage, wayfinding and graphics?
What ADA accommodations need to be made for physical and mental disabilities?
What accommodations can be made for gender?
Phases of the Interior Design Process
Programming
During the programming phase, a designer is meant to ask questions and define goals. It’s the time during the project where the client describes needs and wants in regard to function and look and feel. On a larger scale, programming is when the client and designer determine what spaces are needed and how much of each. For example, if you’re designing a five-story education building like one of my recent projects: How many classrooms are needed? What sizes are required (10 person, 60 person)? What kind of staff is needed to support the students? Do offices need to be open or private? Do you need security or a reception? What amenity spaces are required?
Then, moving on to each individual space: How does each space need to function? Here, getting down to the nitty gritty is important. If it’s a classroom, where is the teacher located? What material is being taught? Does the space need to be flexible? Do they need writing surfaces or monitors? Where does the AV equipment go? What lighting levels are needed? How should acoustics be treated? How long are the students sitting? Are distractions an issue? Surveys are taken from the client which could show up in the form of Room Data Sheets. Room Data Sheets are used to describe each room type and include things like typical dimensions, furniture and equipment requirements and desired finishes.
Programming may also include documenting any existing conditions, if they apply. Measurements would need to be taken, along with photographing the existing space. Research involving codes, restriction and any other legal concerns is completed. Project parameters are also taken; develop a schedule and budget for the project. Designers typically create documents to clearly communicate all these elements and require sign off from the client.
Schematic Design
Schematic Design is used to refine goals and explore solutions. Initial design concepts, layouts and products or materials are suggested. This is a time for exploration and testing ideas for the space. Scale and relationships of spaces begin to develop and emerge, creating functionality, circulation paths and adjacencies. Several options will be tested and presented to the client to get a read on how they feel, though providing too many options can be overwhelming and is not recommended. It’s also best to never show a client something you don’t like, as they may latch on to the idea.
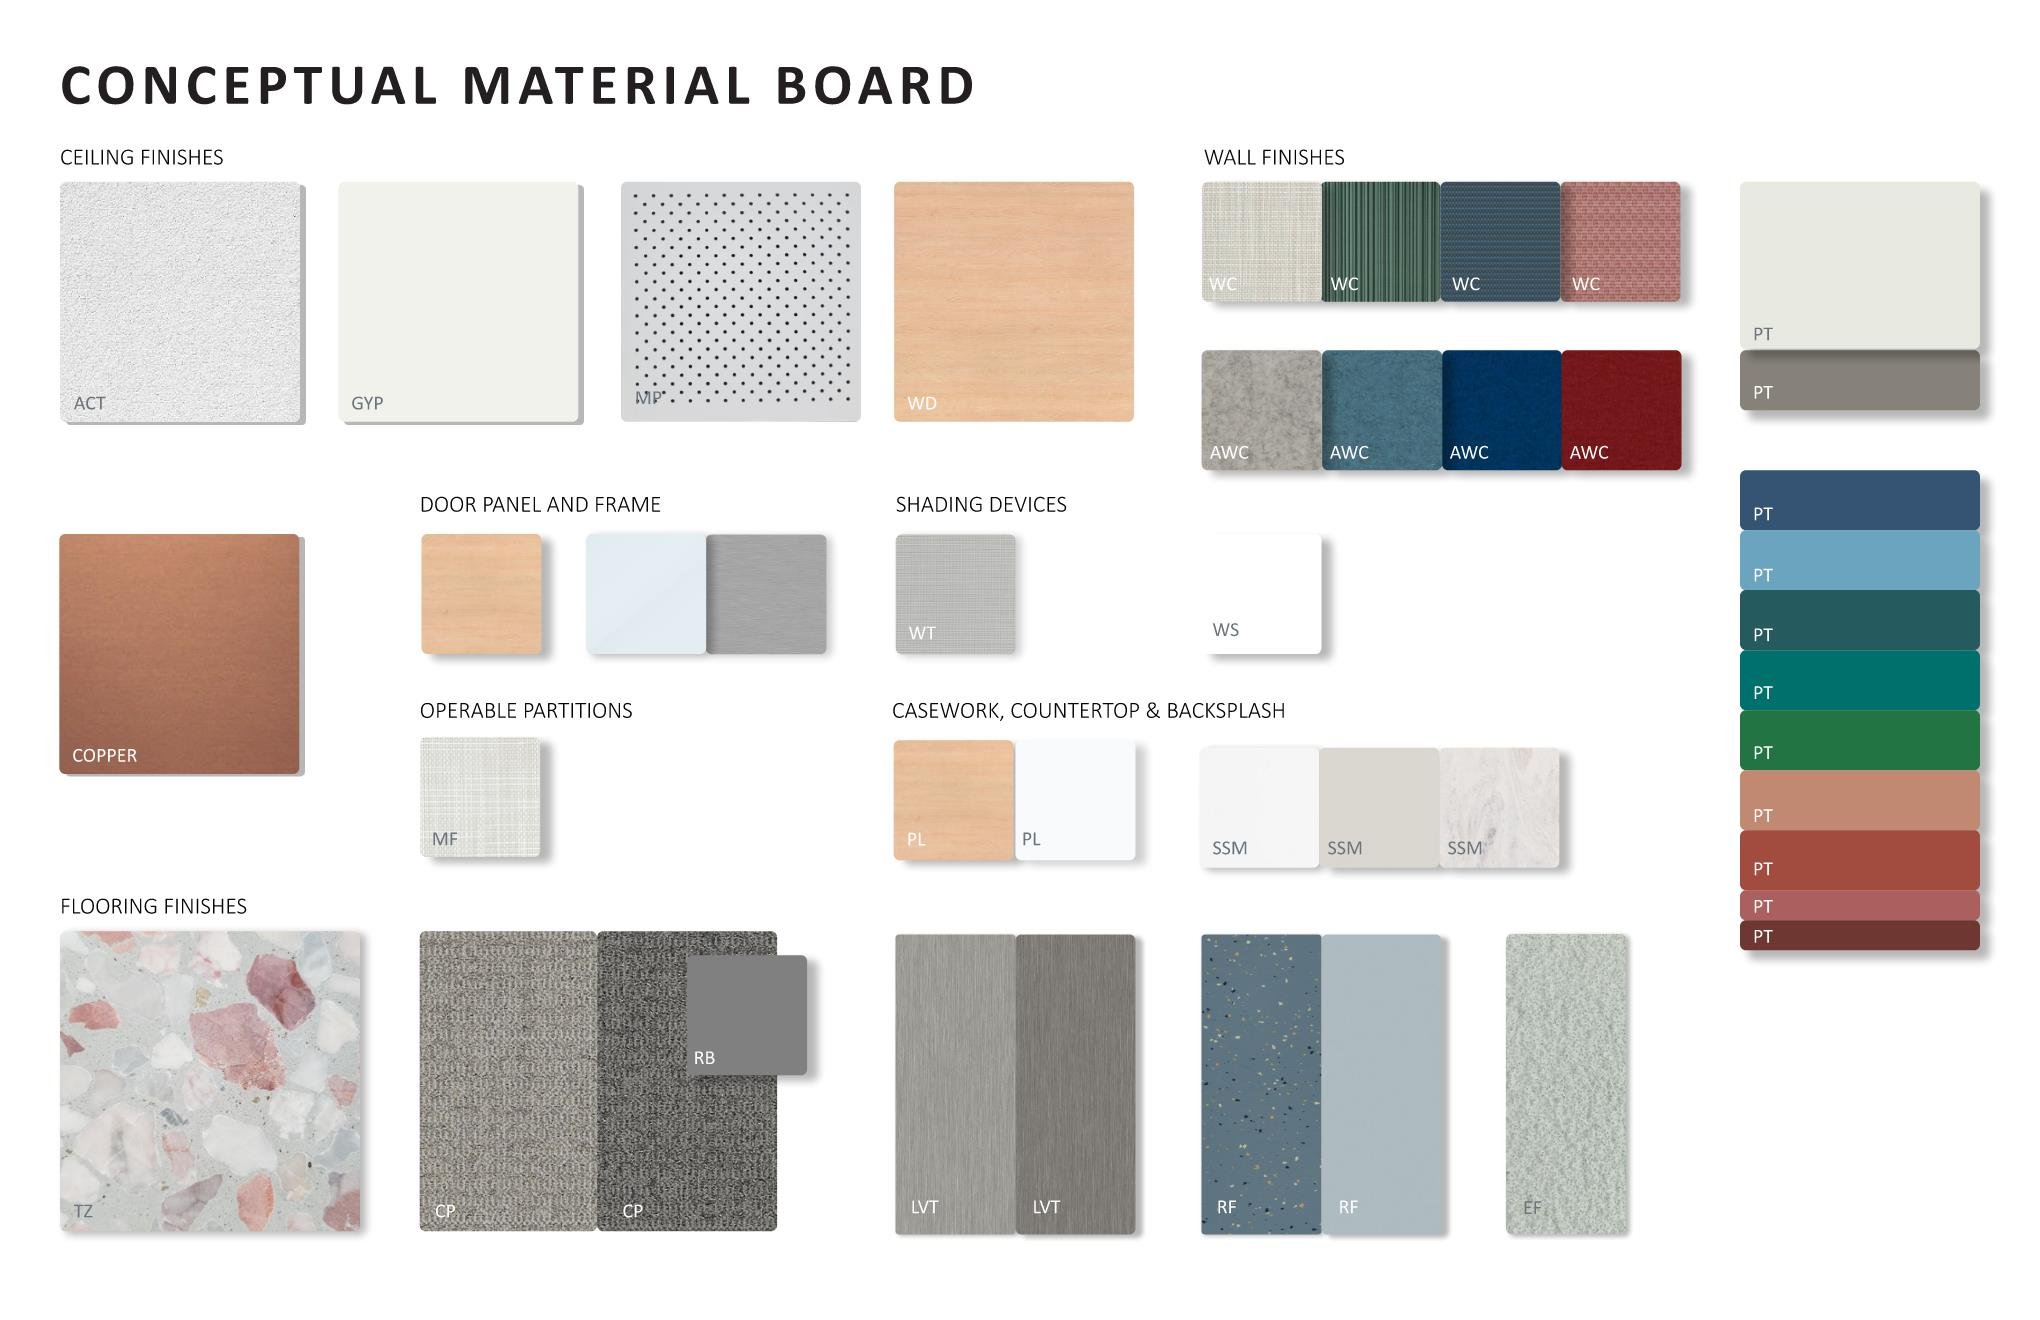
General interior finishes begin to be suggested, though not in specific detail. This is provided not only for look and feel but also to narrow down the budget. The scope, budget and vision start to take shape and become more clear, often times needing to be adjusted as things unfold. During this phase, deliverables are required, including concept layouts and likely initial 3D views and various interior finishes. As elements develop, the client will sign off on each portion, especially the concept, which is incredibly important to nail down early on as it influences the entire design.
Below are a four concepts that were developed early on in the design phase for a client in Arizona. Each concept references a mood or feeling, along with a color story.
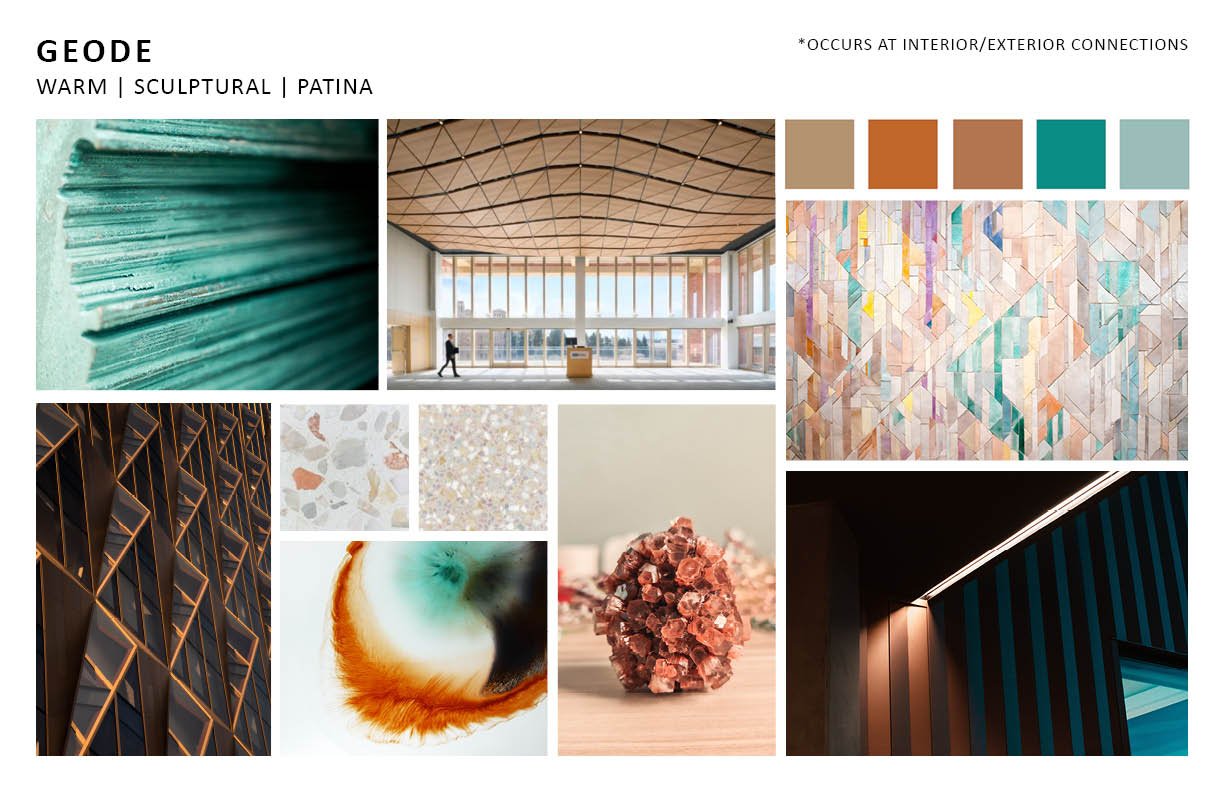
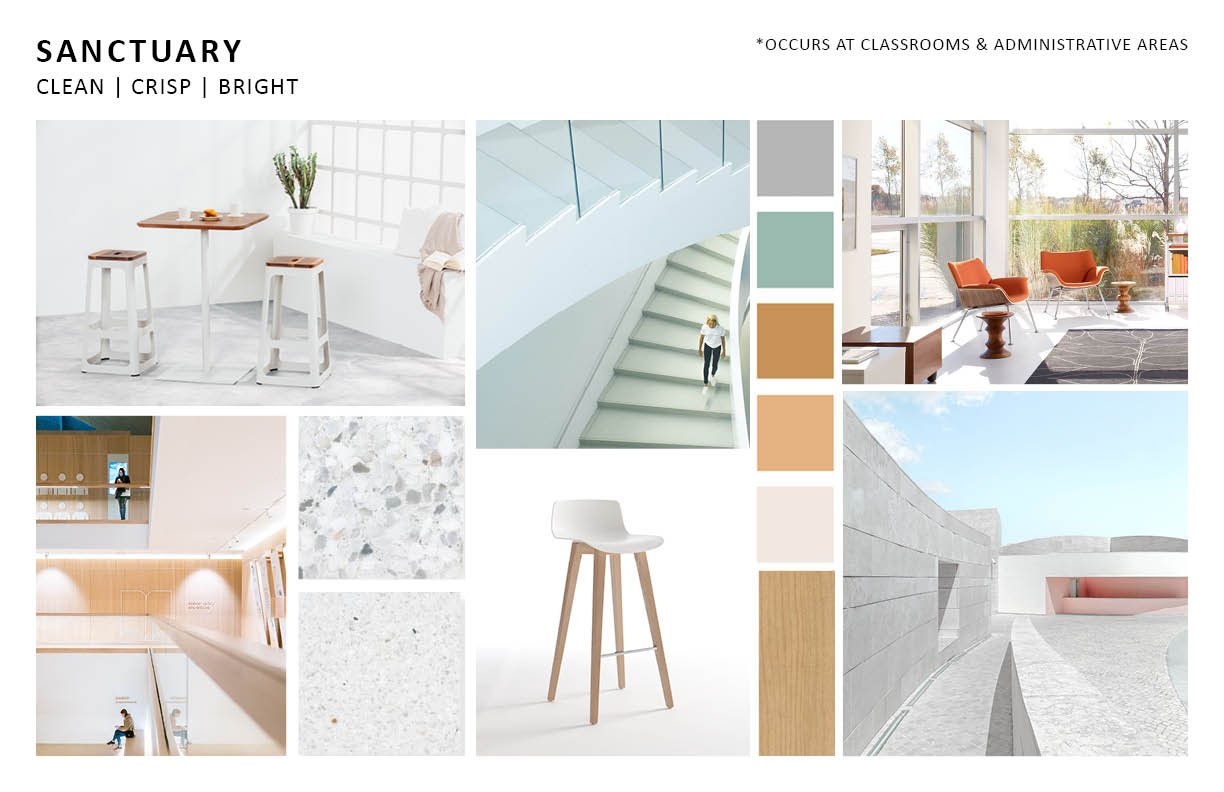
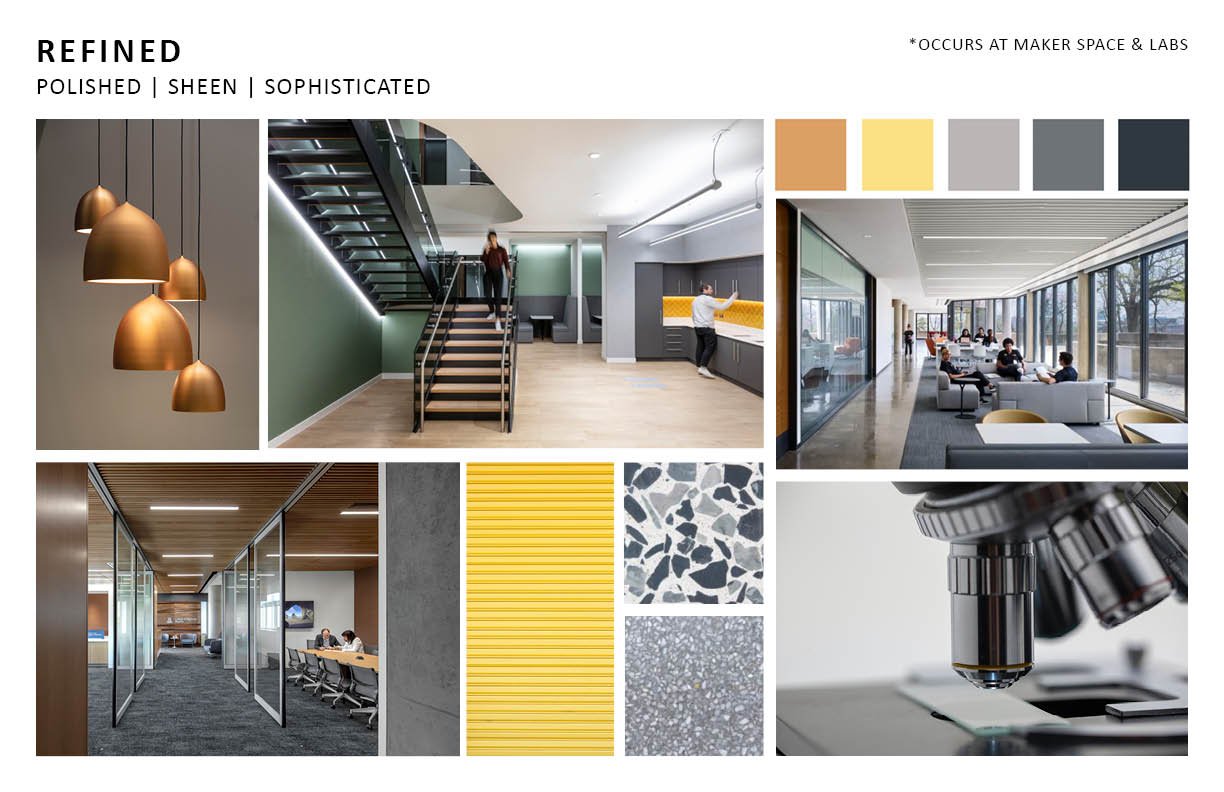
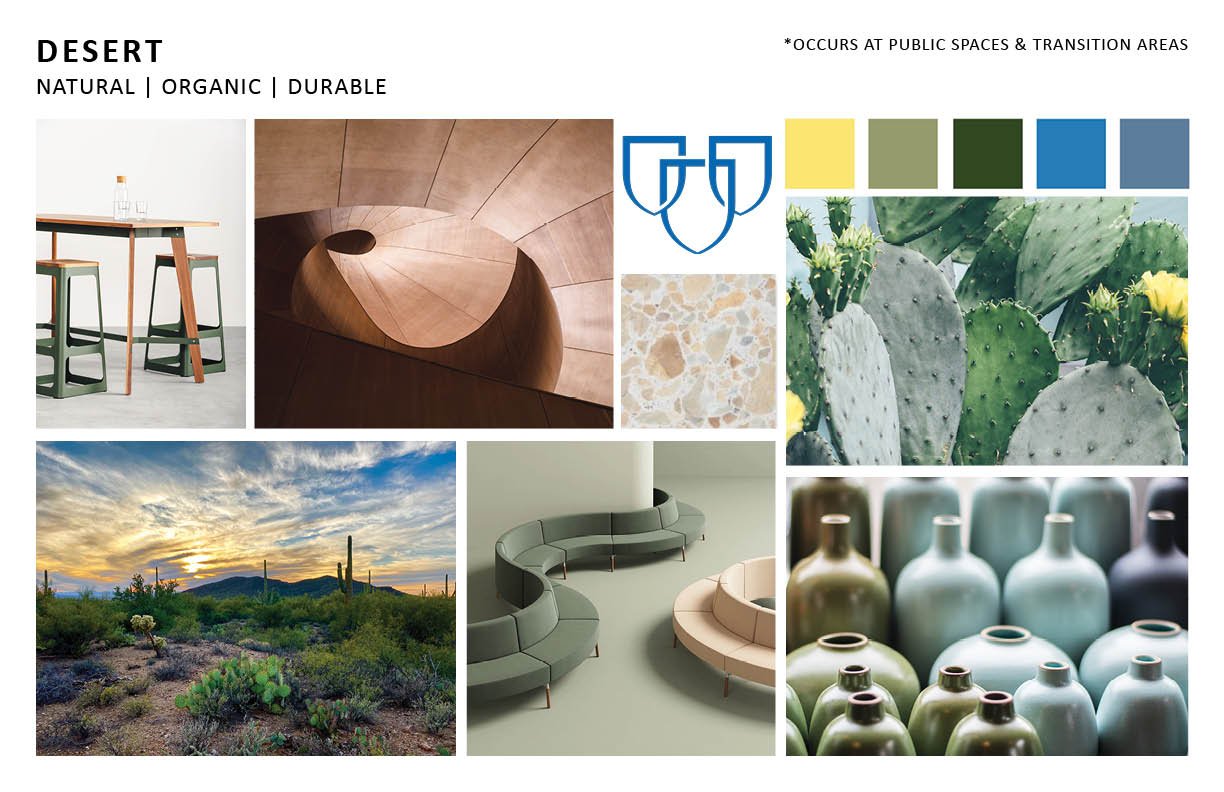
As is often true, the client was pulled toward each concept for a different reason. We landed on merging them together into a single cohesive story, focusing each concept loosely to a certain zone or region in the building and creating a single color palette.
Design Development
Design Development is used to refine solutions and develop details. At this point, the client has selected a direction and the design team runs with the idea. Spaces start to settle as things like fixtures and equipment are determined, though exact dimensions are still in flux. The concept is fully fleshed out, beginning to add in more 3D elements like walls and ceilings. Interior finishes start to become more specific including a color story. At this point, in commercial drawings it’s very important to capture scope, even if it’s not fully baked. Typically, the general contractor will price a drawing set called the 100% Design Development and if something is not included at this time, it’s very difficult to get it into the project later because it’s seen as an added cost.
Designers spend a huge amount of time developing the design ideas with tools to communicate their concepts. During this part of the process, imagery is often developed in the form of renderings, or 3D life-like imagery that represents the intent. Initial materials used may not be final but will generally give the client a good idea of the look and feel. Creating a mood or a point of view is important during this time, as it’s often some of the first true imagery the client sees. Clients often get distracted at the tiniest of things so it’s best not to add layers that may confuse or distract, particularly color.
Specific views of the space are chosen and developed; those the designer feels are most important and convey the design intent best. Even if furniture is not part of the scope, it’s best to include general recommendations to show scale, mood and intent. It’s also very important the interior designers work closely with the architects on the project so the connection between interior and exterior is seamless. Sometimes, this is done in-house but other times, designers are working with a team across the country.
Initially, a typical material board may start out digitally, especially if the client is long distance. It’s an opportunity to get a feel for the client and see how they start to respond to color and material.
Eventually, finishes become tactile. An in person client meeting is always preferred so you can help steer the conversation and explain why certain decisions have been made in real time. It’s also an opportunity to touch and feel each finish.
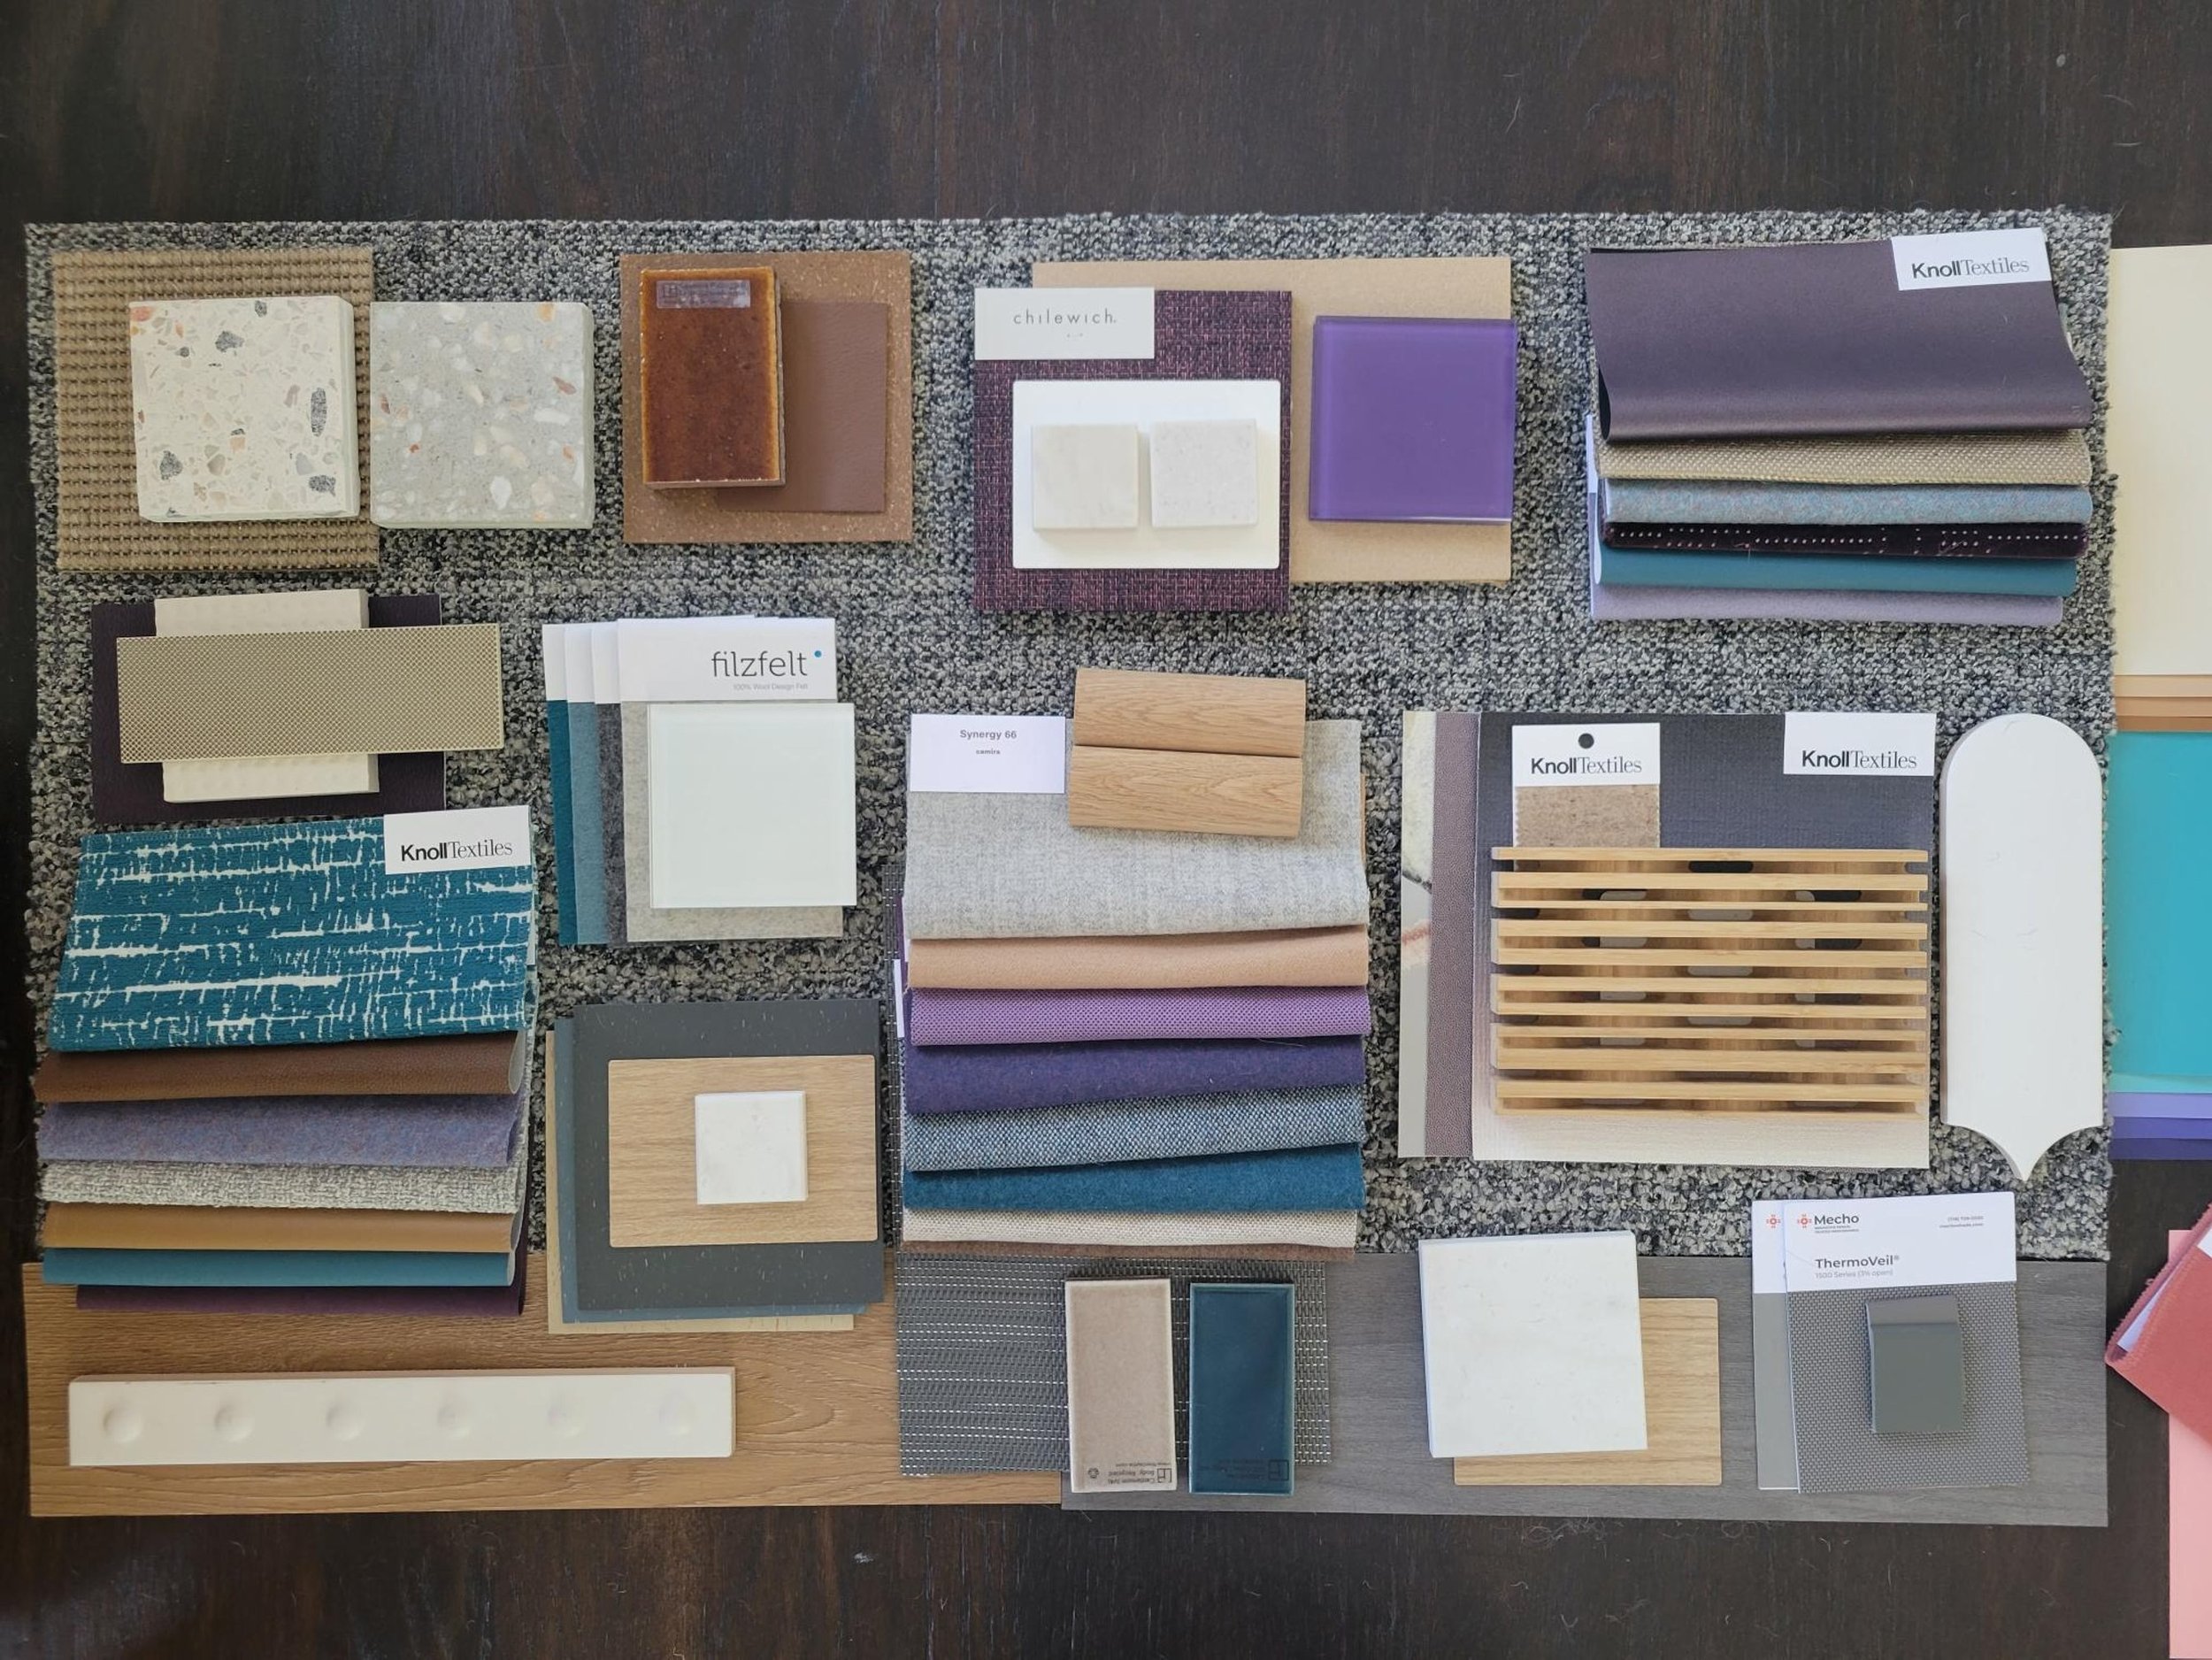
If at all possible, keep options fairly limited and conversation focused. Be familiar with each product you are proposing; know its cost, available sizes, lead time, what it’s made of, installation method, cleaning requirements and so on. If any questions come up that you’re not familiar with, it’s best to circle back with the client and not over promise.
Construction Documents
Construction Documents are typically done in various increments such as a 50% CD Set and a permit set which falls around 90-95% complete. This document is the one that’s submitted to the city for a permit, so it needs to follow all safety guidelines and ADA requirements. During this phase, a designer creates the documents needed to build the project. Floor plans, reflected ceiling plans and elevations are set in stone and dimensioned. Details and finishes are also finalized, with approval from the client. Electrical, plumbing, mechanical and AV are fully coordinated and submit drawings alongside interiors and architectural; structural is finalized. A final set of contract documents is provided to the client and the city for approval. Any additional information must be provided in an addendum or change request. When completing the construction documents, it’s critical to get as much content into the documents as possible. In the end, if it’s not documented, the GC has no obligation to build it.
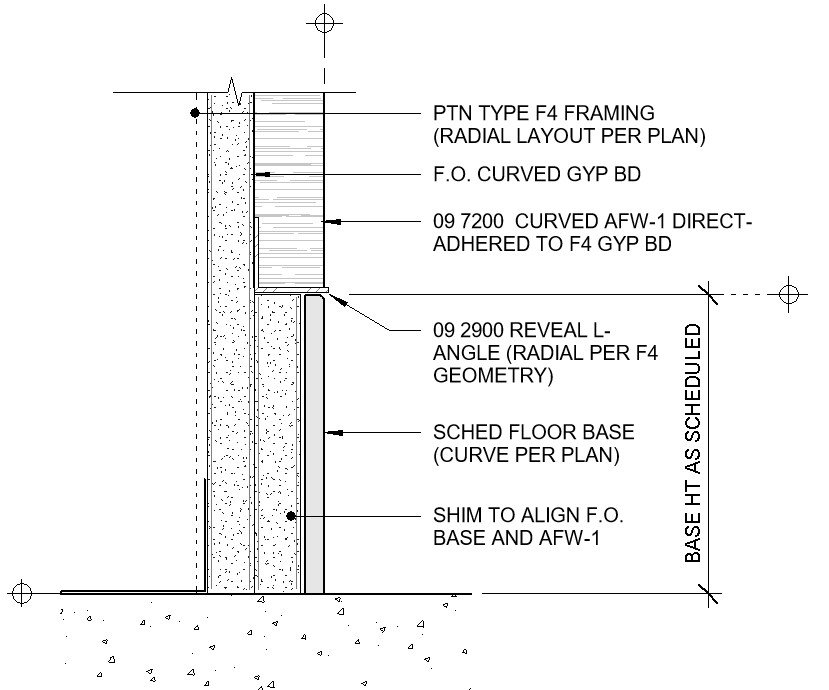
Above is a sample of a detail showing how an acoustic wall product meets with wall base. Because of its thickness, we had to add an l-angle trim piece to catch the bottom of the material and create a nice transition. It’s areas like these, throughout the project, where details need to be drawn prior to submission in order to capture scope and intent. The more detailed a project, the higher the cost.
Construction Administration
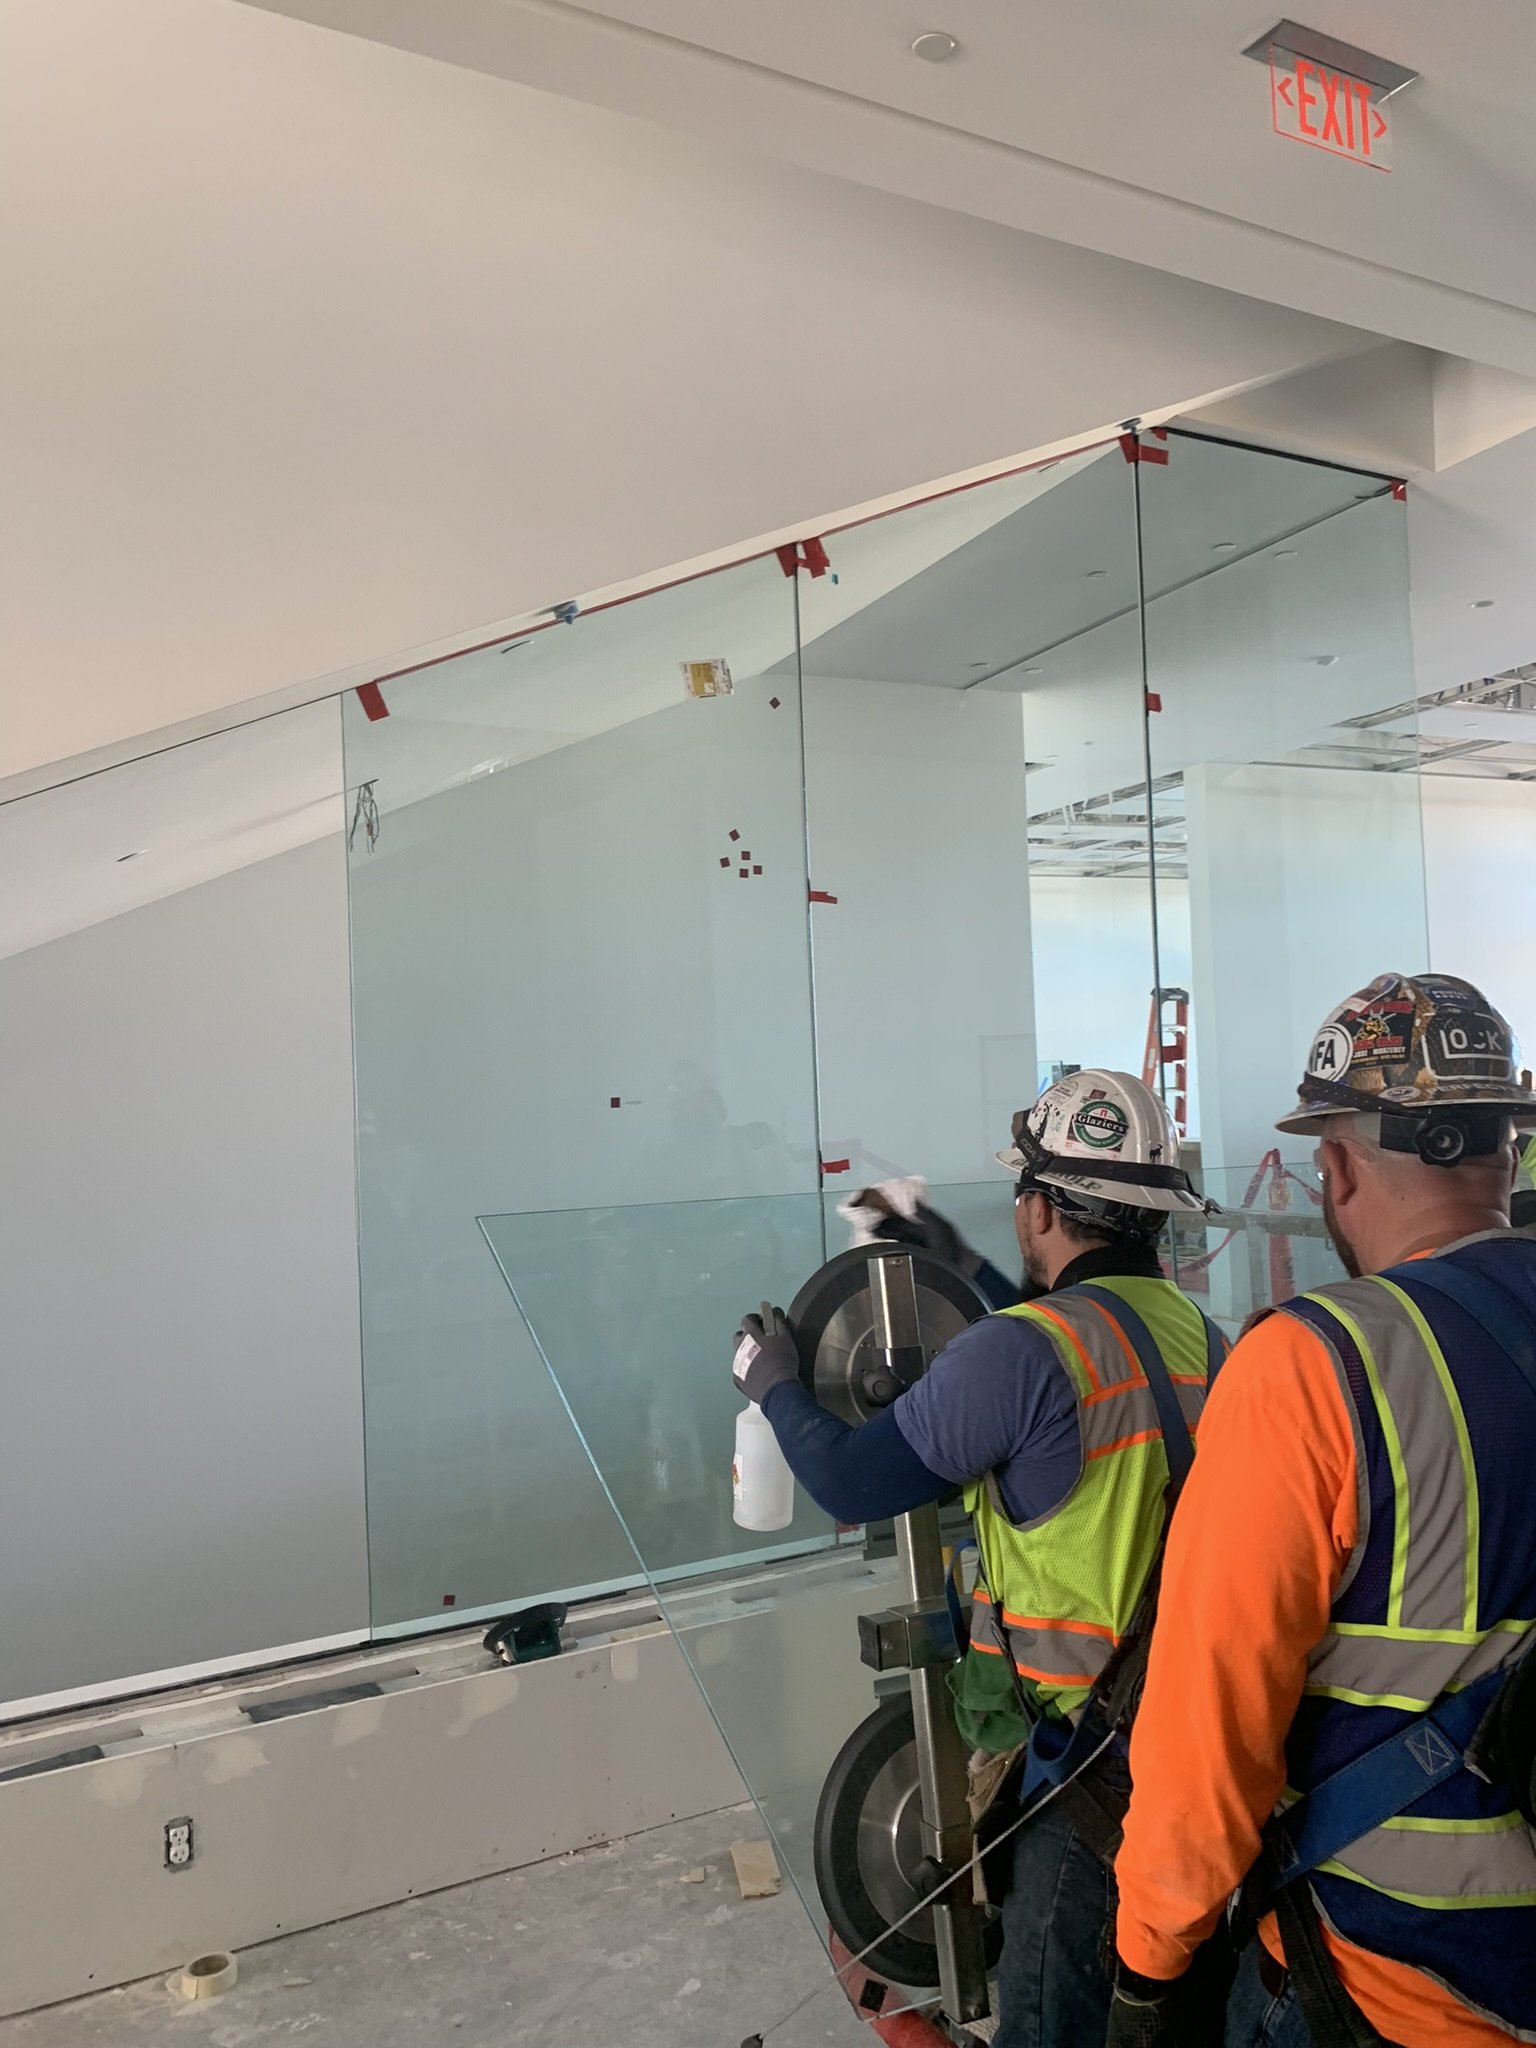
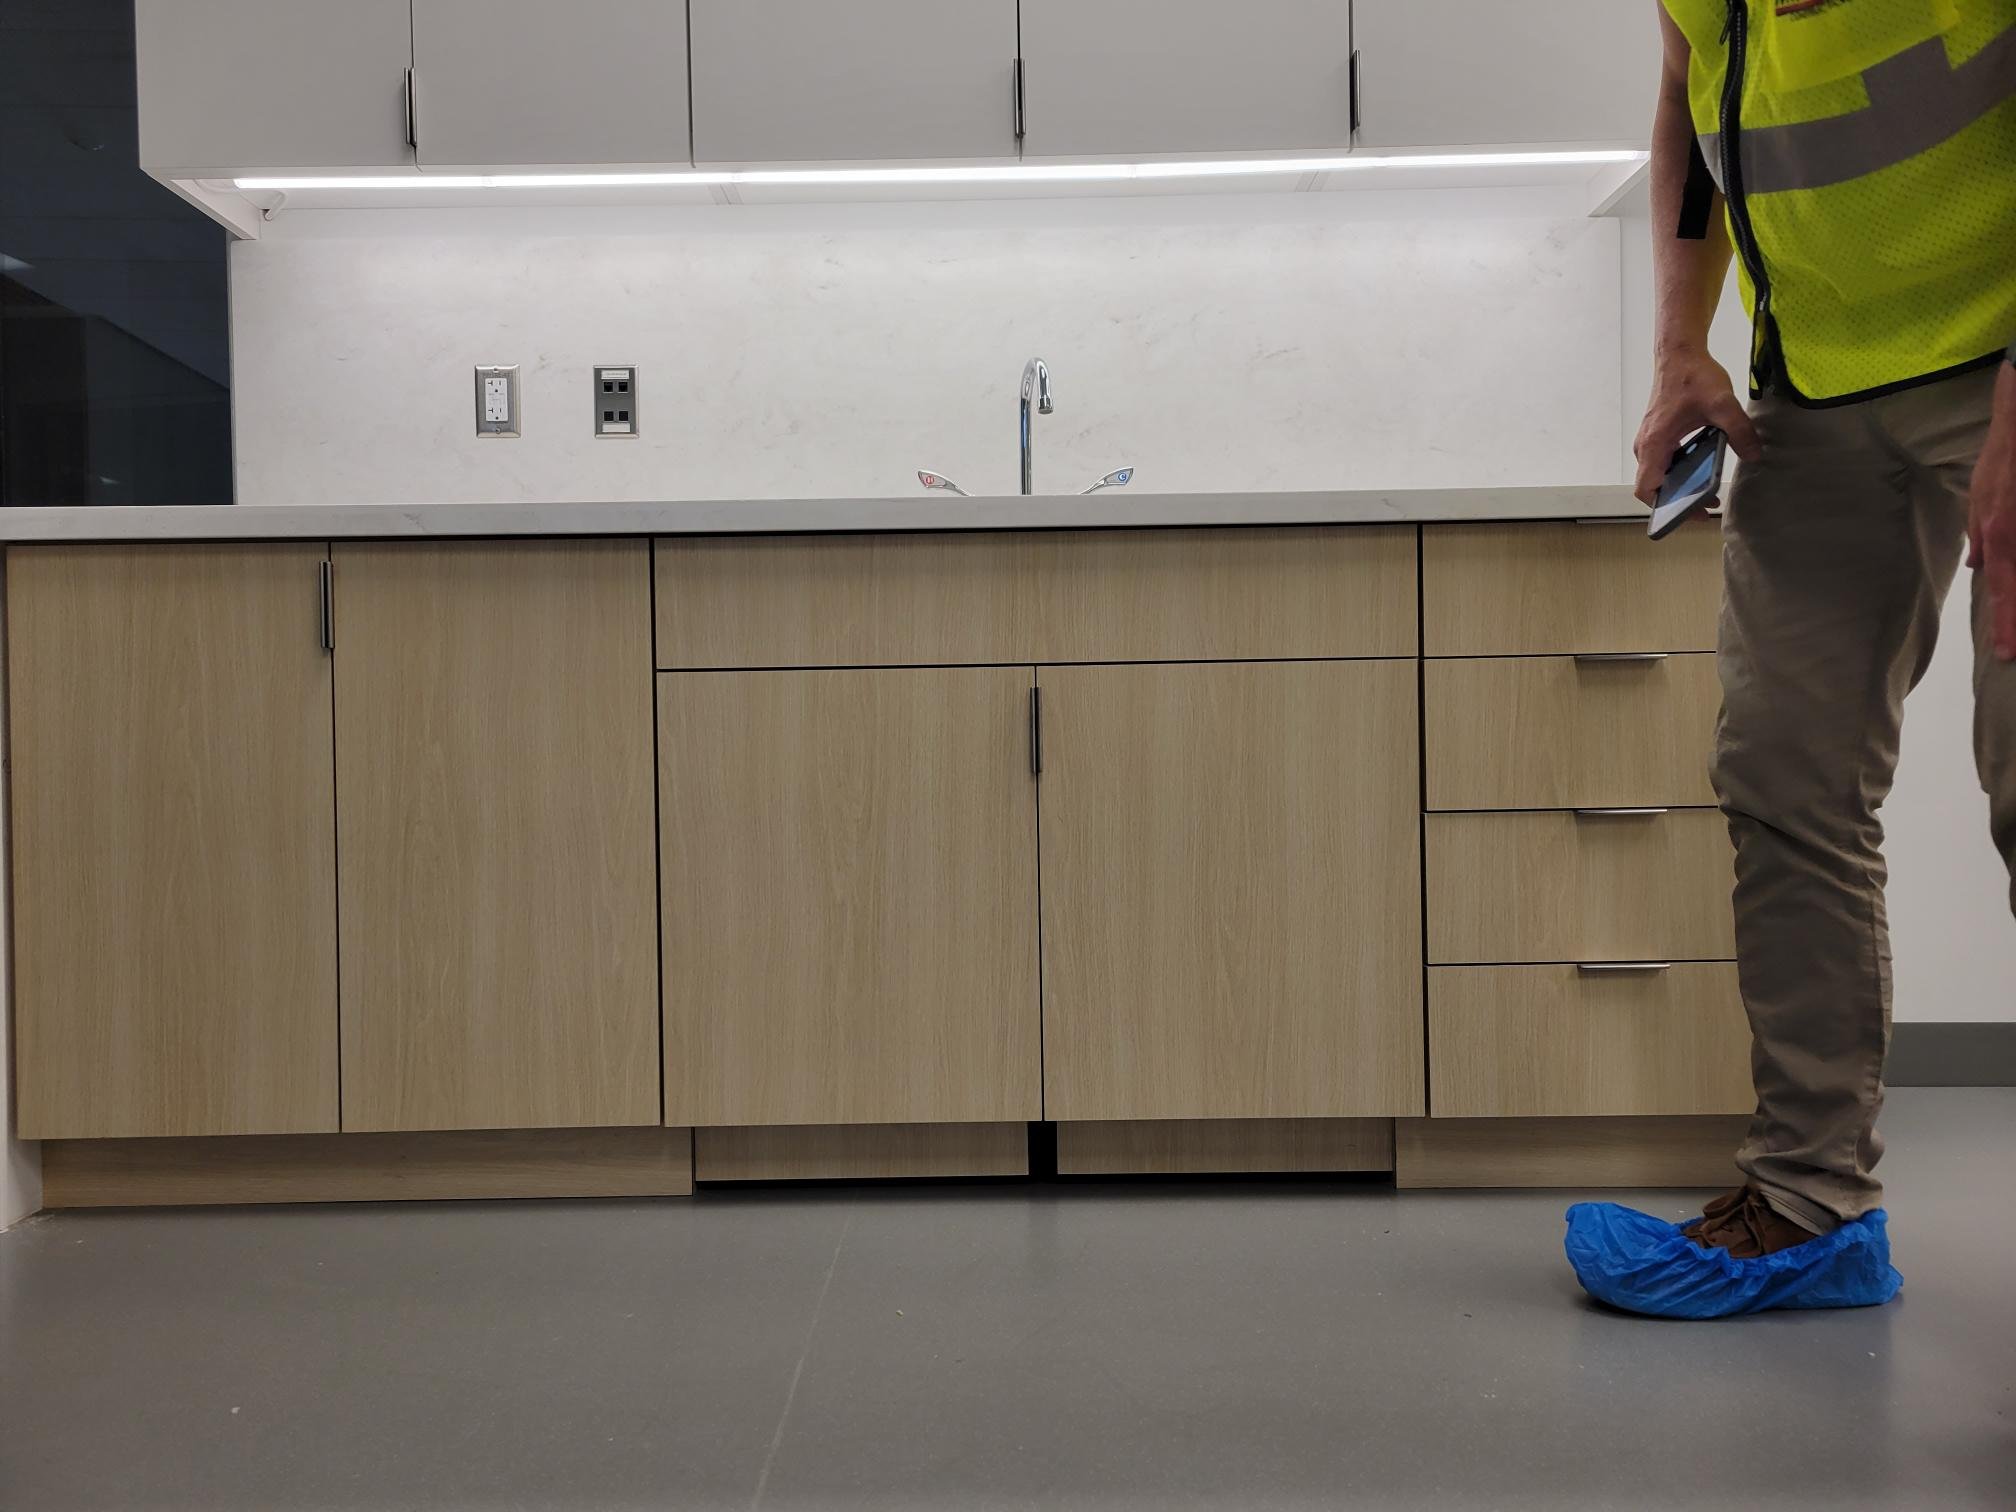
During Construction Administration, bidding, permitting, construction, procurement and installation occurs. Contractors give bids and are hired for the job. Permits are secured and items like light fixtures, plumbing fixtures and furniture are ordered, shipped, received and installed. Throughout this phase, shop drawings are submitted to the designers for approval. The drawings are exactly what will be installed and therefore must be reviewed carefully. This is the last moment to catch anything that was missed along the way or has been documented incorrectly.
The general contractor and subcontractors work onsite and conduct walk throughs with the designers and client on a regular basis. This is the time for designers to keep their eyes peeled, making sure builders are following specifications and design intent. During each visit, designers document, noting anything unsatisfactory. Mistakes that have been made should be caught in the field and corrected in a timely manner. Keeping up to date on site visits and documentation protects the space from mistakes or damage, which can occur as workers continue to complete construction.
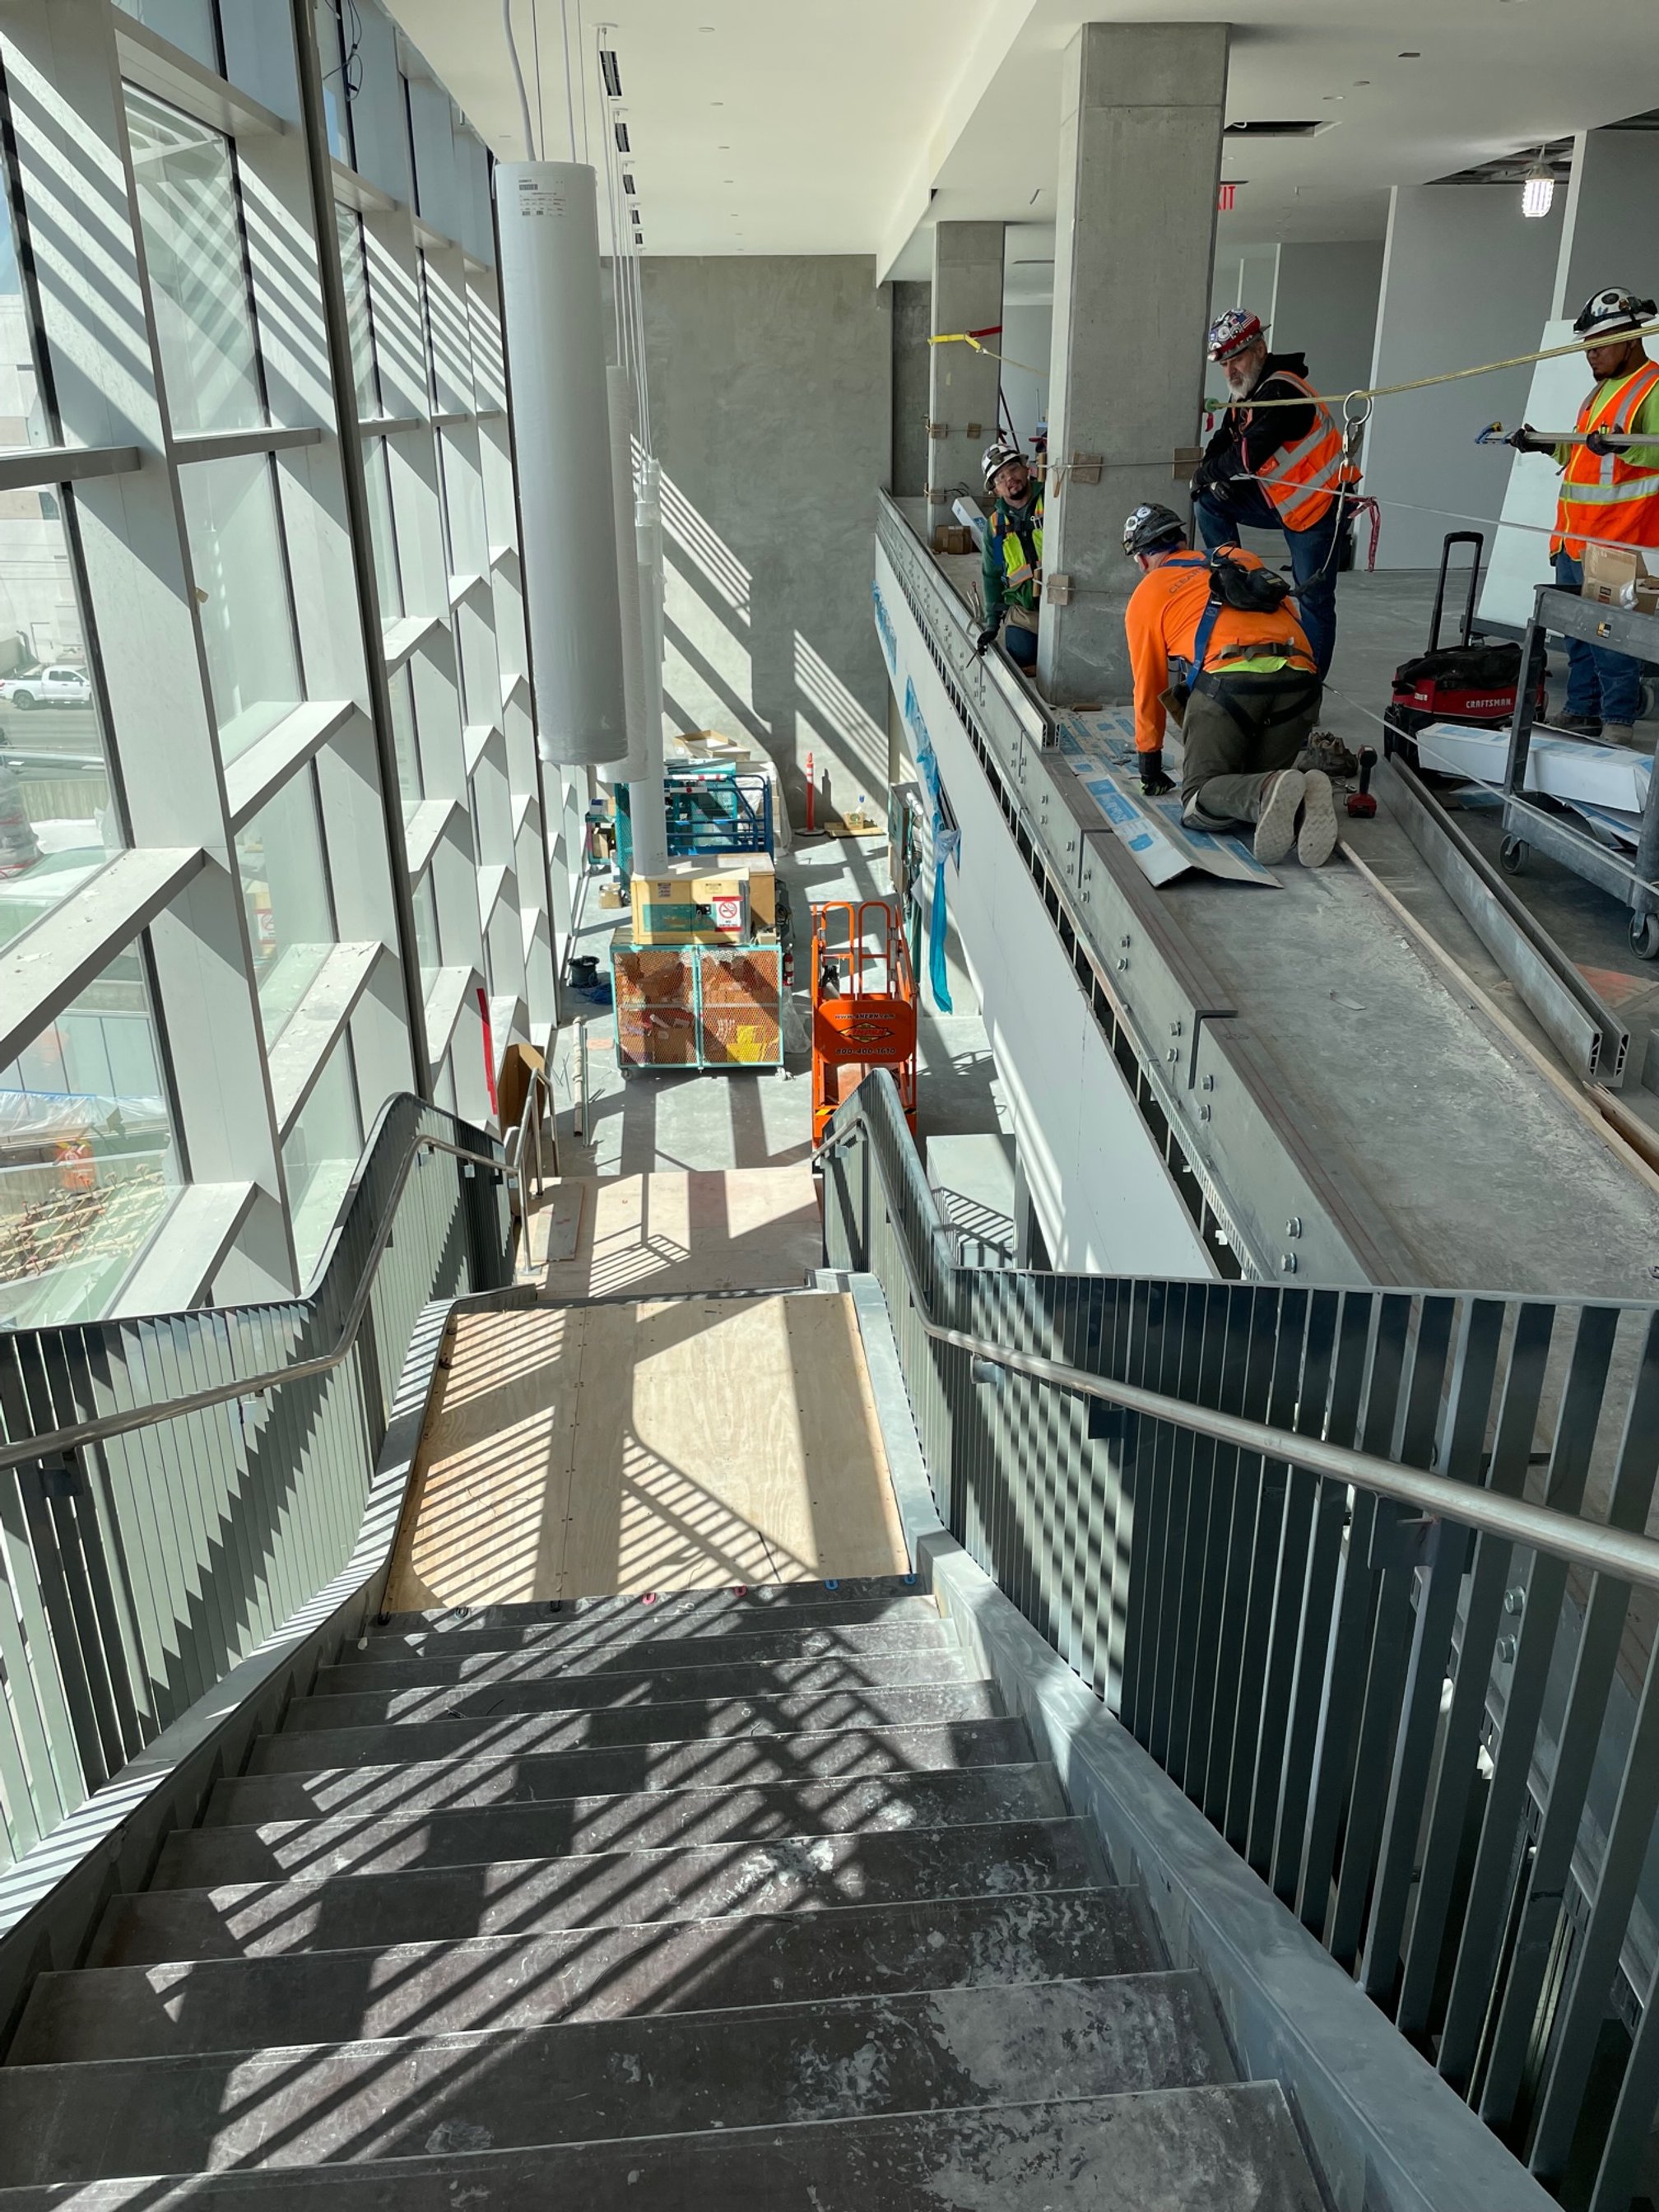
Early on, site visits are pretty rough and are mostly used to make sure walls are in the right place, ceilings have the correct height and things are being built correctly. Later on, designers have to be a bit more detective-like, looking up and under and around to find any errors that have been made. It may be something as small as wood grain that’s facing the wrong direction or a fabric that was installed inside out.
Typically, a final Punch List is completed where the designer walks the entire space and documents any outlying design items to remedy. Typical items that might be caught are scratches, digs or gouges, architectural elements not aligning, incomplete installation of items, wrong products installed or poor quality. And unfortunately, if the designer finds something they want to change but it not was documented in the original drawings, they might be out of luck, especially if it’s an add, cost-wise.
Schedule-wise, the GC is responsible to coordinate the order in which things get installed but that said, it’s extremely important to protect the finishes and furniture that have already been installed. Not to say workers are careless but they may unintentionally damage the space as they continue to work. It’s also important to count quantities of items like light fixtures and furniture, to ensure they’ve been fully installed and none are missing. Typically, furniture is the last thing installed to prevent damage and ensure sizing and layouts are correct.
What Tools Are Used by Interior Designers?
Back in the day, drafting by hand was the main method of creating drawings. From there, it moved to AutoCAD as the primary medium. AutoCAD is a 2D and 3D program developed by Autodesk during the 1980s. In my opinion, it’s fairly primitive and less intuitive, taking more time to draw every line of every element exactly as it appears. When you draw a line in CAD, it’s simply a line, whereas other programs will spit out a 3D wall with depth and height. Those who work for smaller firms or who were trained in CAD, are likely still using the program. I’ve also noticed more architects prefer CAD than interior designers.
Today, most firms use Revit, a 4D building information modeling application capable of planning and tracking various stages in a building’s lifecycle, from concept to construction, maintenance and demolition. In Revit, you can select to build a wall, even four walls connected to make a room, and it spits out exactly that; same goes for the floor and ceiling. Though, Revit isn’t without its faults; it’s fairly rectilinear and hard to fudge anything because schedules are created by modeled elements. So, if you add in a door, it needs to be the correct model, size and material of the actual door in order to populate the schedule correctly.
There are also other programs used for specific design purposes. A lot of designers like SketchUp for quick studies. Simple extrusions and material application in SketchUp is pretty straight forward but it’s not used for drawing sets that will be submitted to the city. Another tool many designers use is Rhino, or Rhinoceros 3D. This program is geared toward more complicated geometries and details, think curves and unique shapes as opposed to linear elements; I never quite got the hang of this one during school. And Enscape is a real-time rendering and virtual reality plugin often linked with 3D programs that can create life-like renderings, or imagery.
In conjunction with the programs above, it’s also important for designers to communicate their ideas and designs with each other, their clients or even the public. For most client presentations designers use the Adobe Suite. Photoshop can be used to alter any imagery created from the programs above, including 3D views, elevations or even floor plans. InDesign is typically used to pull together a bunch of slides for a presentation, ultimately creating a single file in PDF form called a deck.
Another tool my firm has recently started to use is Miro, a digital collaboration platform that can be used to place all sorts of imagery and then accessed anywhere anytime, even by clients. Less formal than a presentation deck, this tool has started to replace formal presentations with clients that prefer to be part of the process. Finally, Bluebeam is used almost daily to review and markup documents. A team can open a session for a set of drawings and give all the consultants access so everyone can review simultaneously, helping ease coordination and communication across disciplines.
Projects
Once a project is complete and everything is installed and cleaned, it’s important to get back into the space to photograph it. Below are a few of the projects I’ve worked on since moving to Los Angeles. Please note, all imagery below is not my own and was taken by professional photographers hired by my firm.
LACMA Administrative Offices
| Photography by Kim Rodgers |
With the expansion of LACMA, the museum needed additional office space to house their teams on Wilshire Boulevard. The design offers flexible spaces that inspire connection and a variety of work styles.
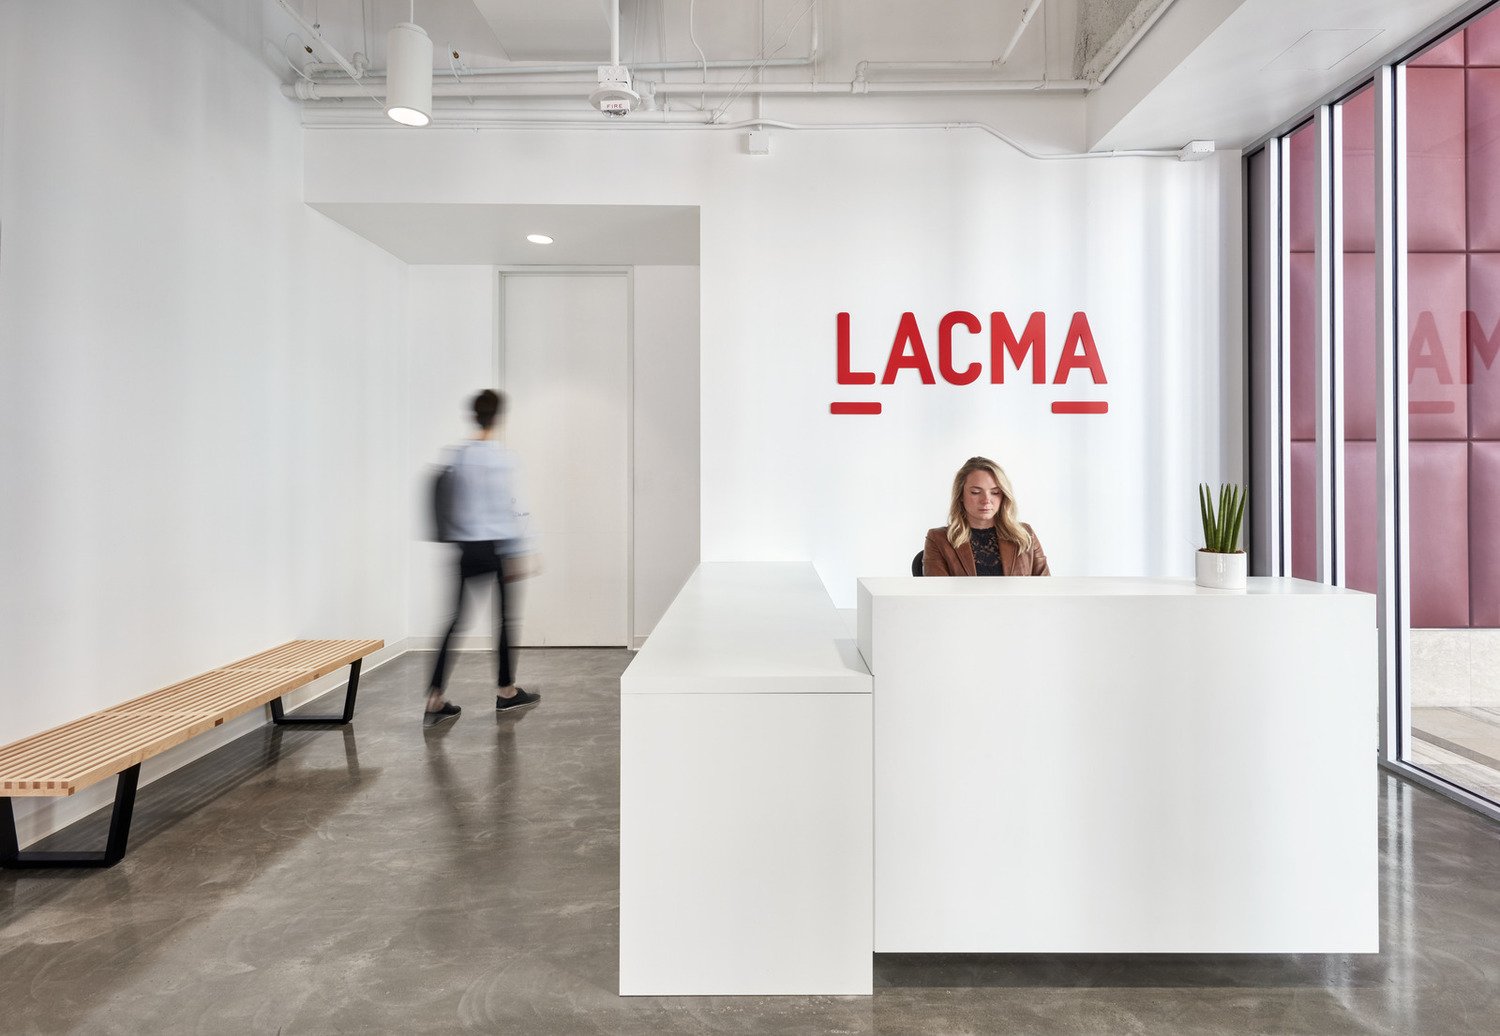
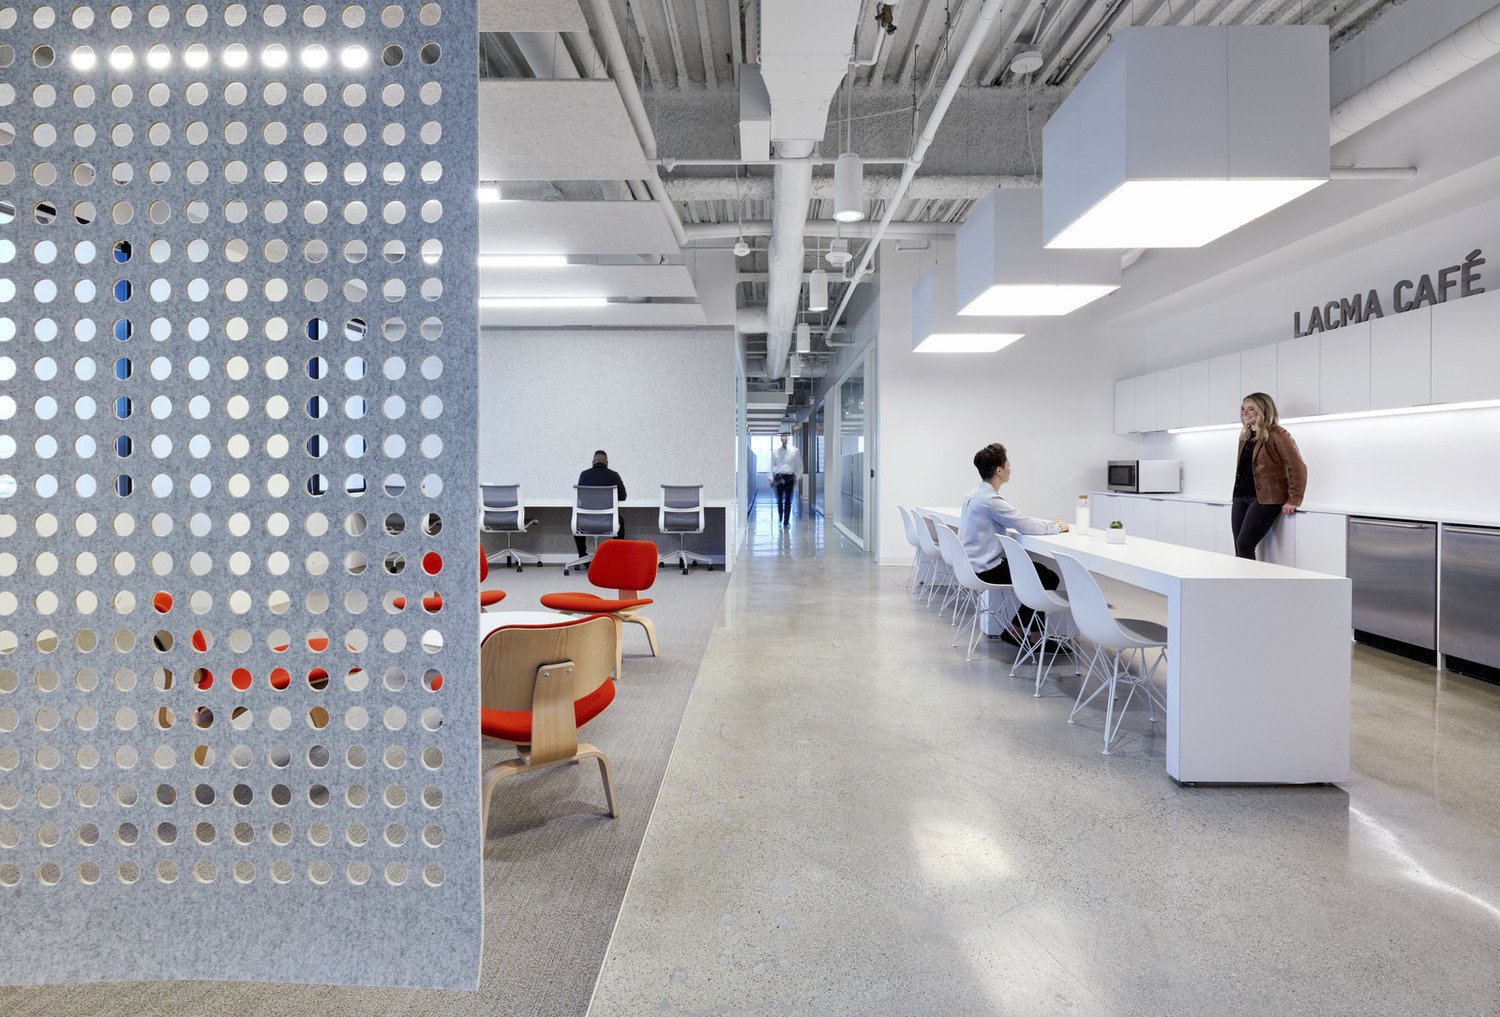
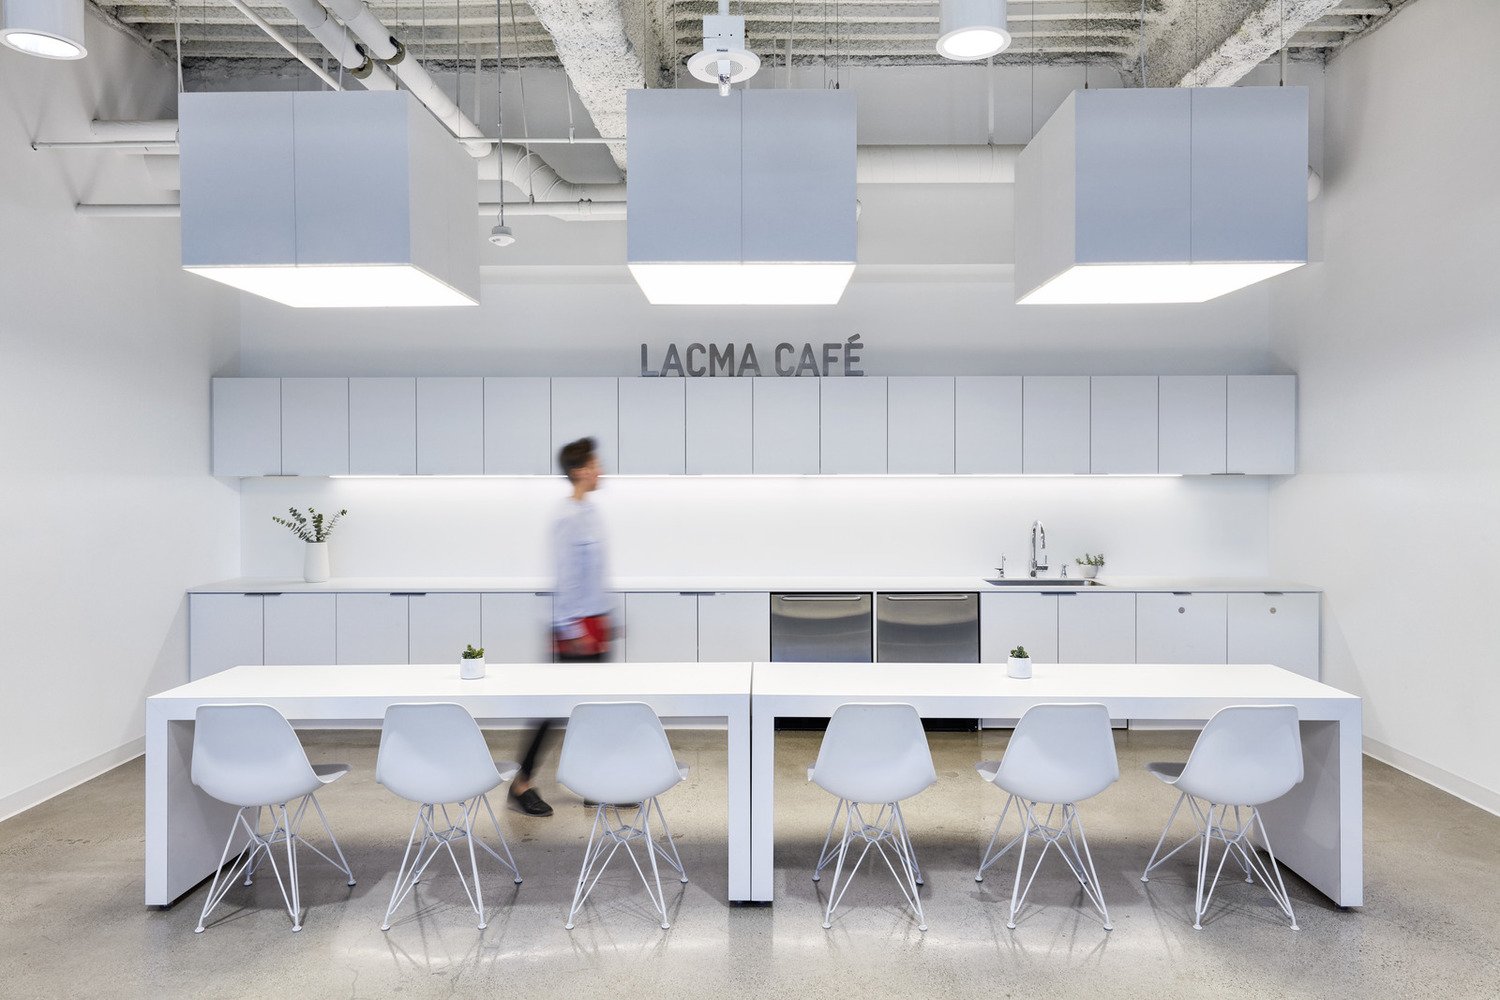
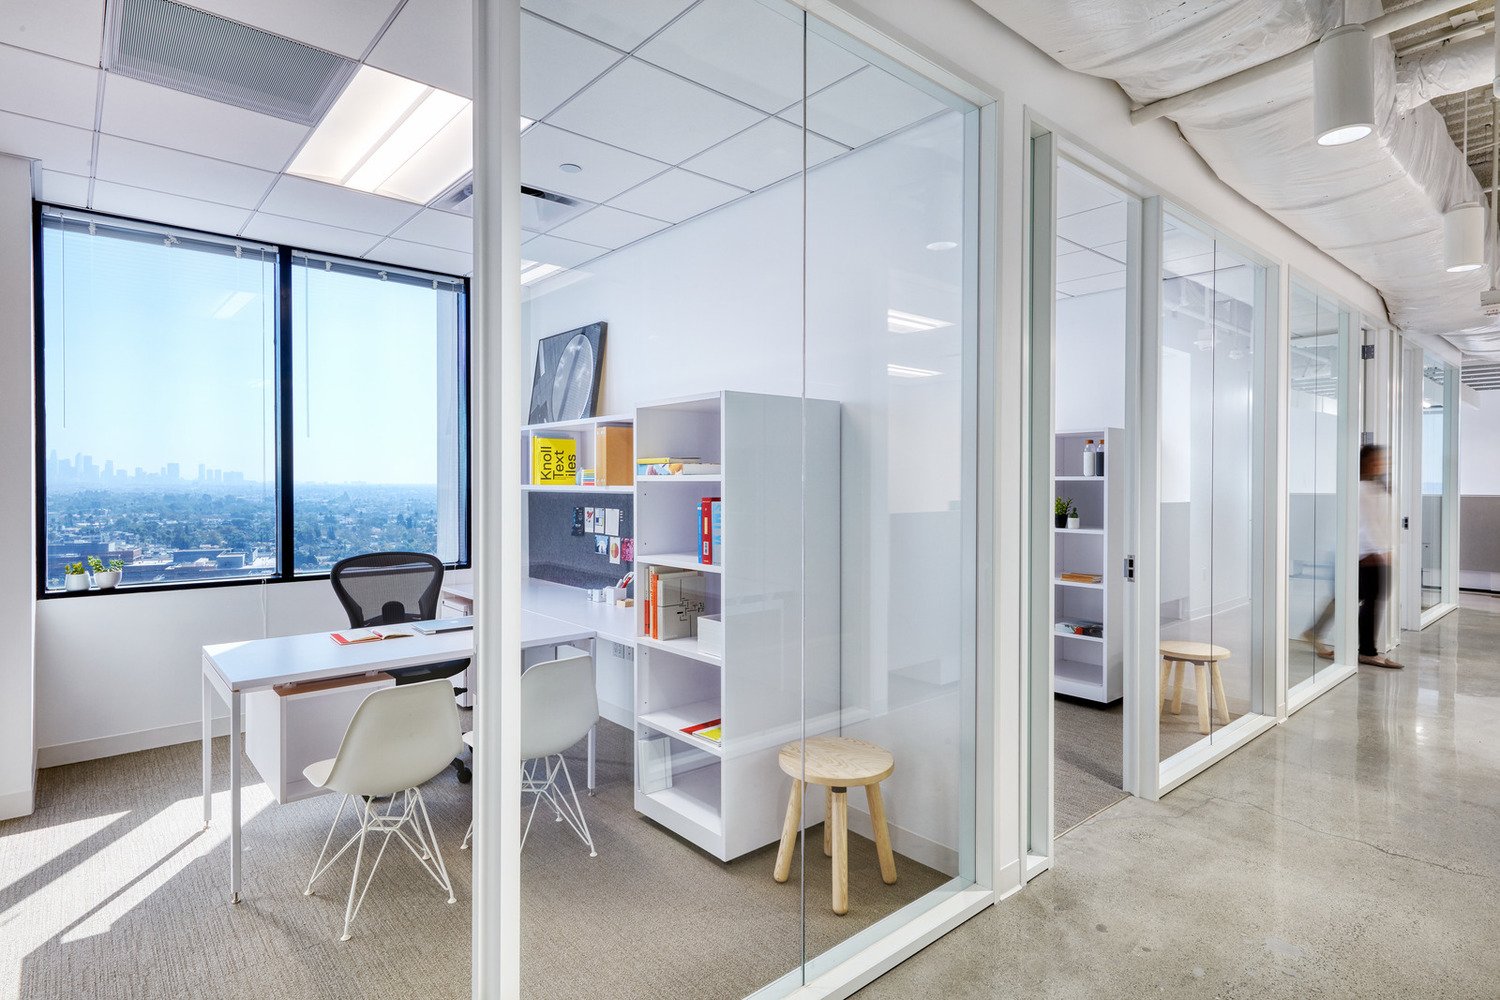
A dense office layout was combined with open, transparent work spaces, including rotating gallery walls. The overall palette was neutral to give way for a clean modern look that highlights artistic pops of color throughout.
Unnamed Aerospace
| Photography by Kim Rodgers |
This Aerospace company was in the process of transferring from a more traditional office layout with private offices to one with a more open floor plan. It was also extremely important they showcase their technical work, putting it on display and highlighting its importance.
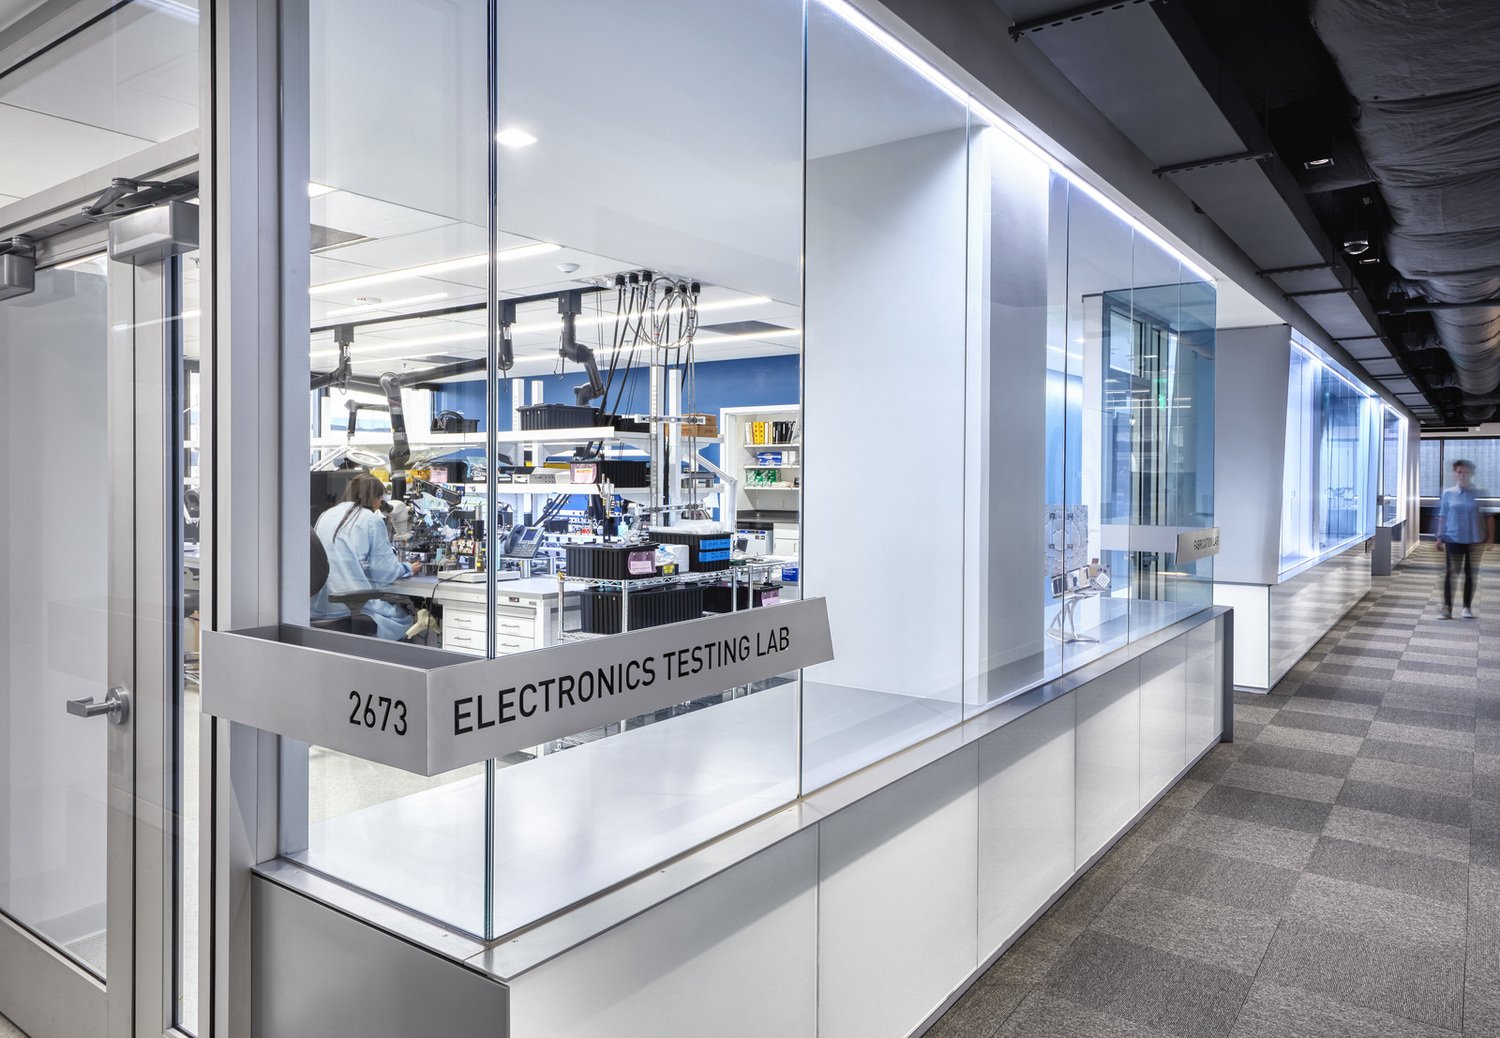

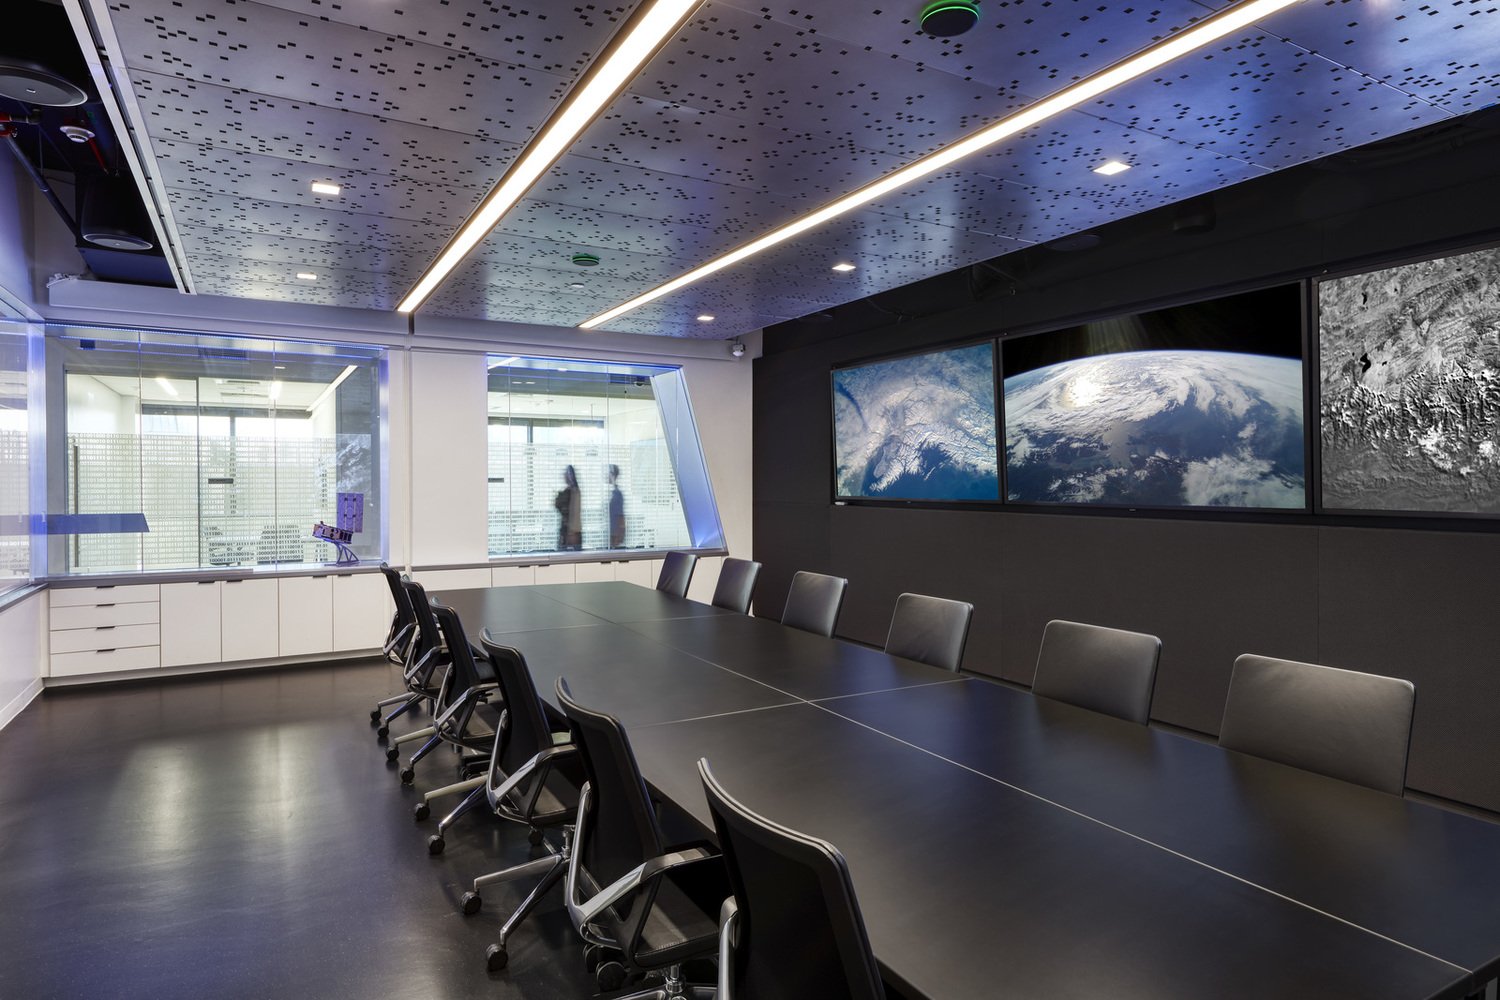
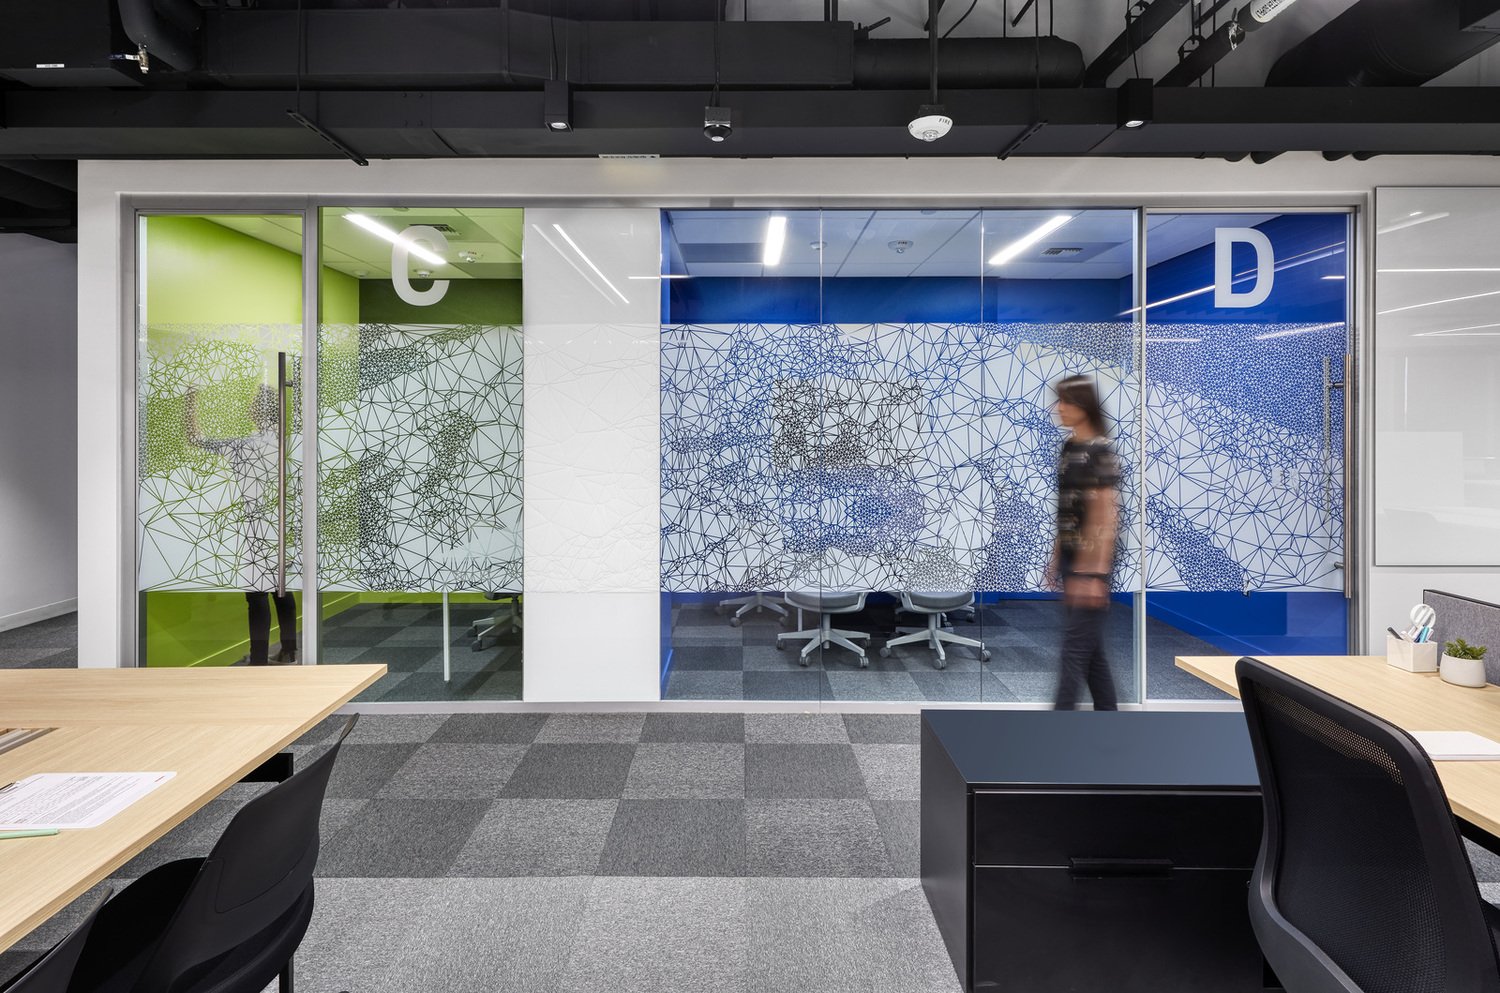
The look created was sleek and “techie” in nature, using vibrant colors to energize active spaces like collaboration rooms and neutral tones for heads-down areas like personal workspaces.
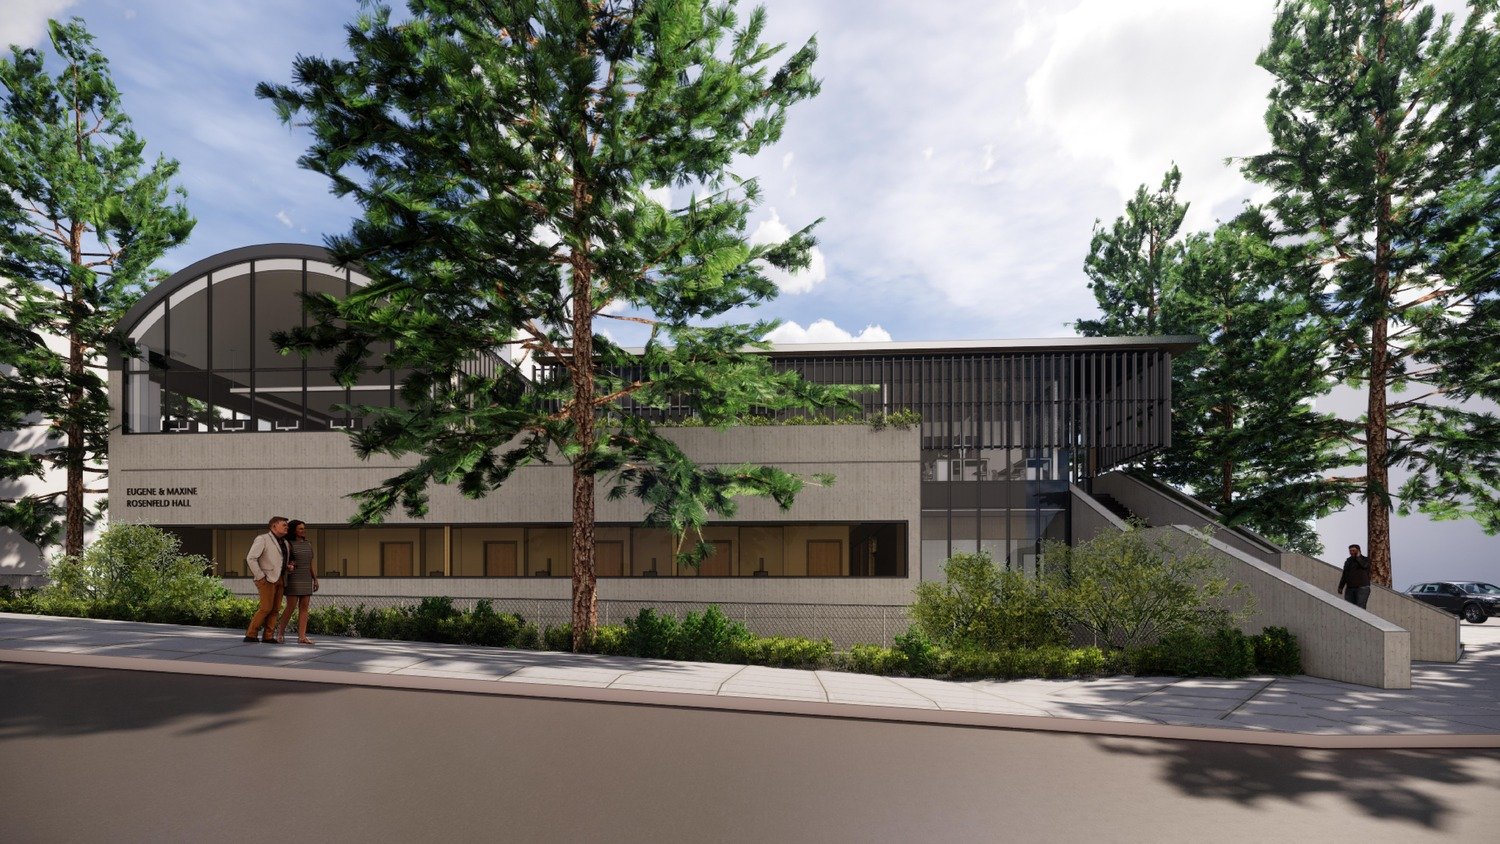
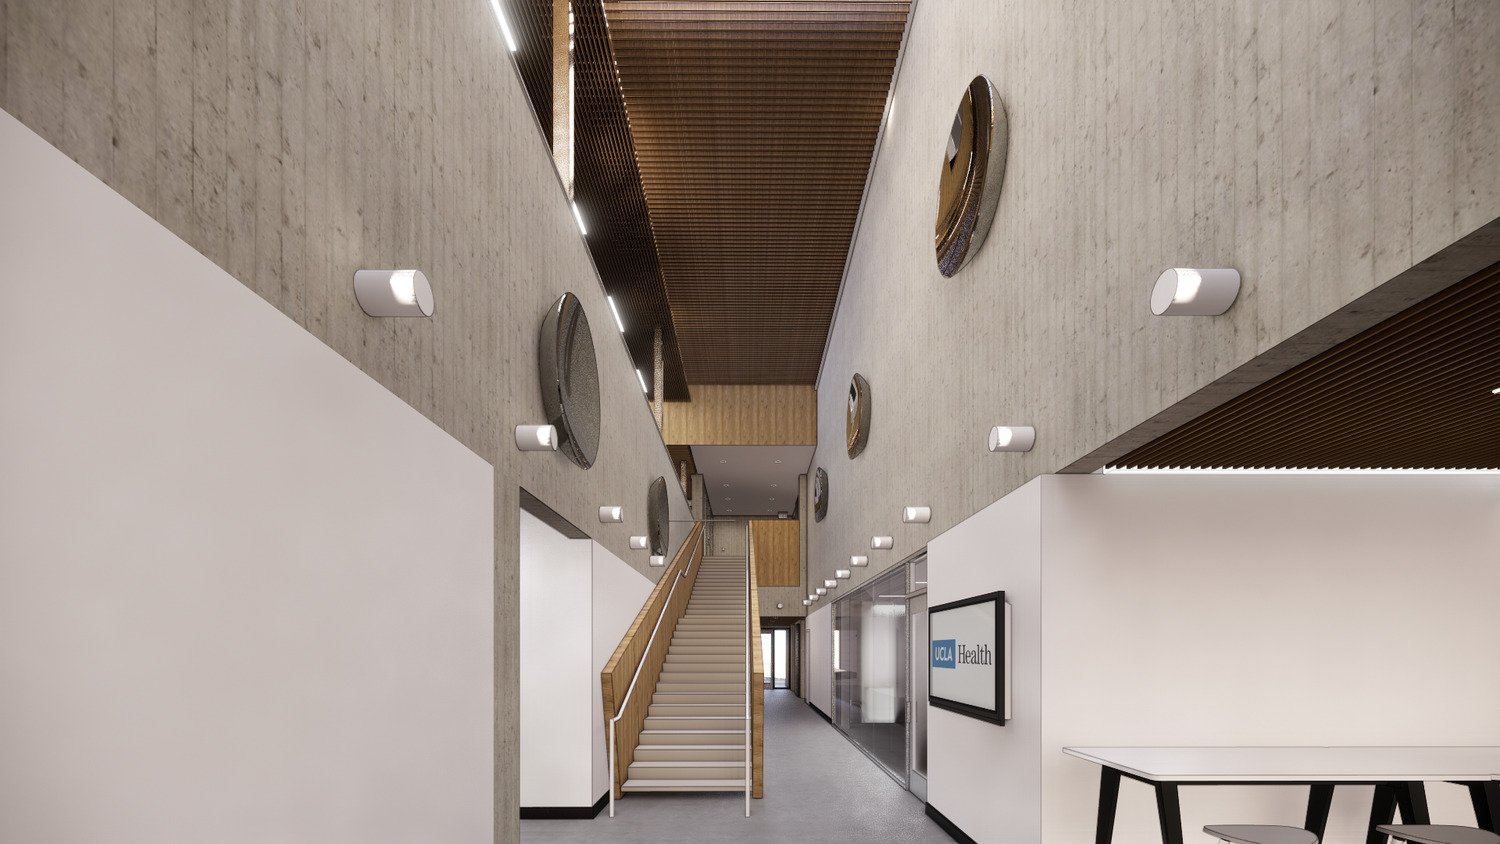
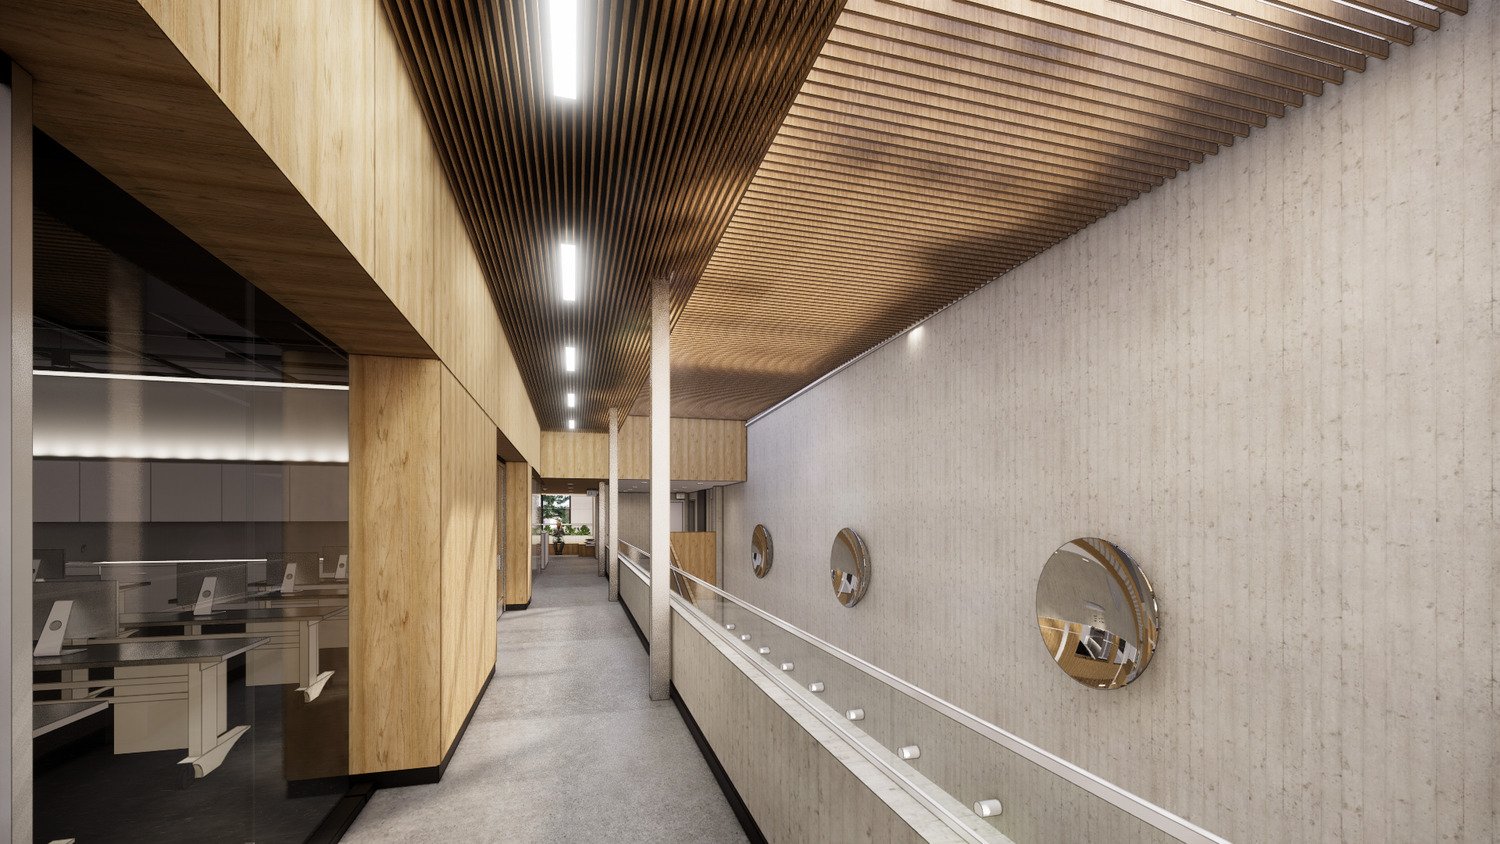
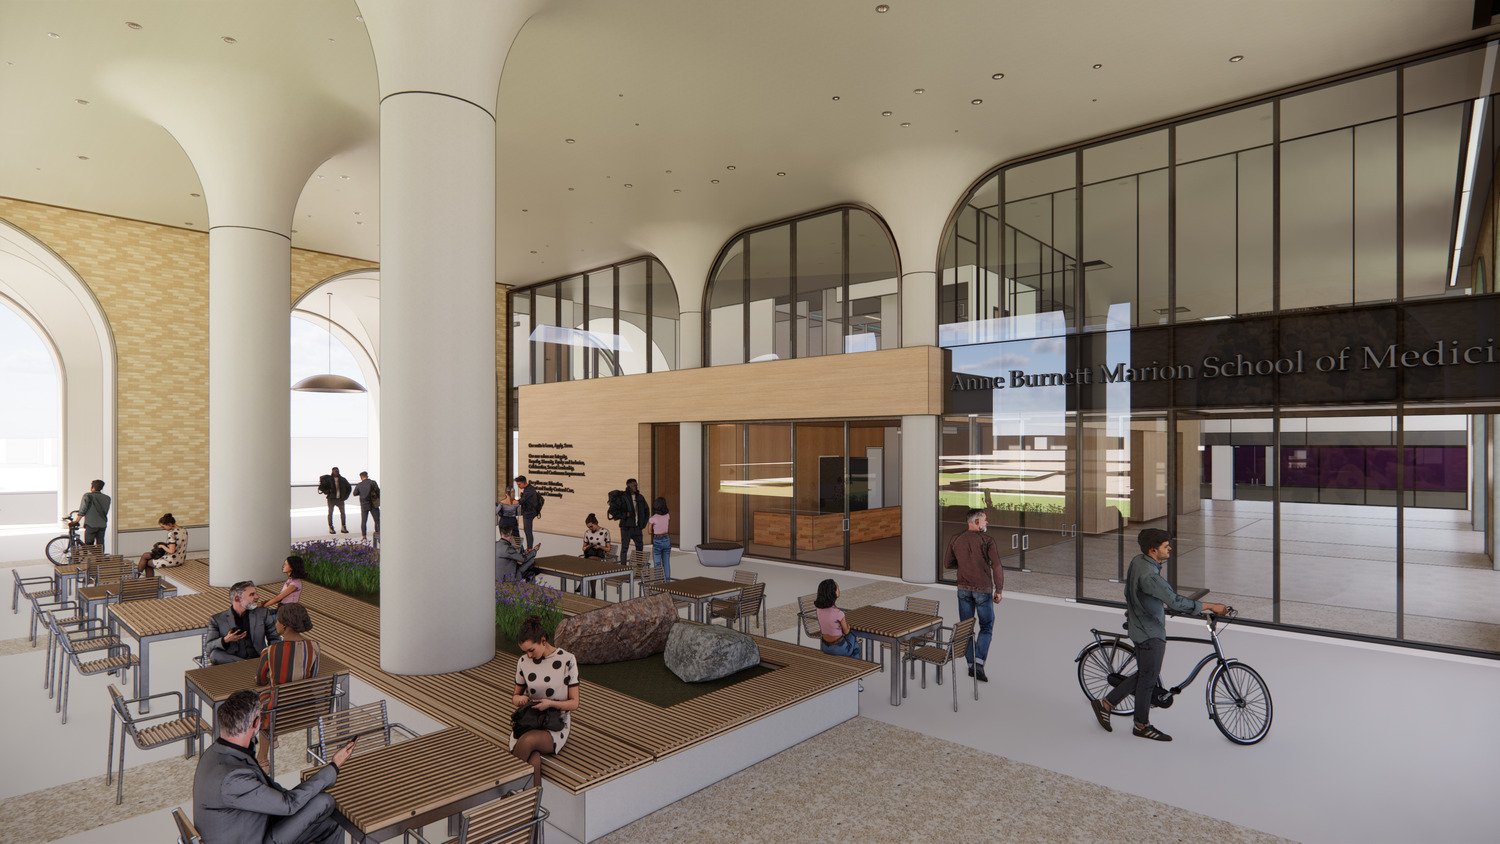
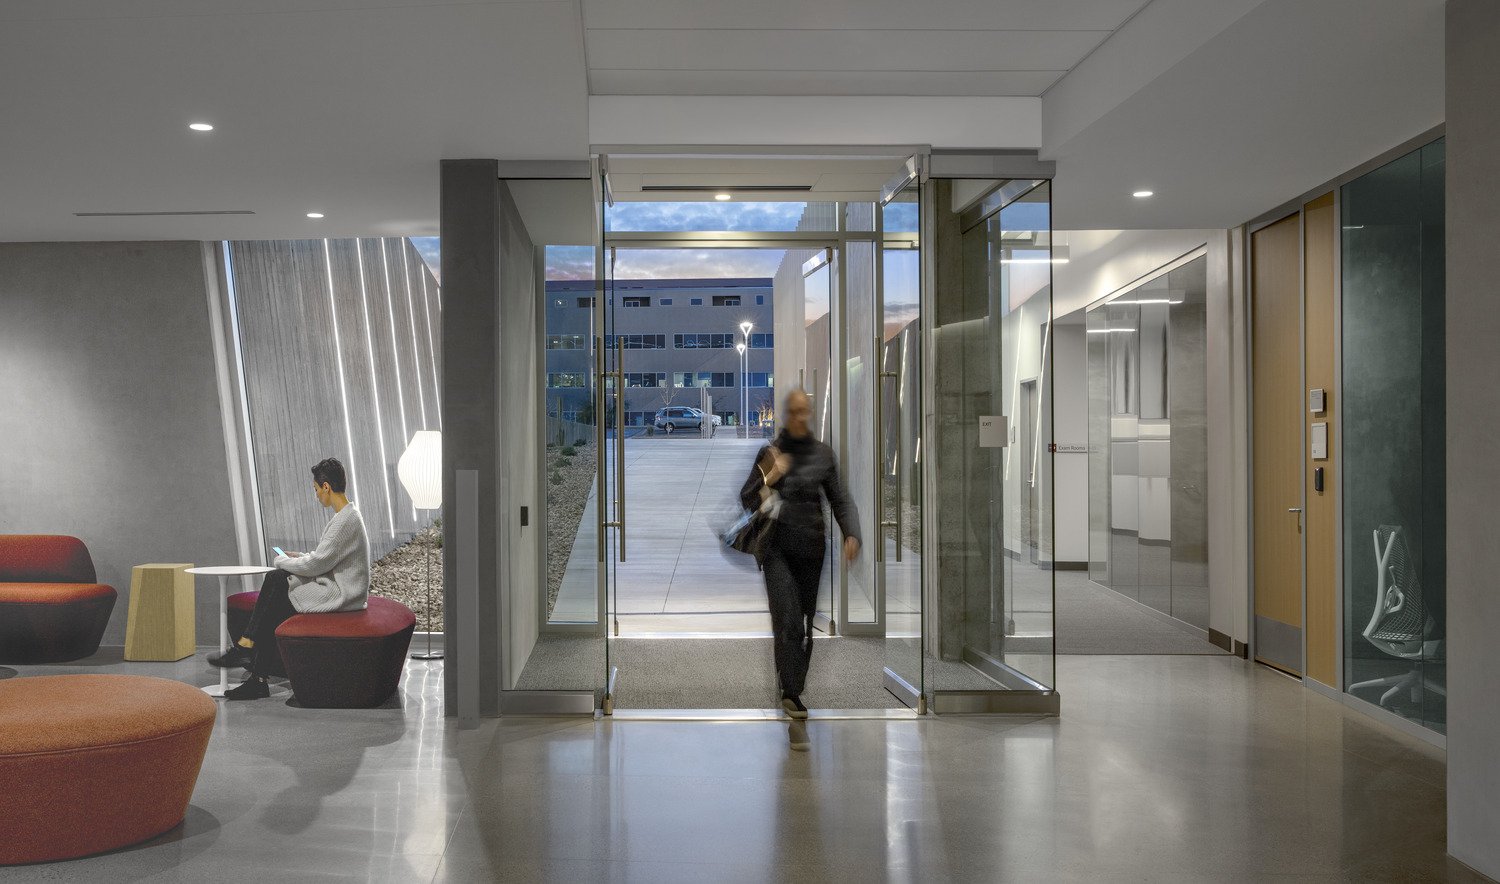
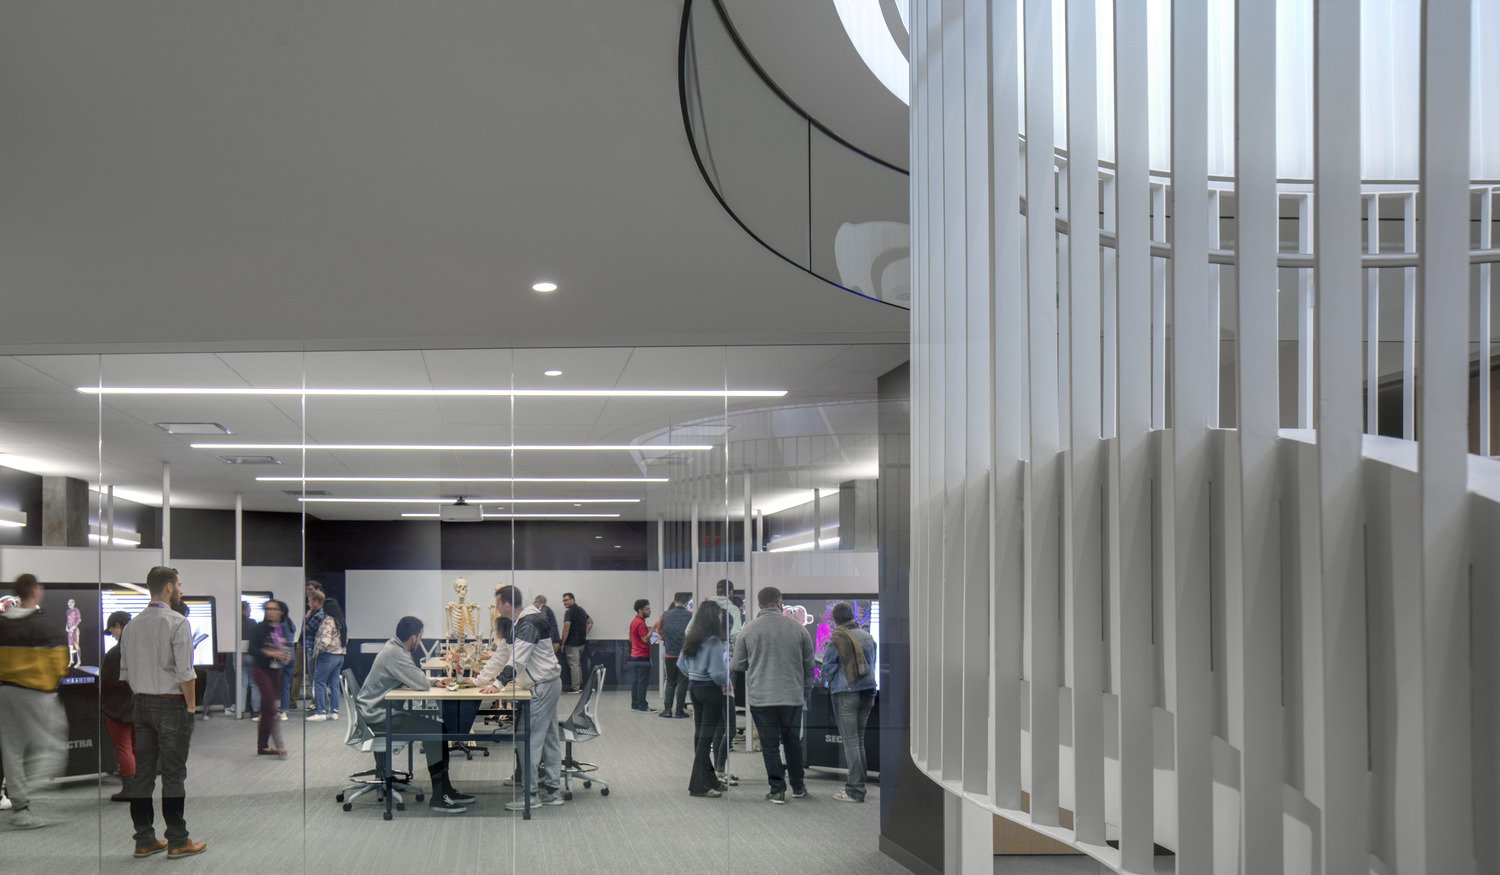
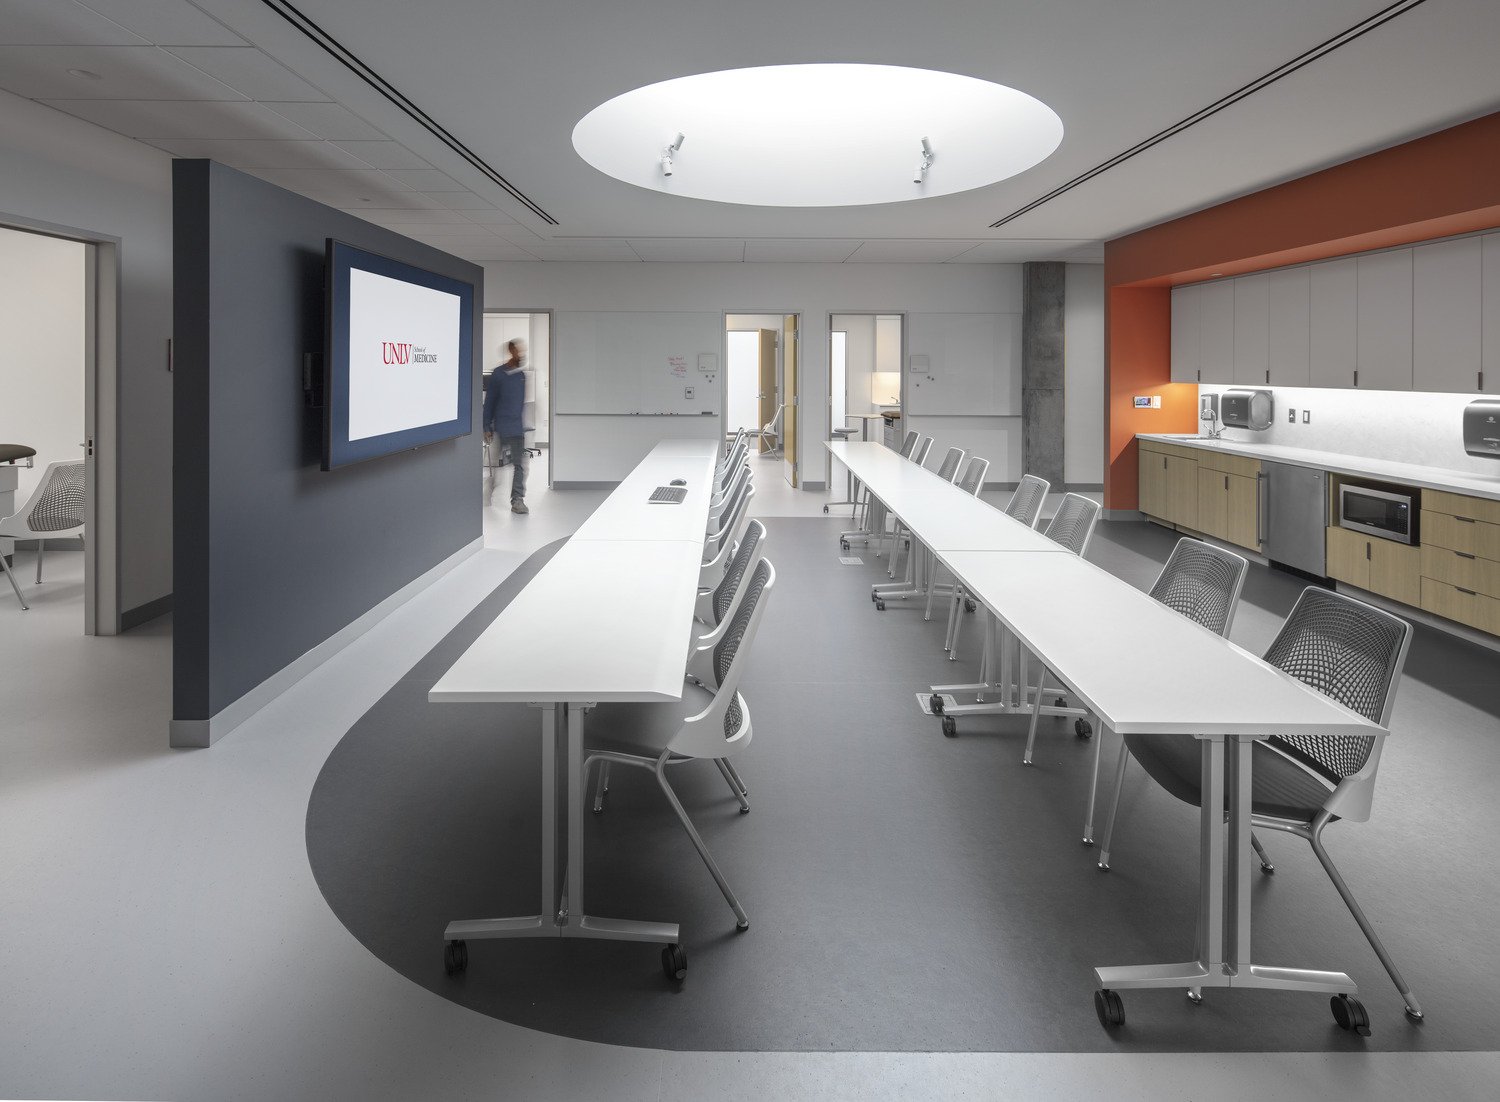
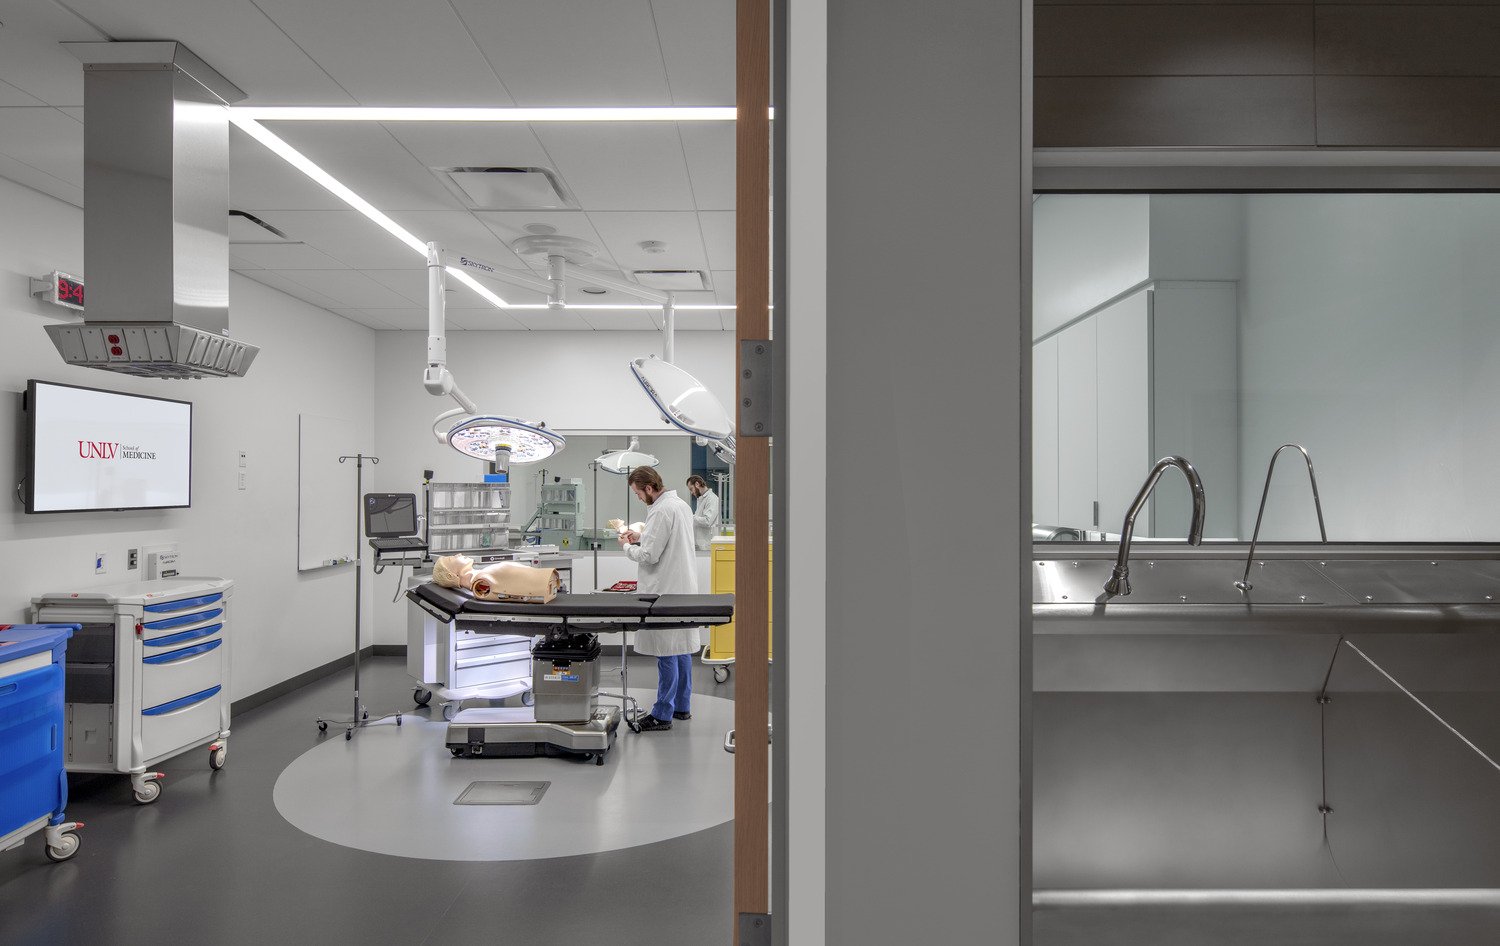
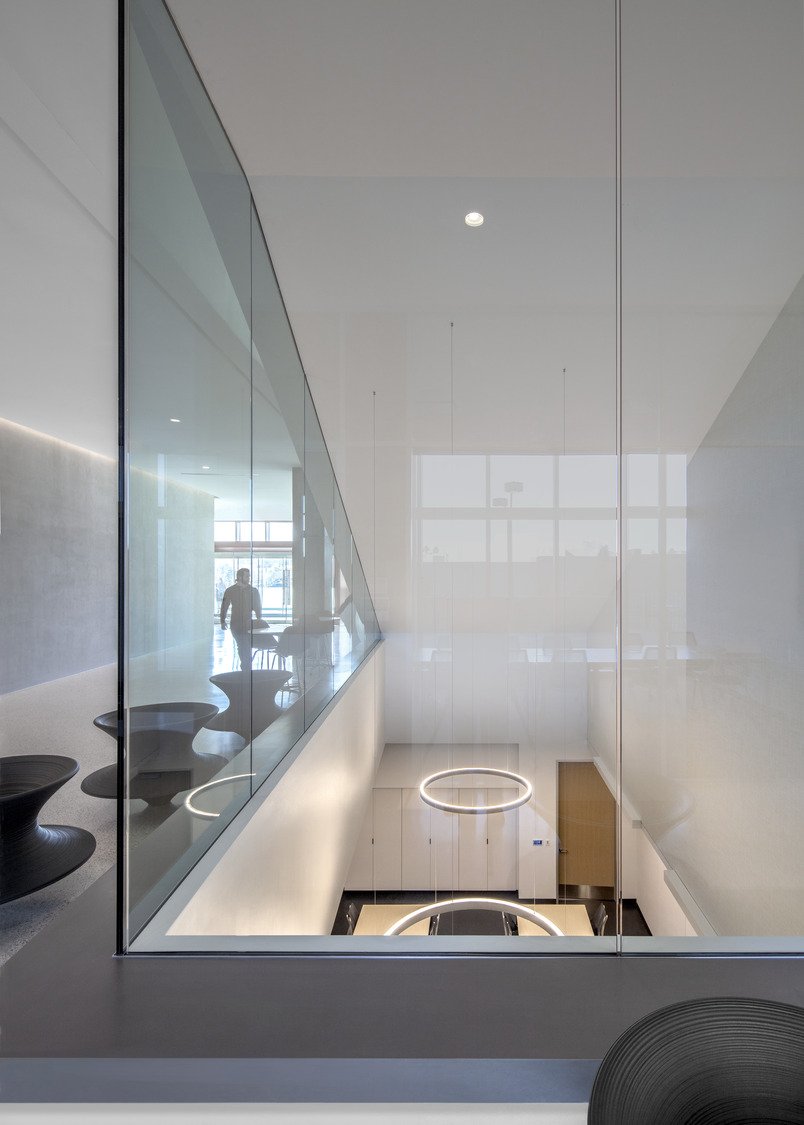
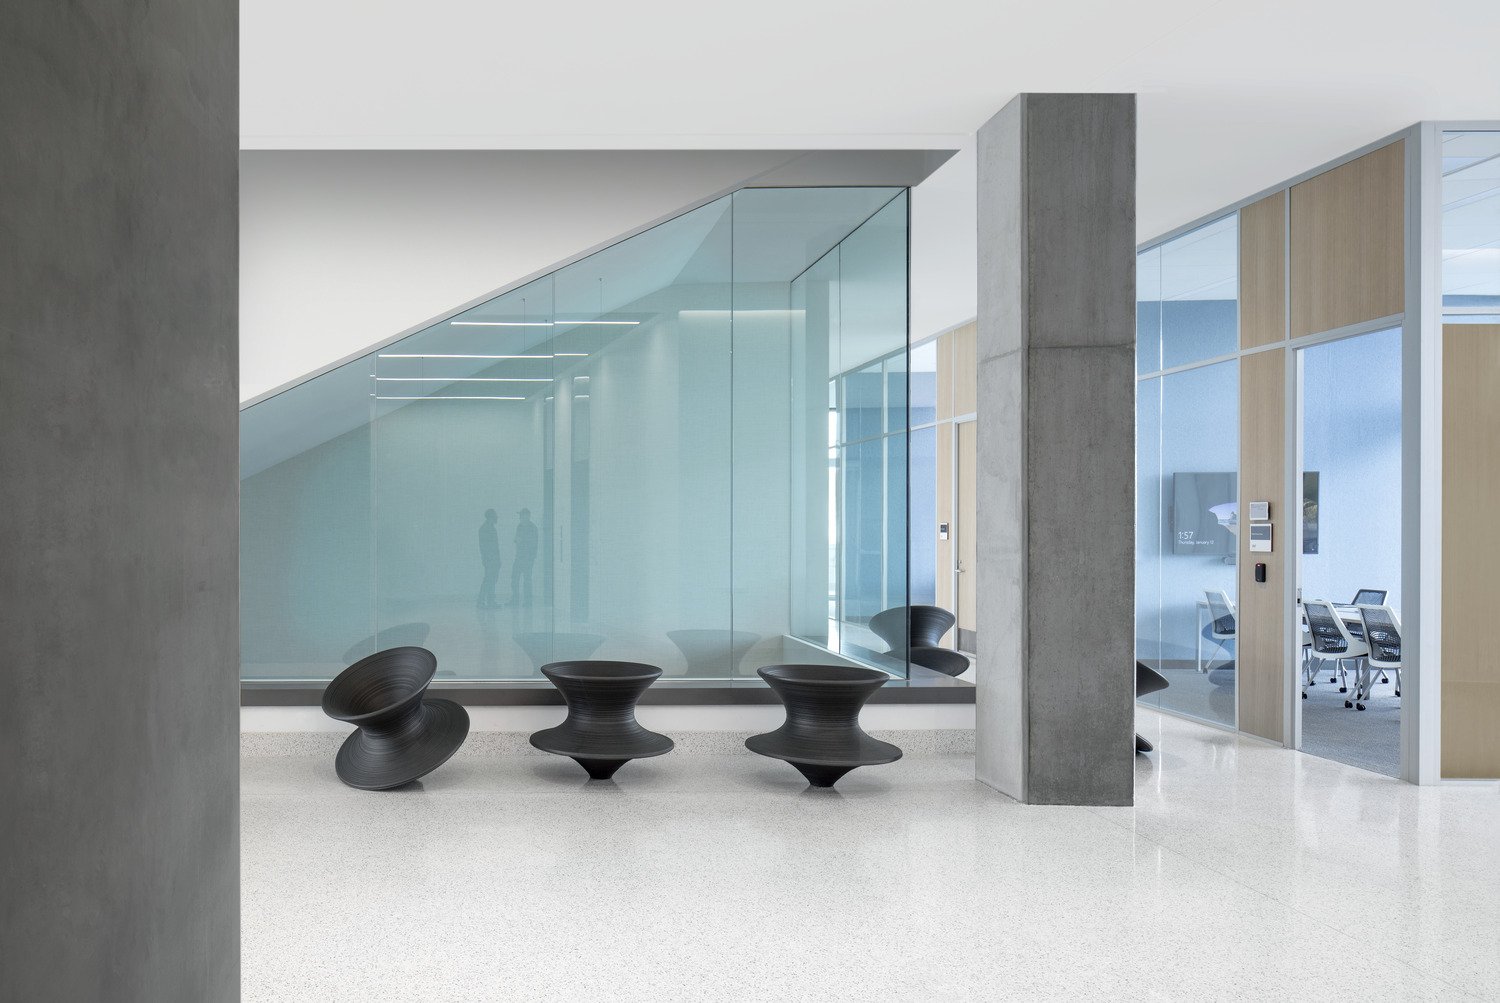
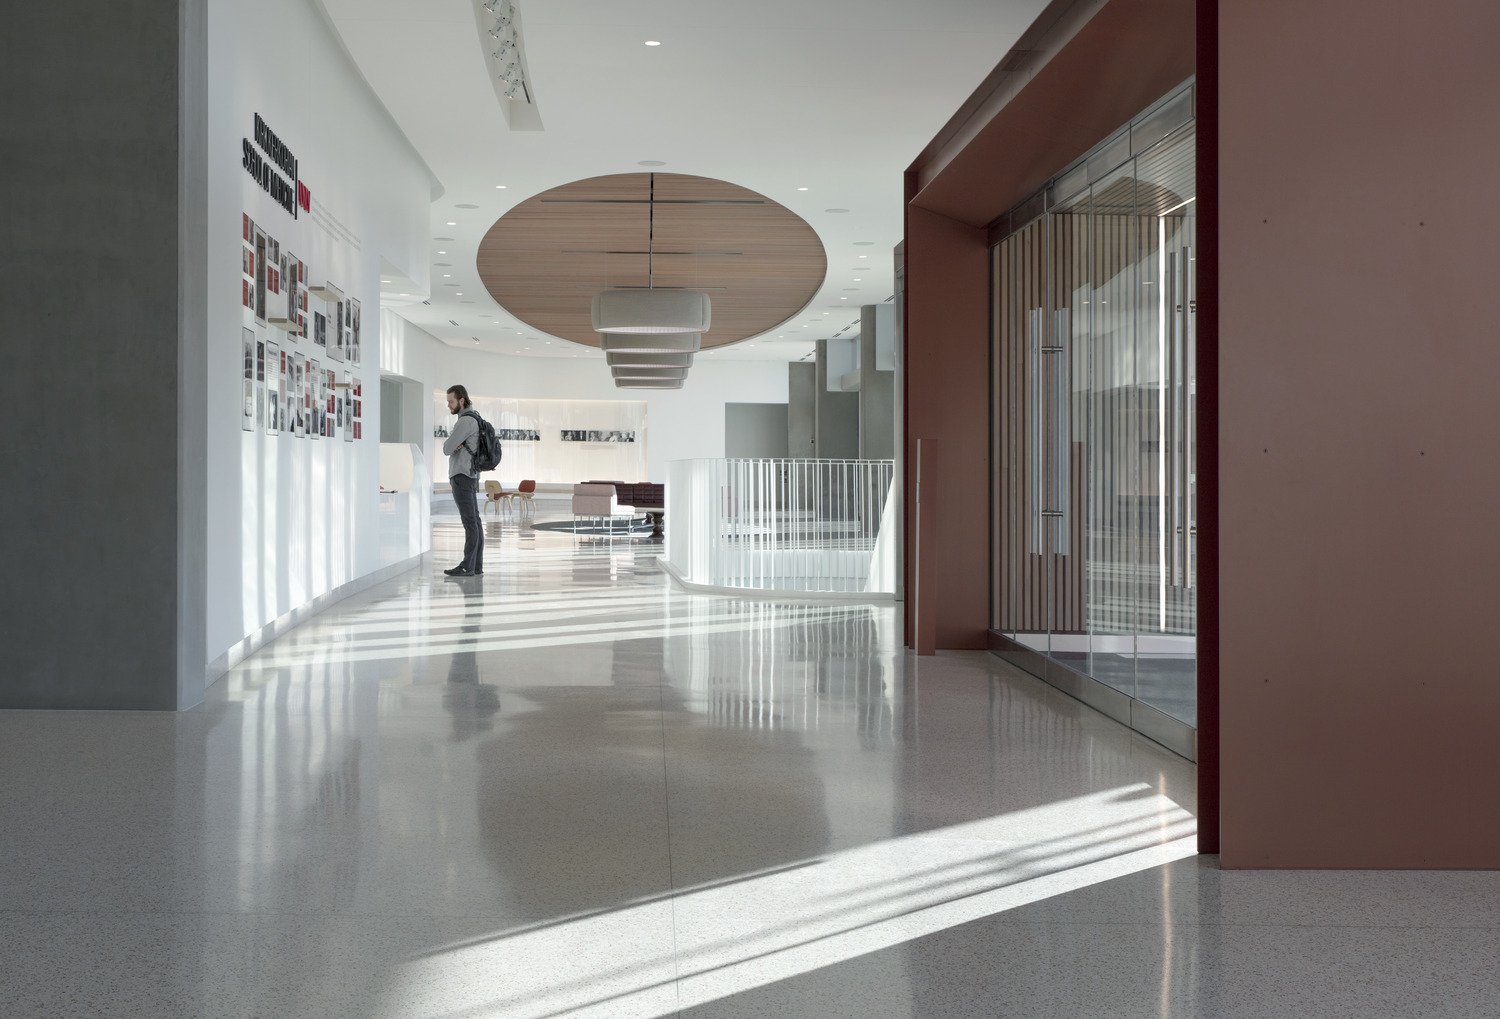
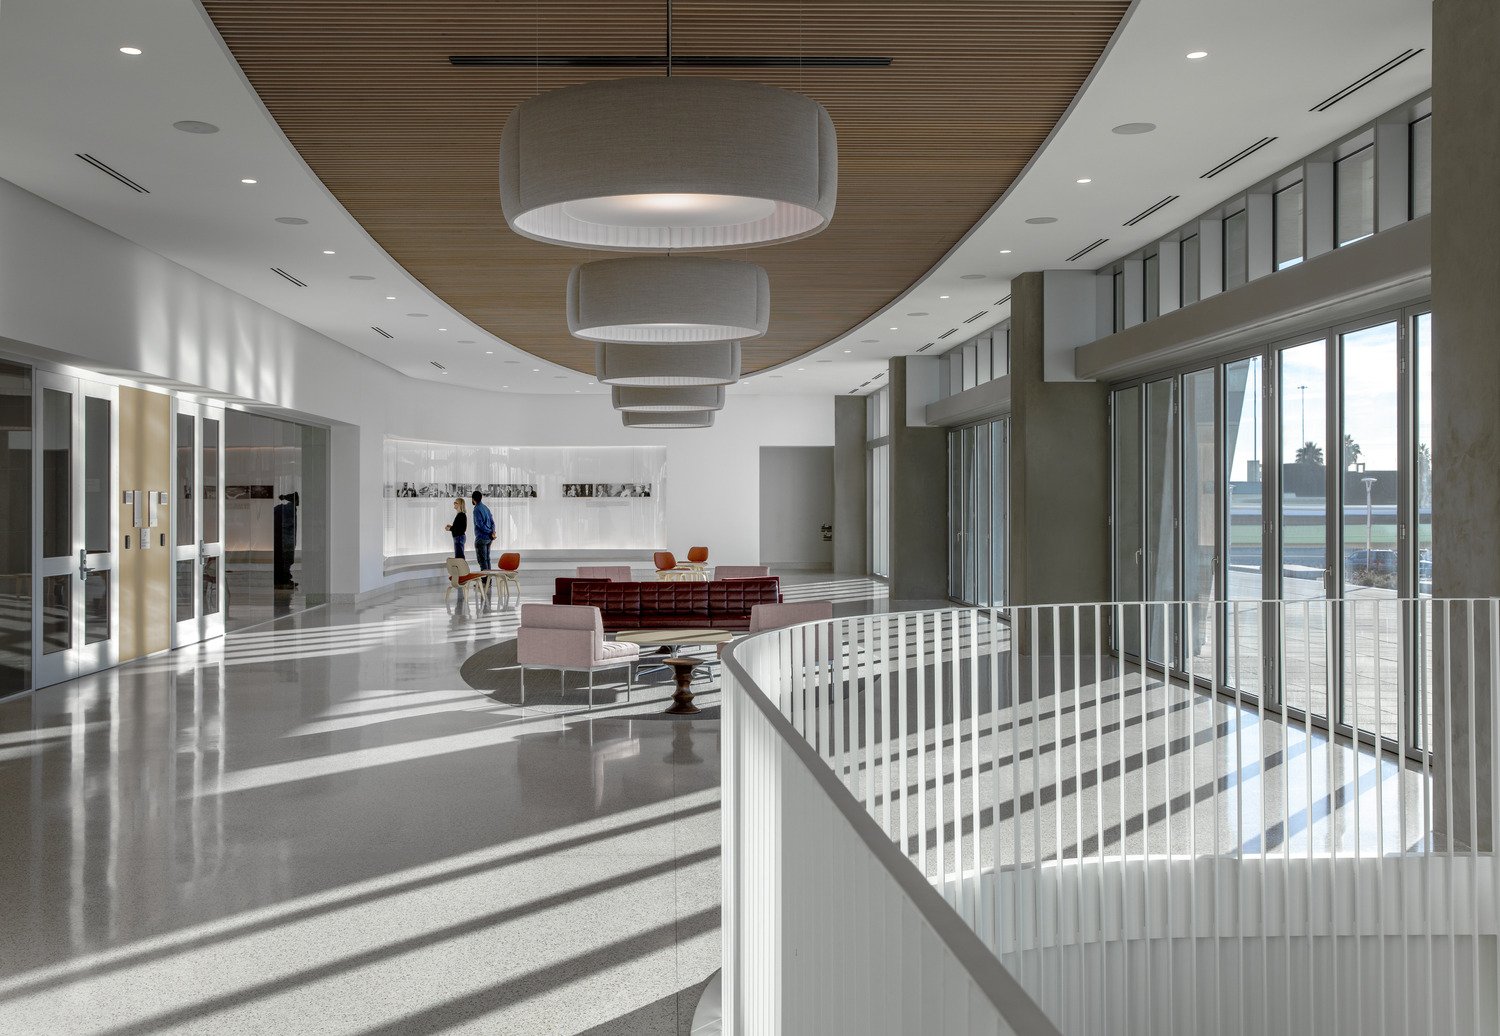
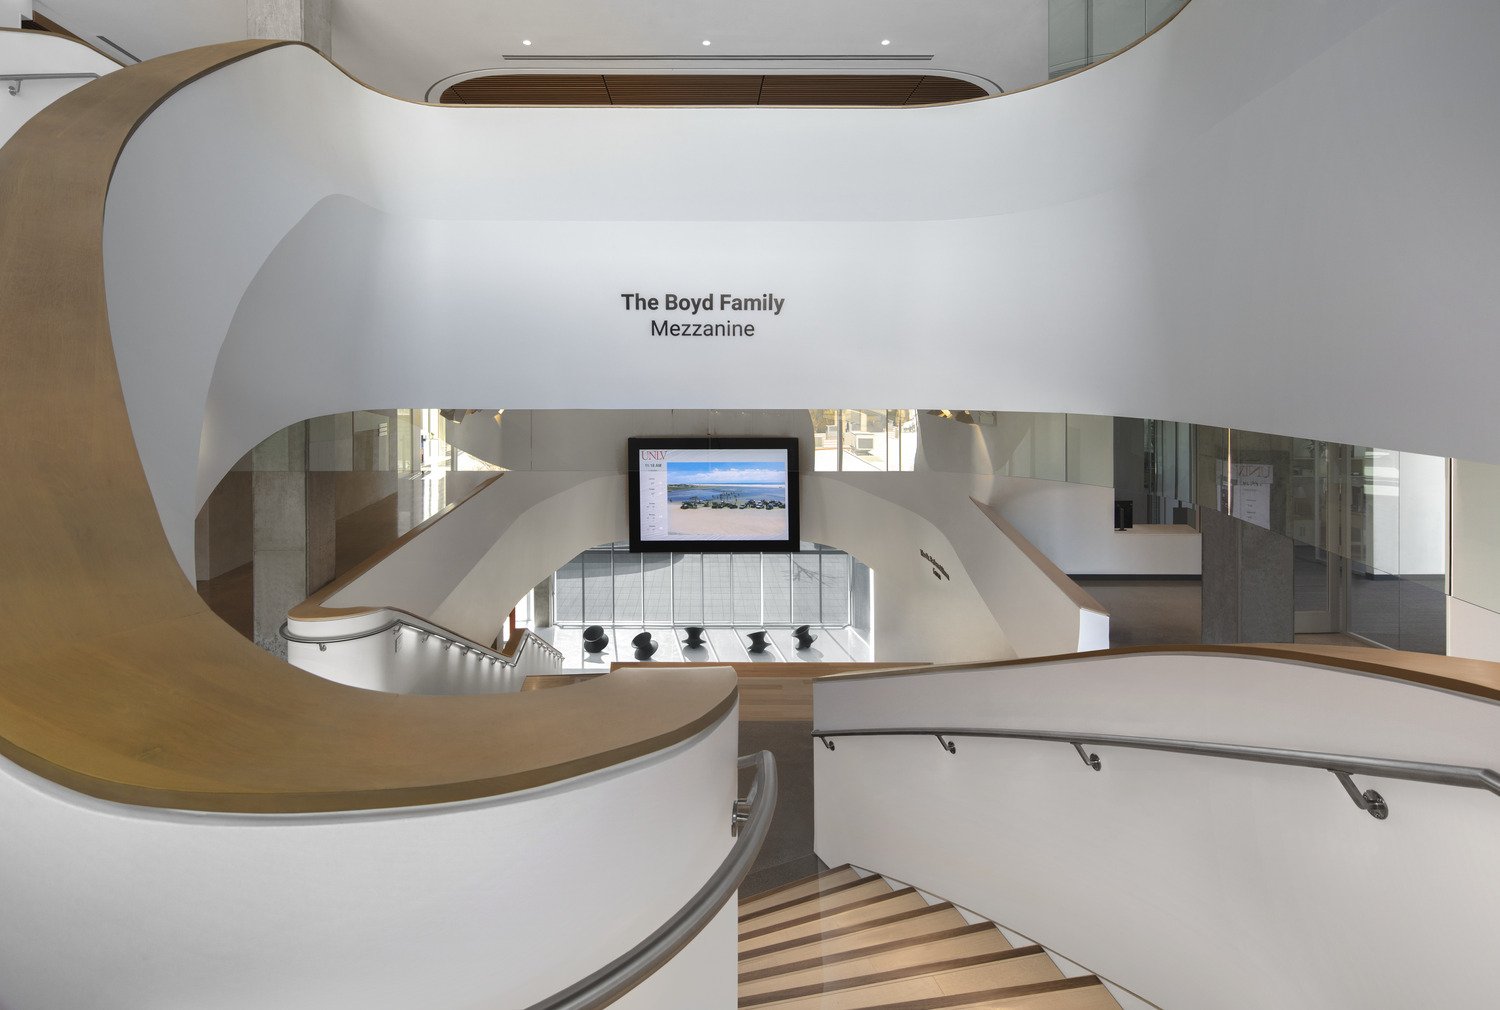
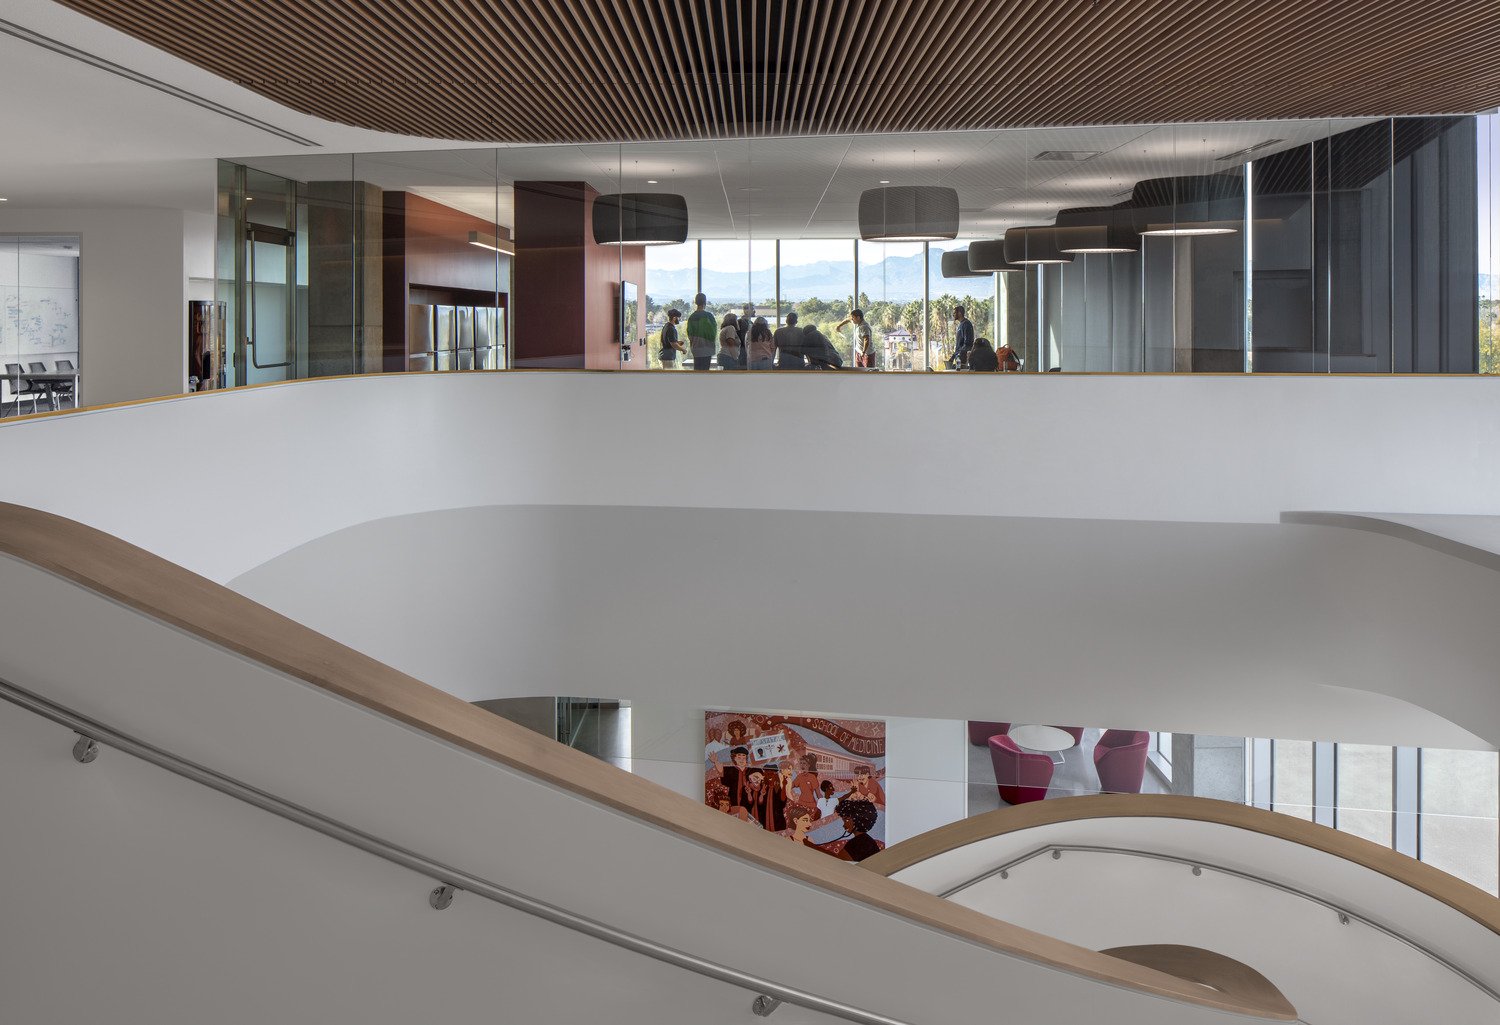
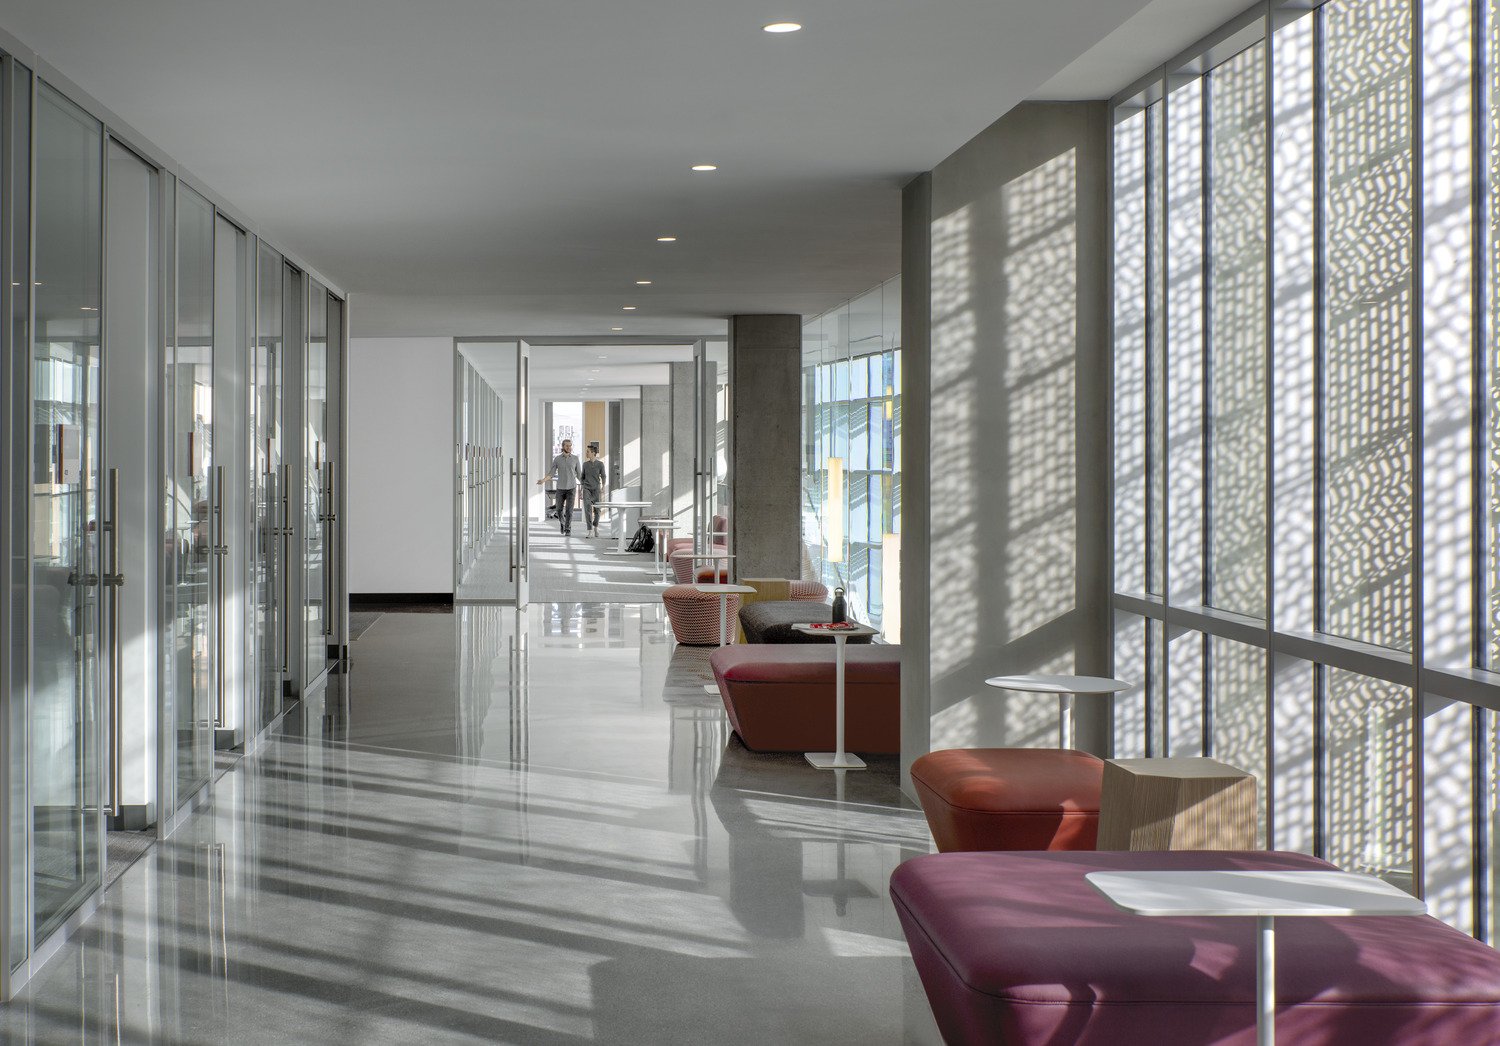
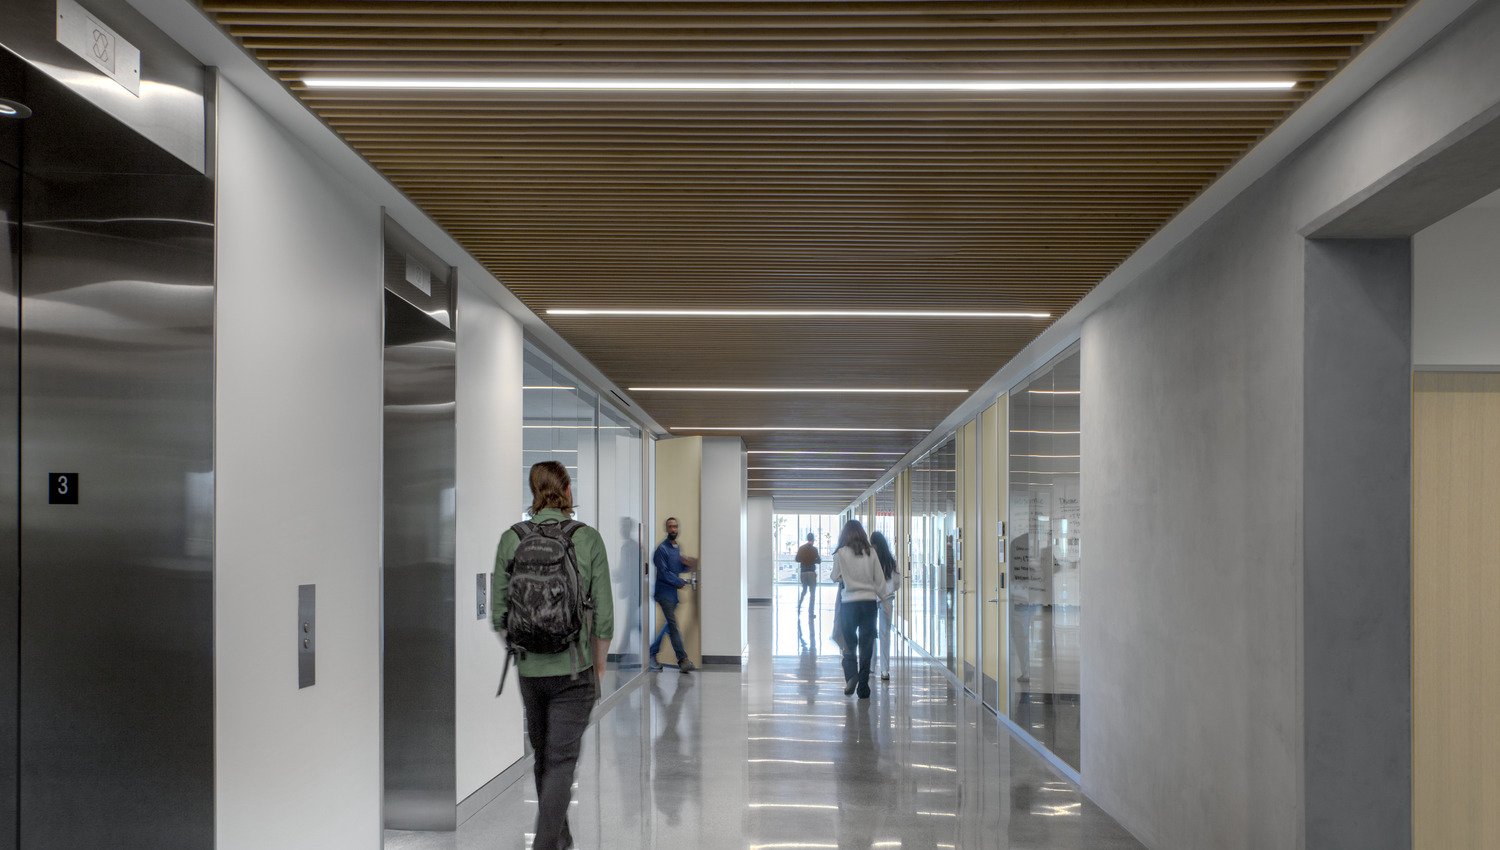
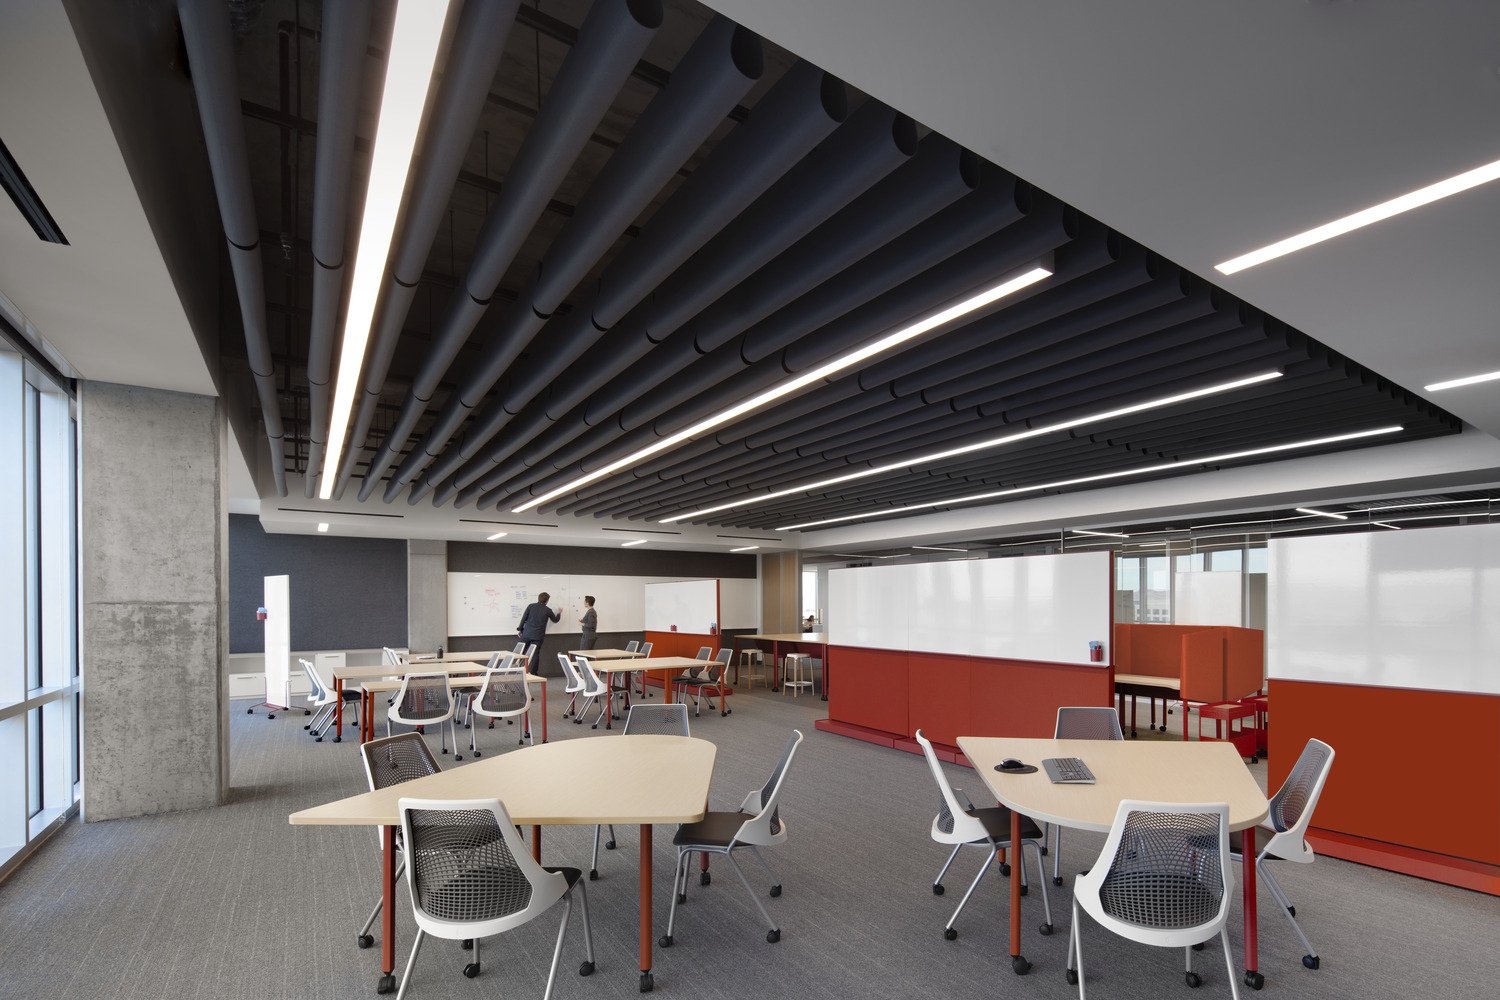
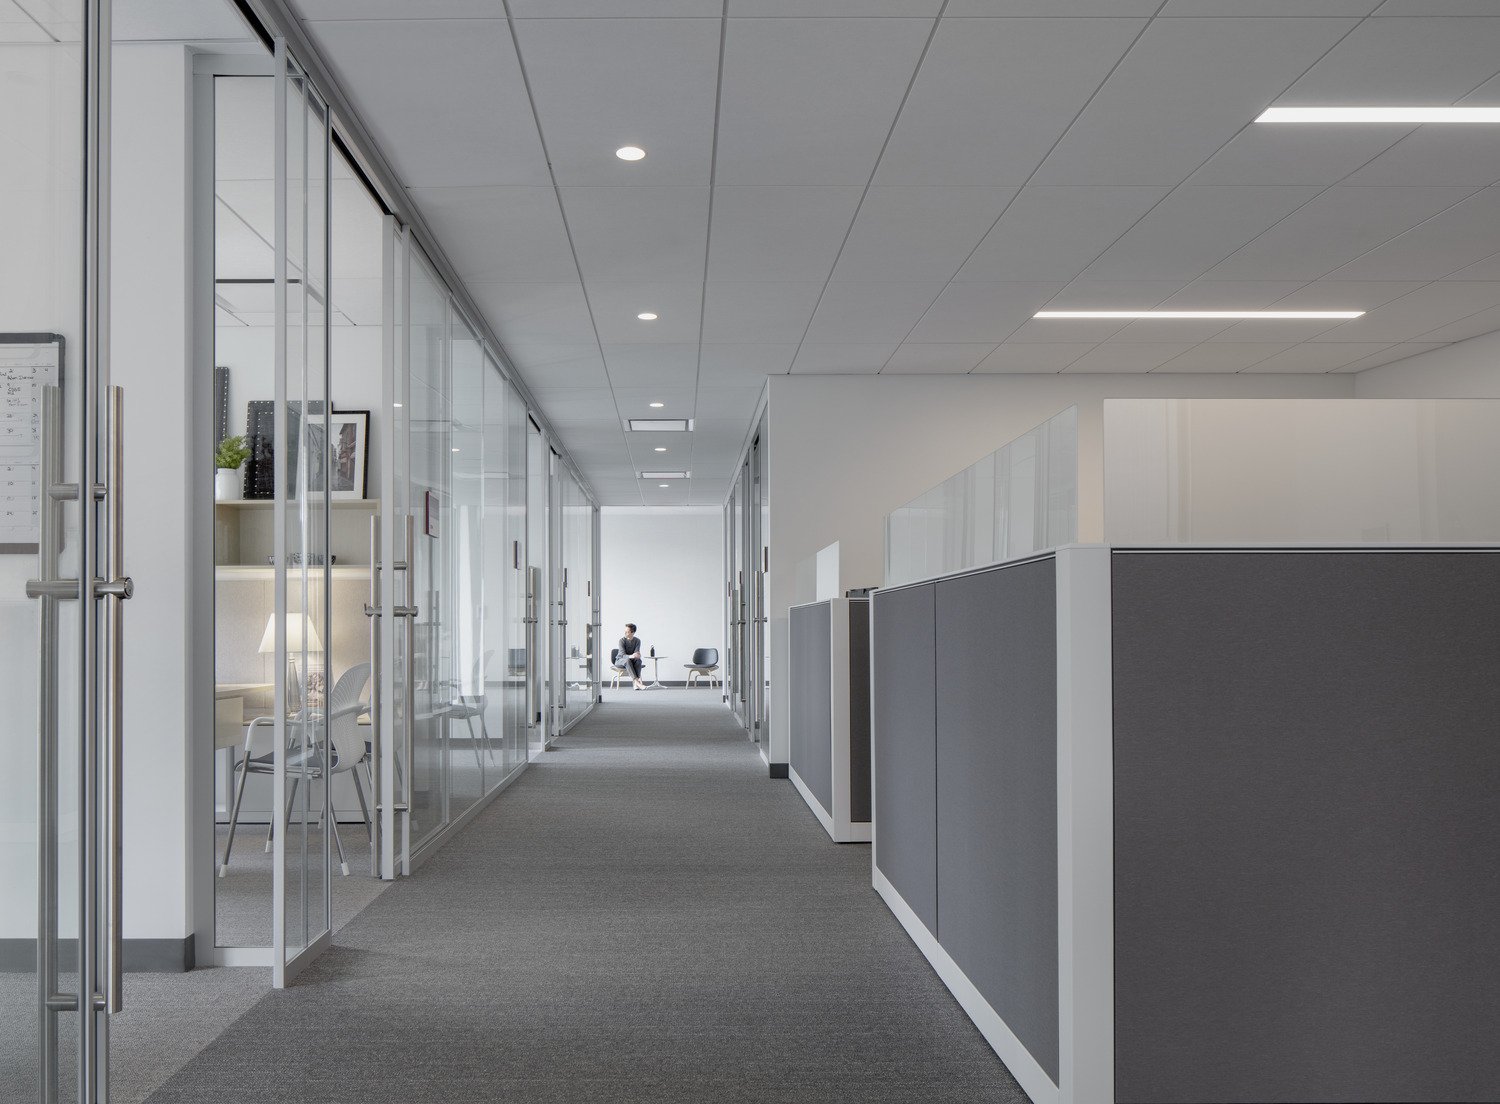
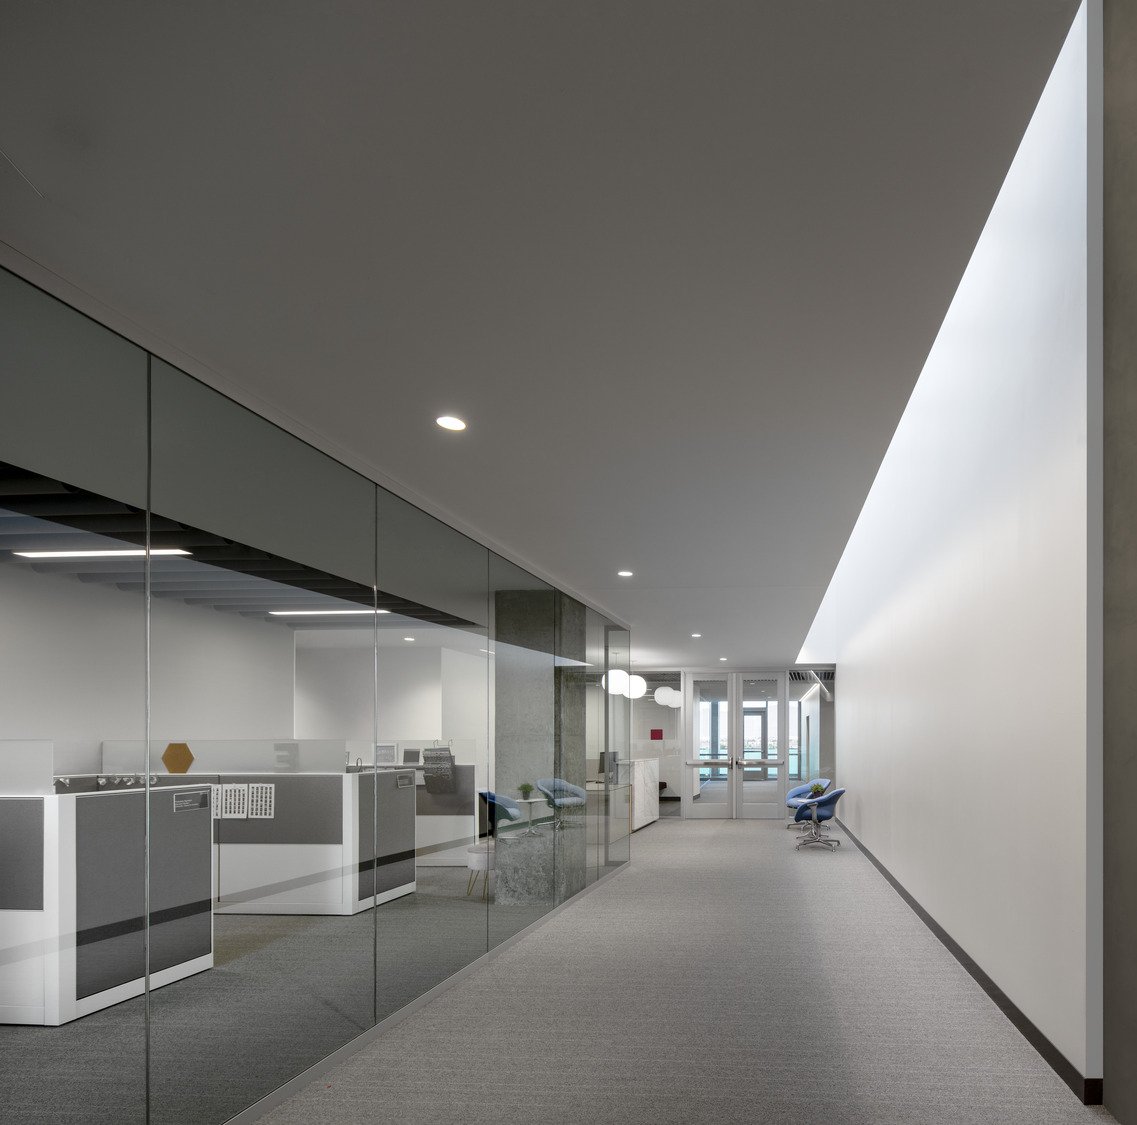
UNLV Kirk Kerkorian School of Medicine
| Photography by Tom Bonner |
This project is one I hold dear, as it was the first project where I really took the lead and was involved with nearly every aspect of design. The building is the first on the new UNLV Health Sciences Campus and contains a diverse program that encourages connection and collaboration at many scales.
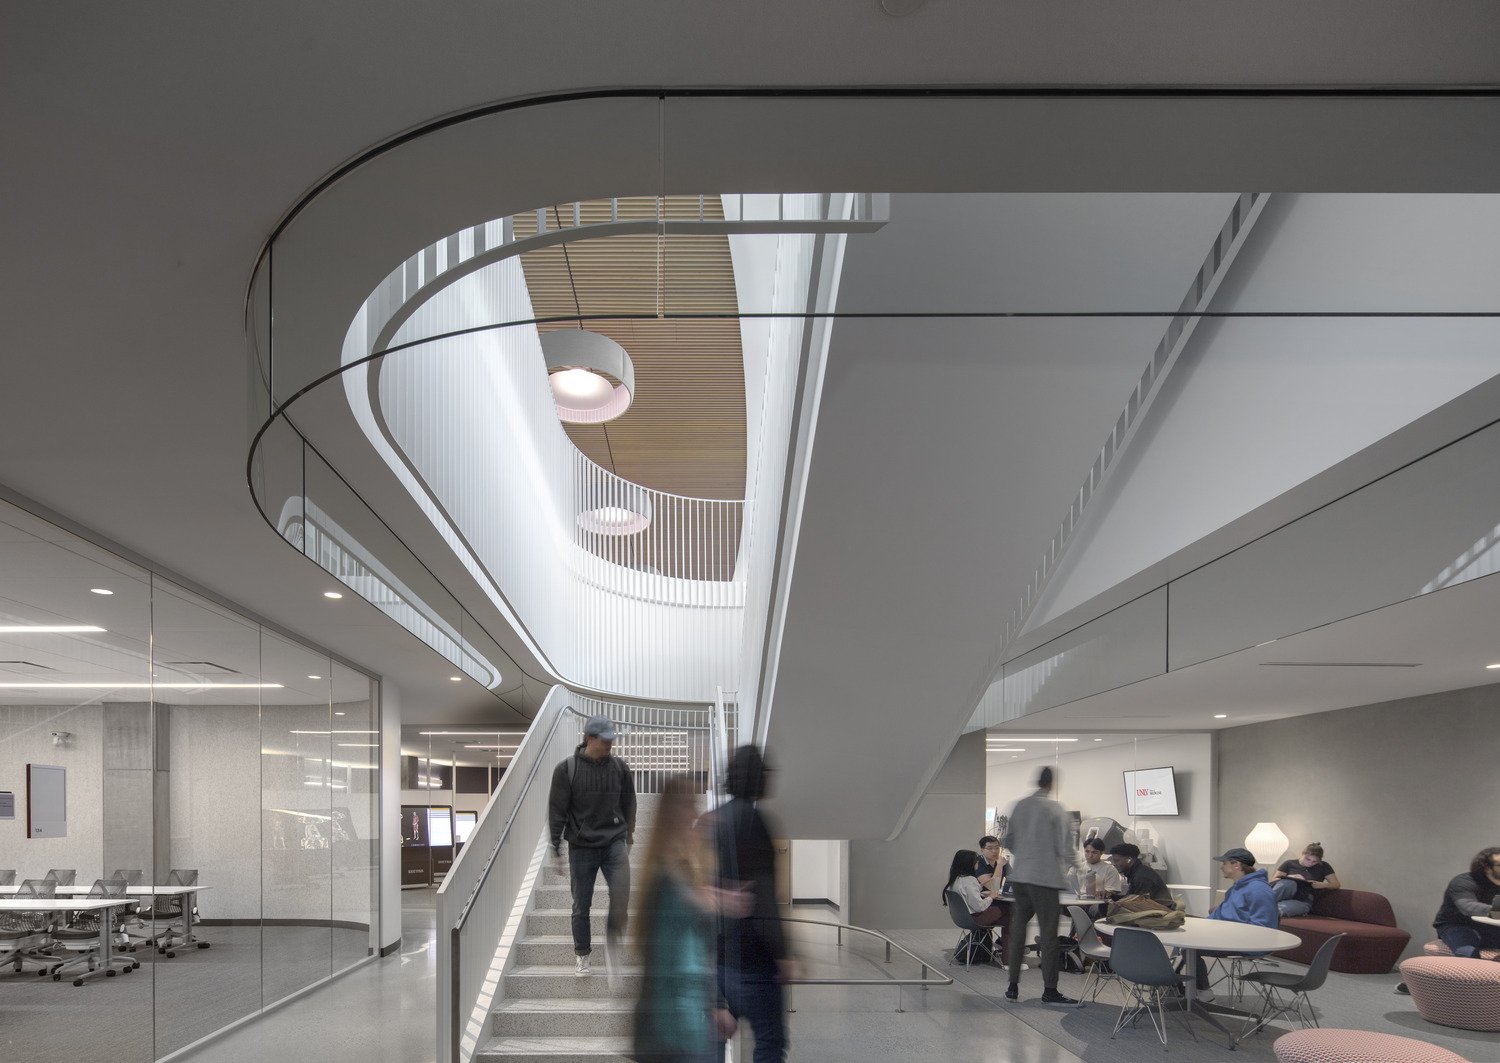
On the lower podium level, the “superfloor” serves as a base for the medical building and houses a number of classrooms and laboratories.

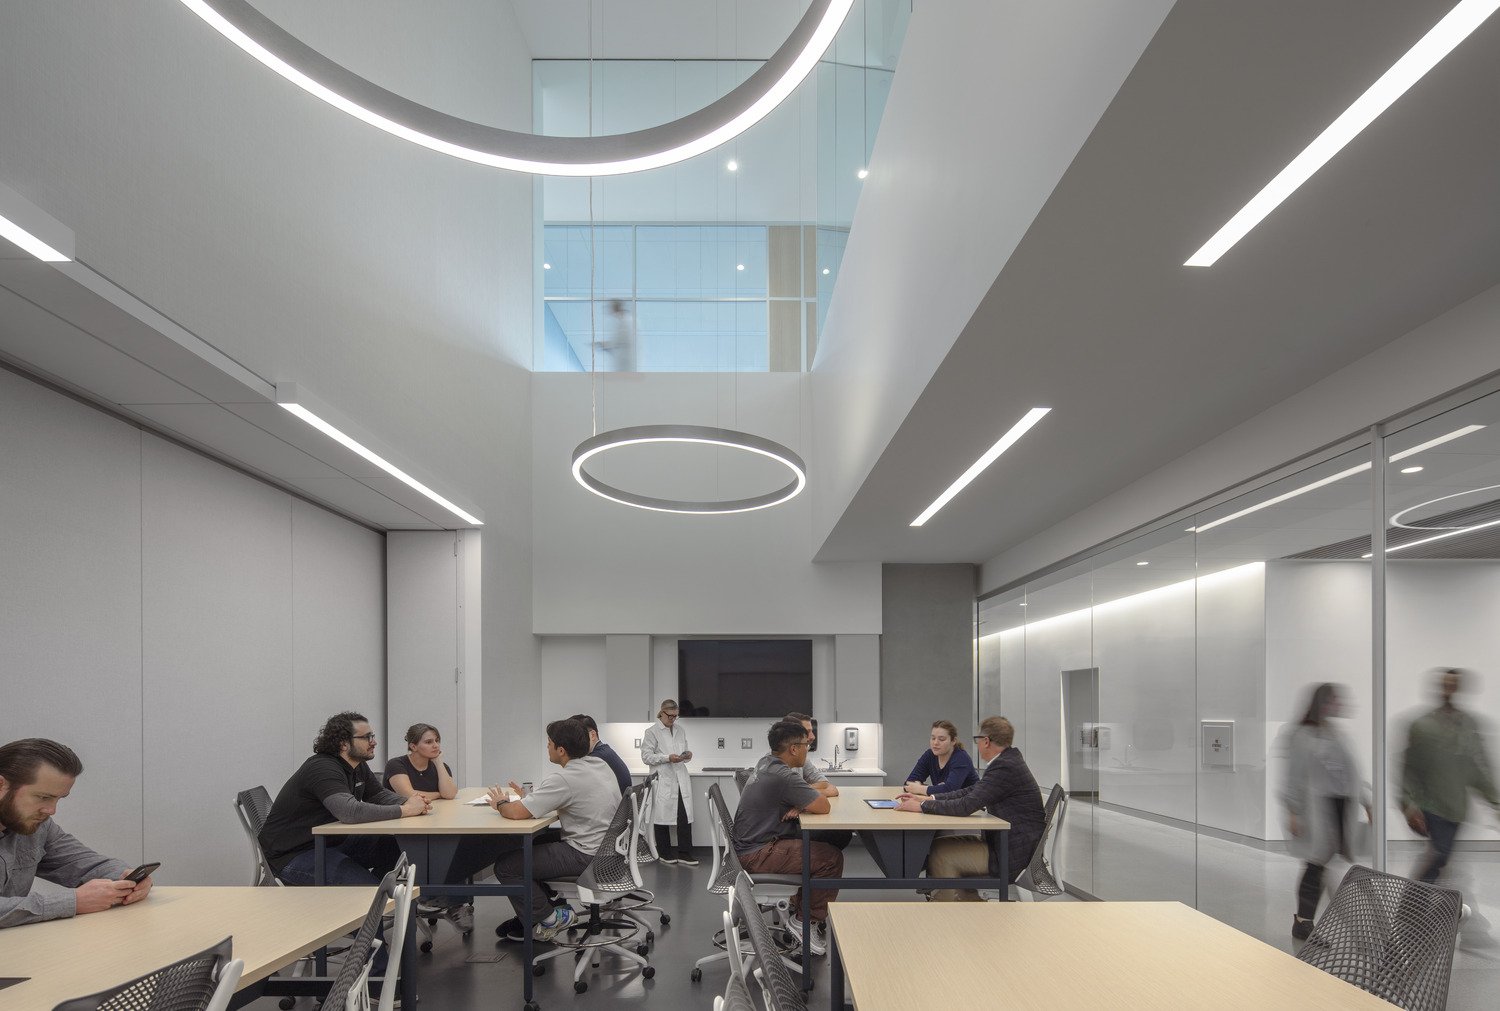
Connection from the main entry level down to the “superfloor” was valuable and can be experienced through a double height learning space.
Playful spun chairs were used to spark wonder and create a playful moment juxtaposed with the formality of clean lines and modern finishes.
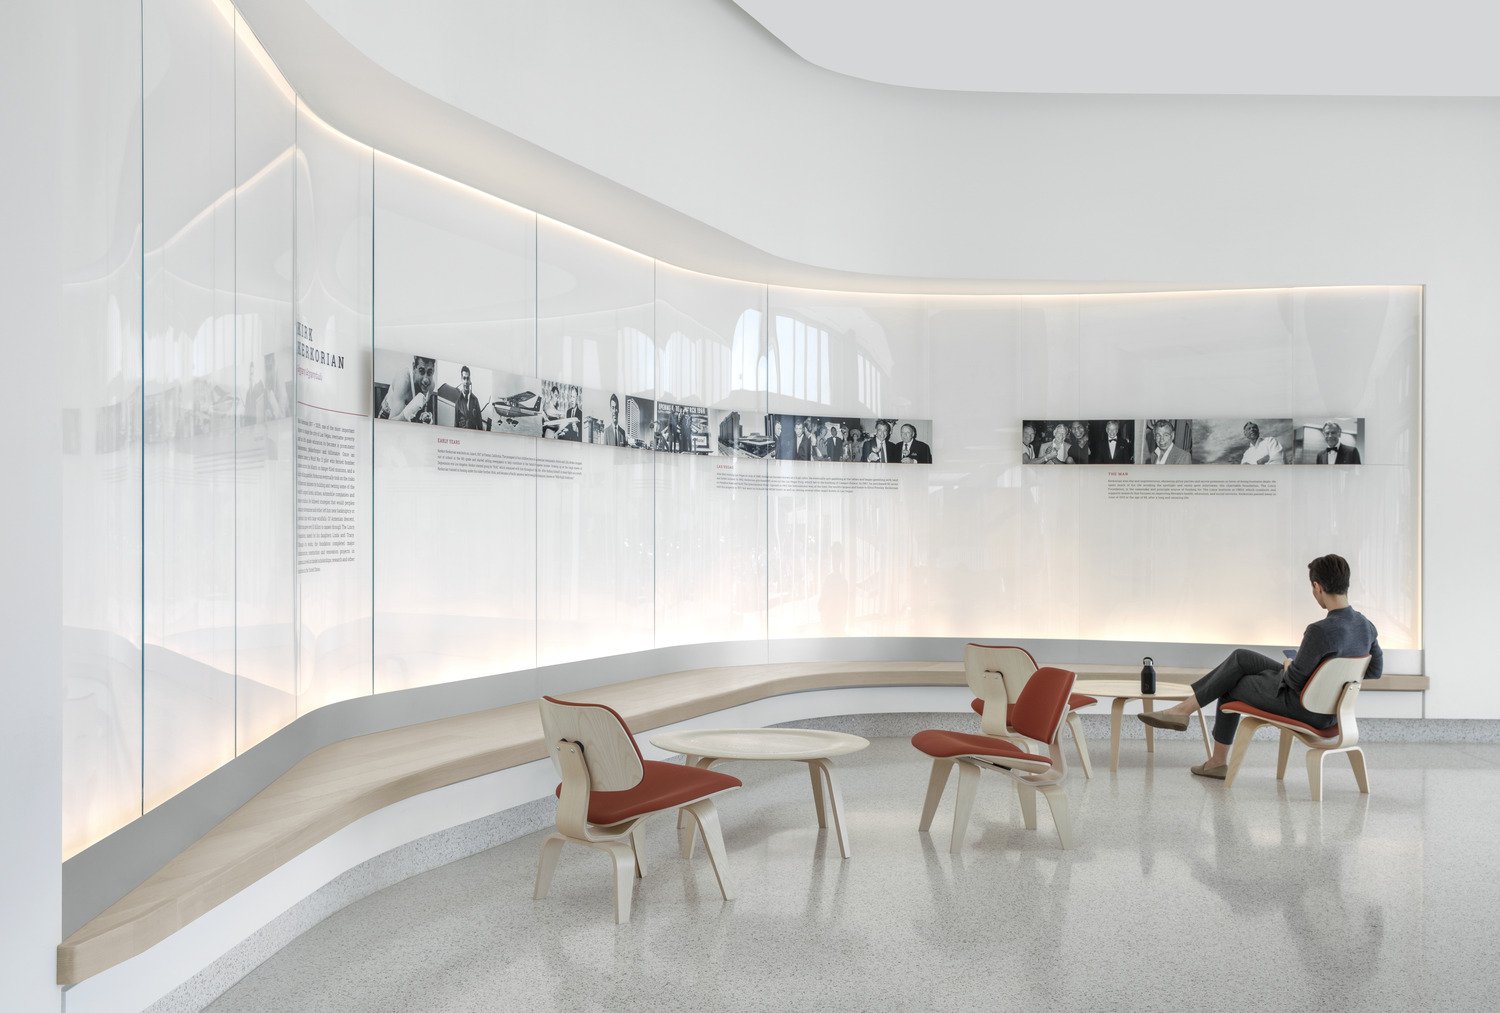
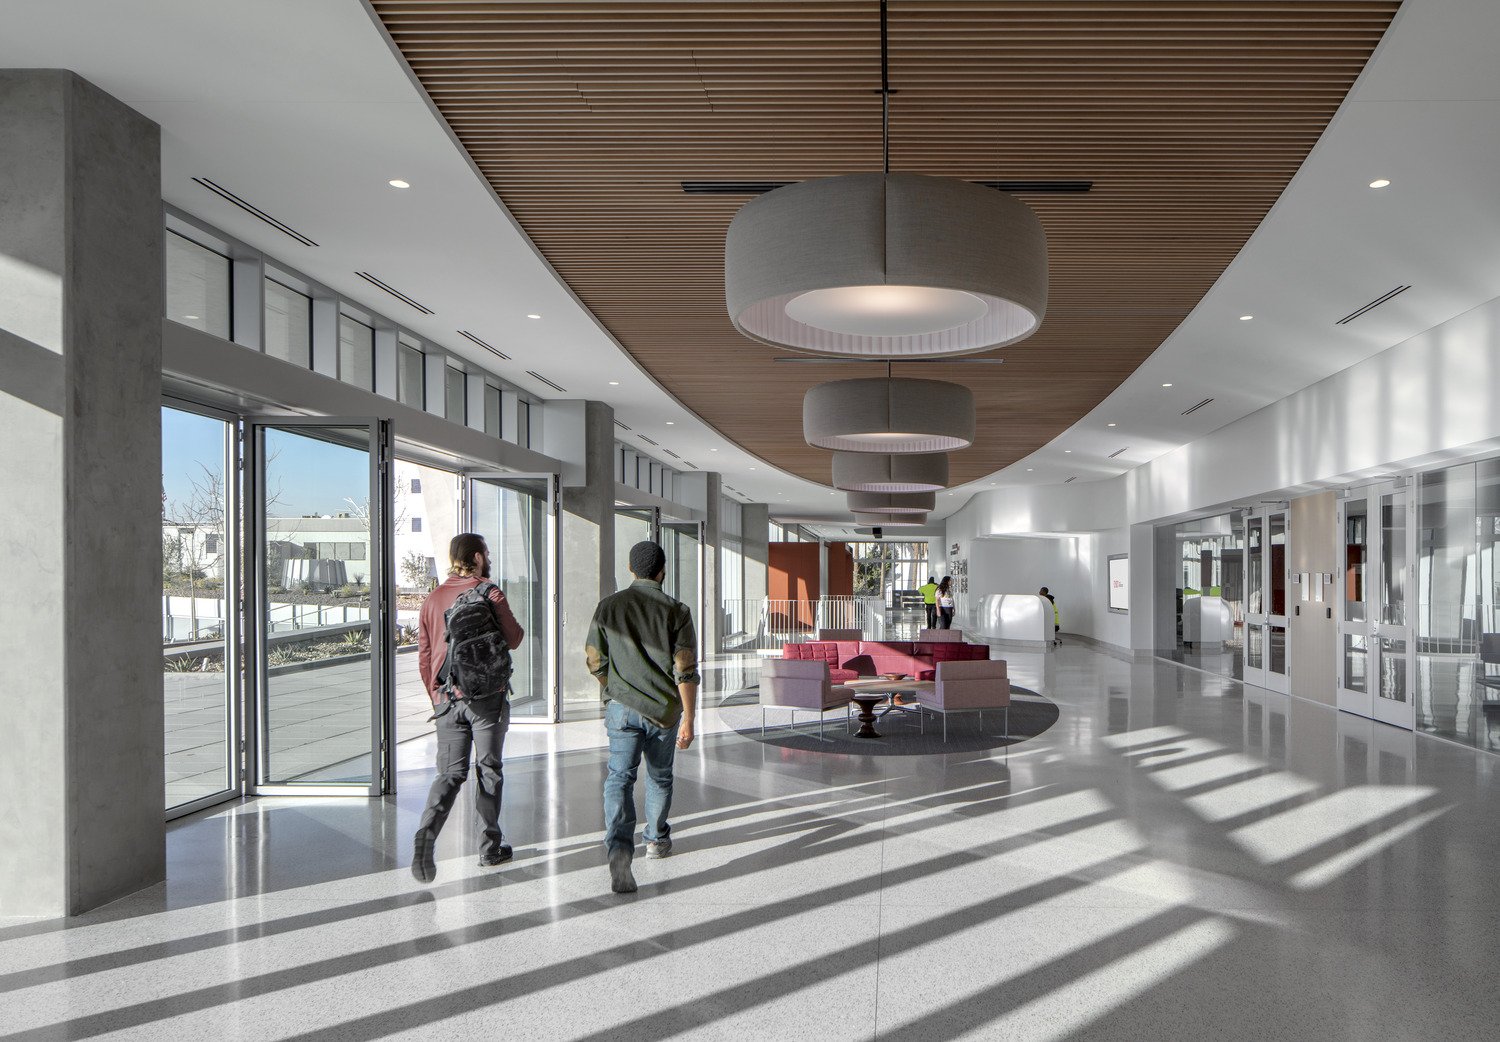
Wood elements and pops of color helped to bring warmth into the space, while large garage doors opened out onto the patio, creating a connection to the exterior.
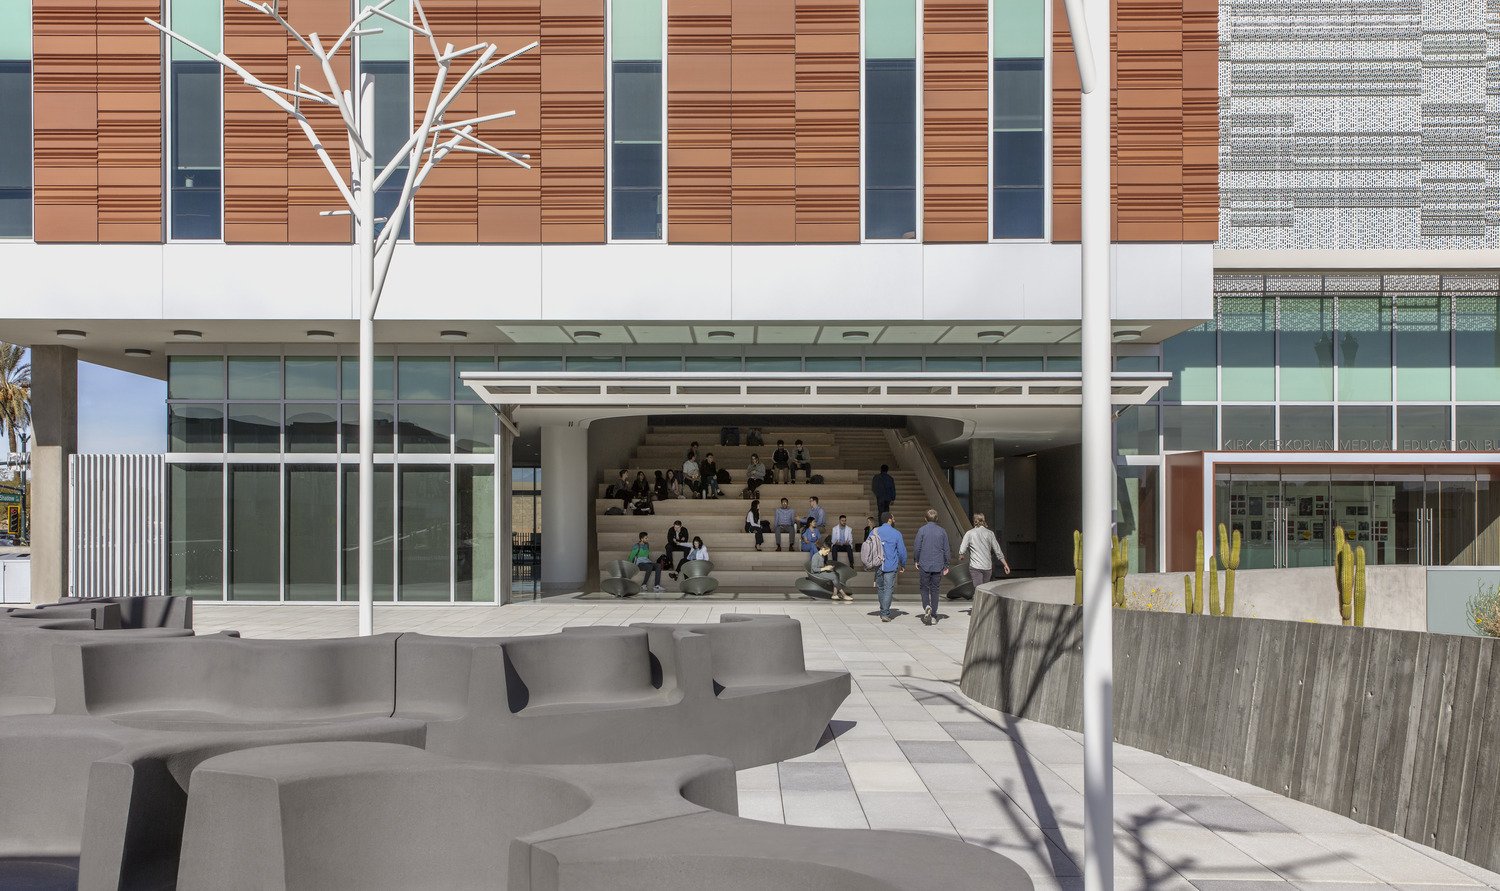
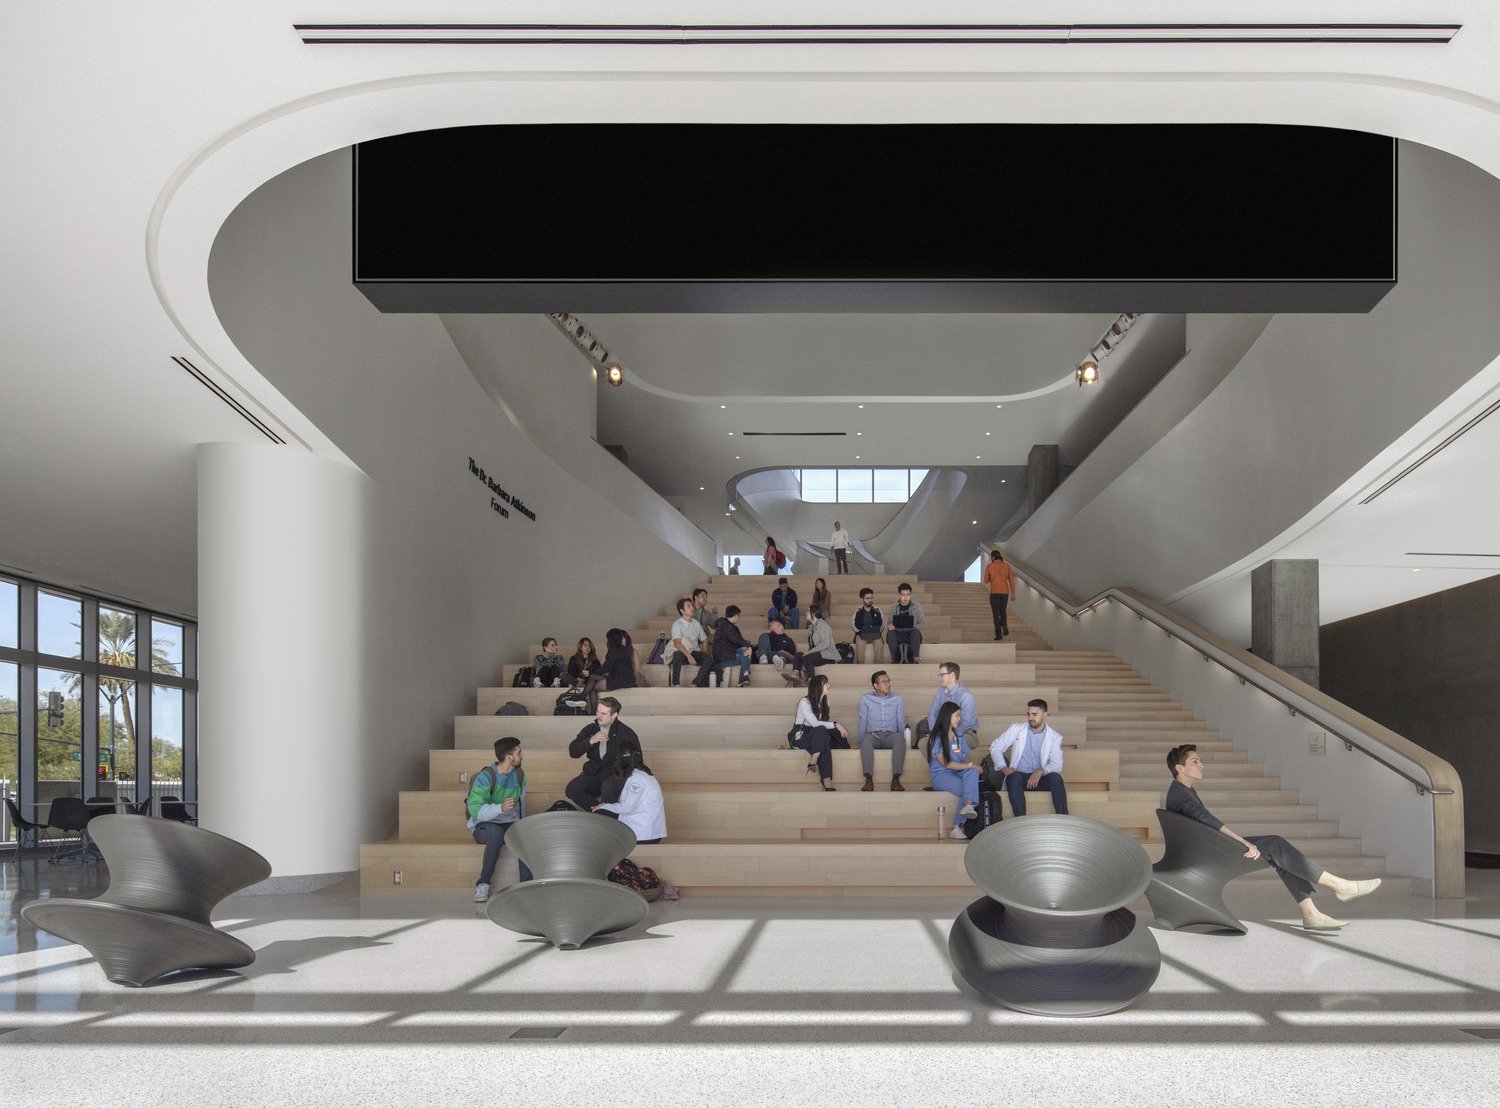
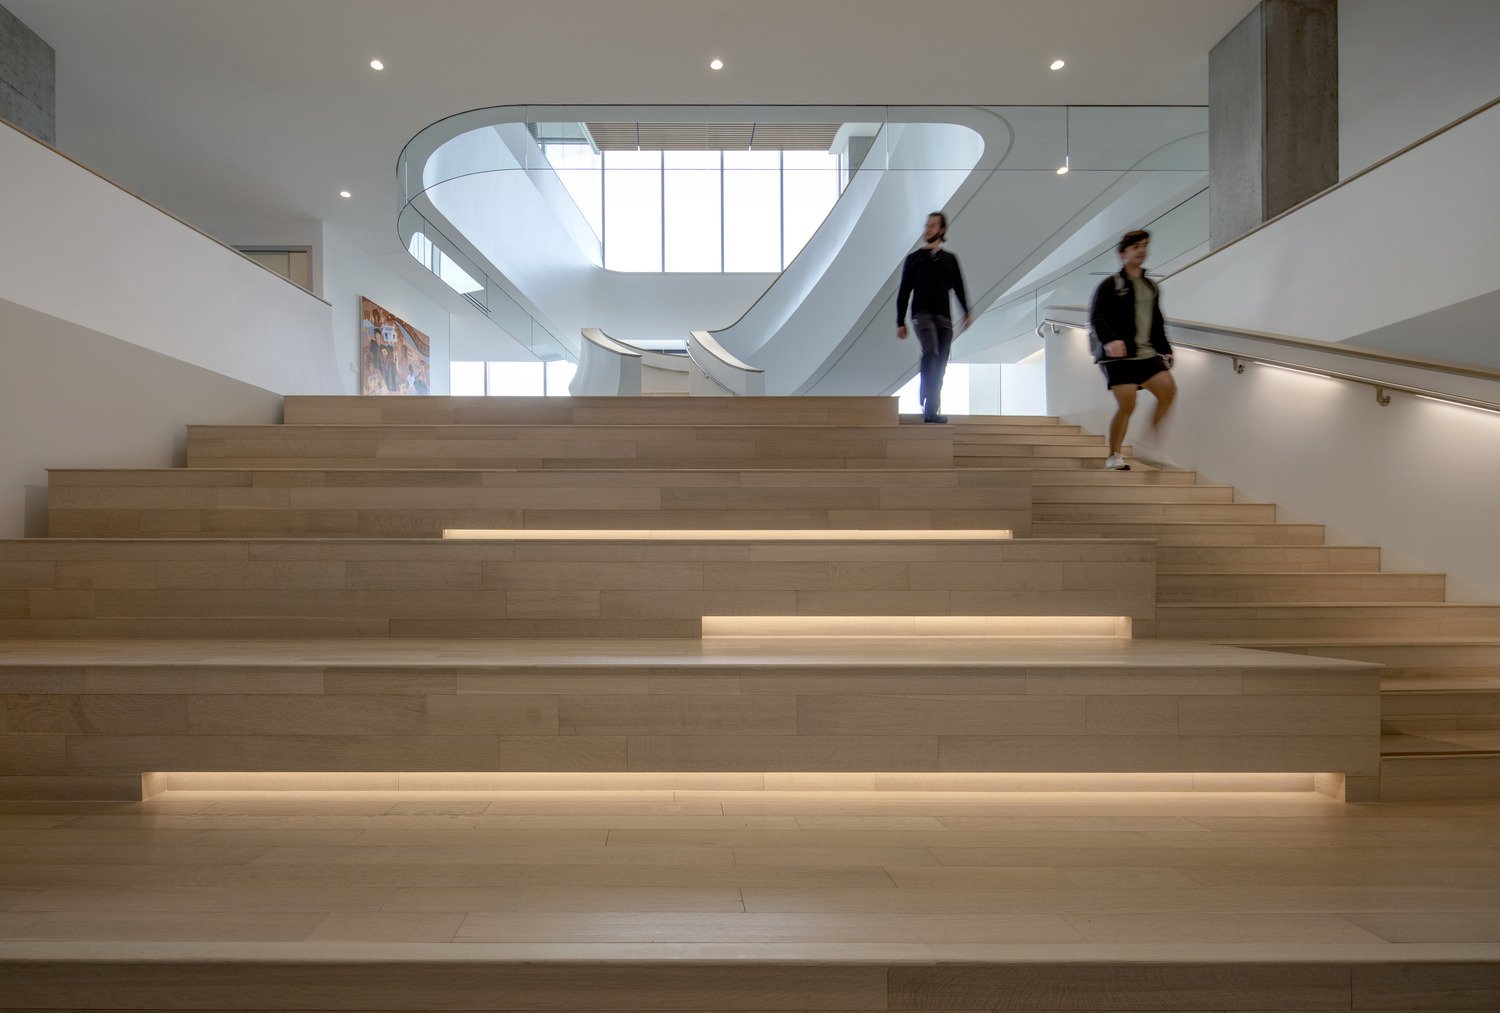
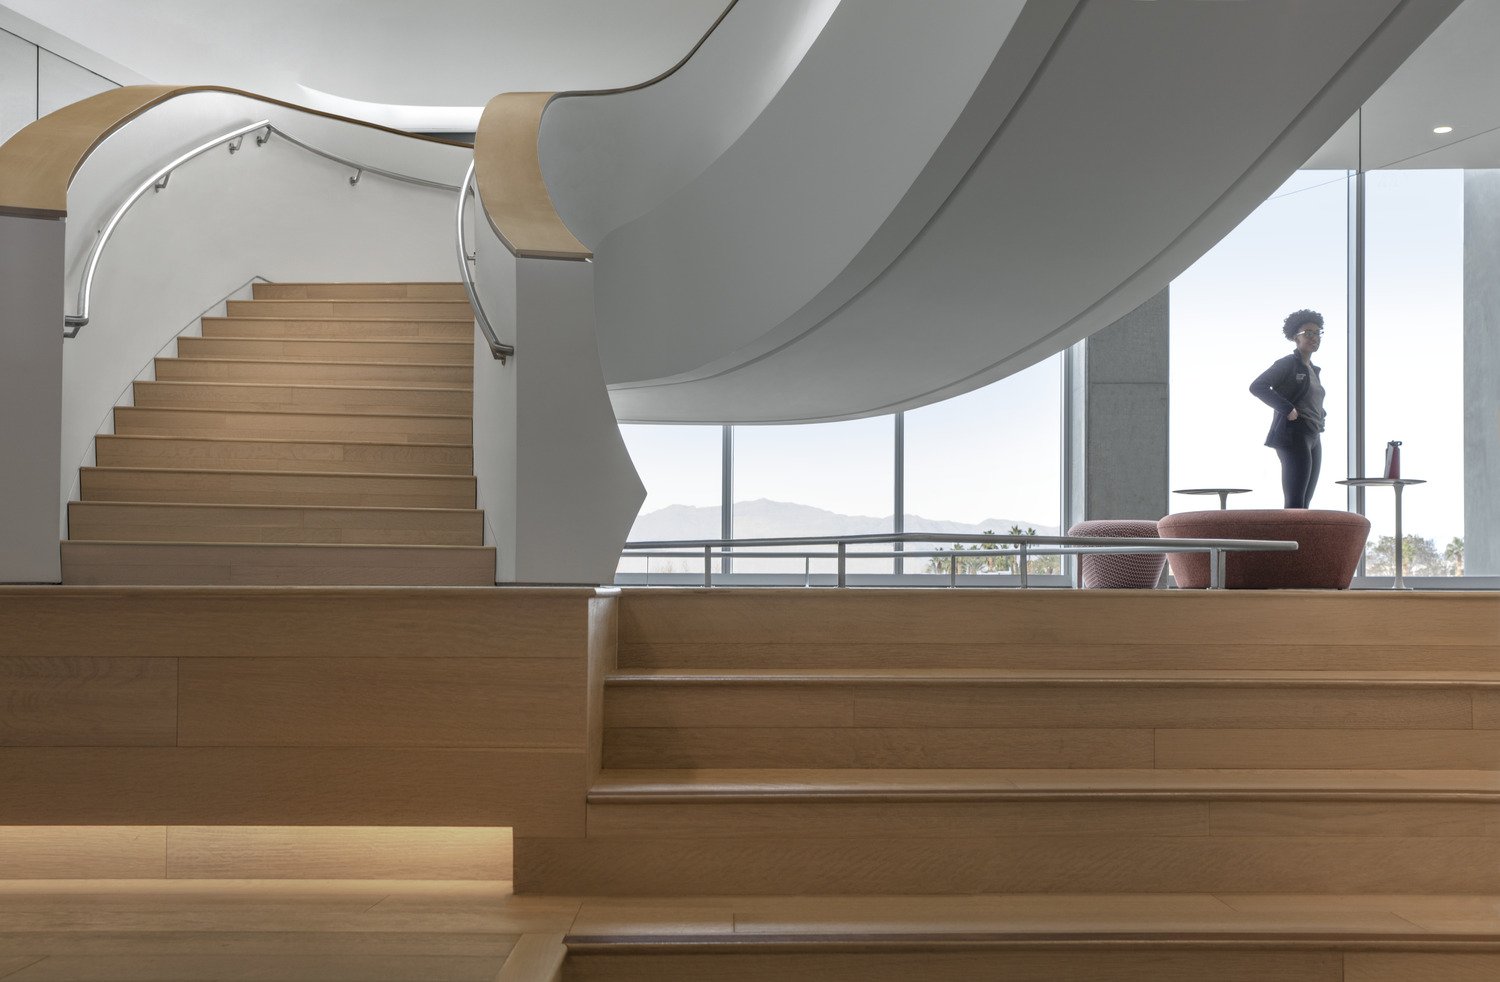
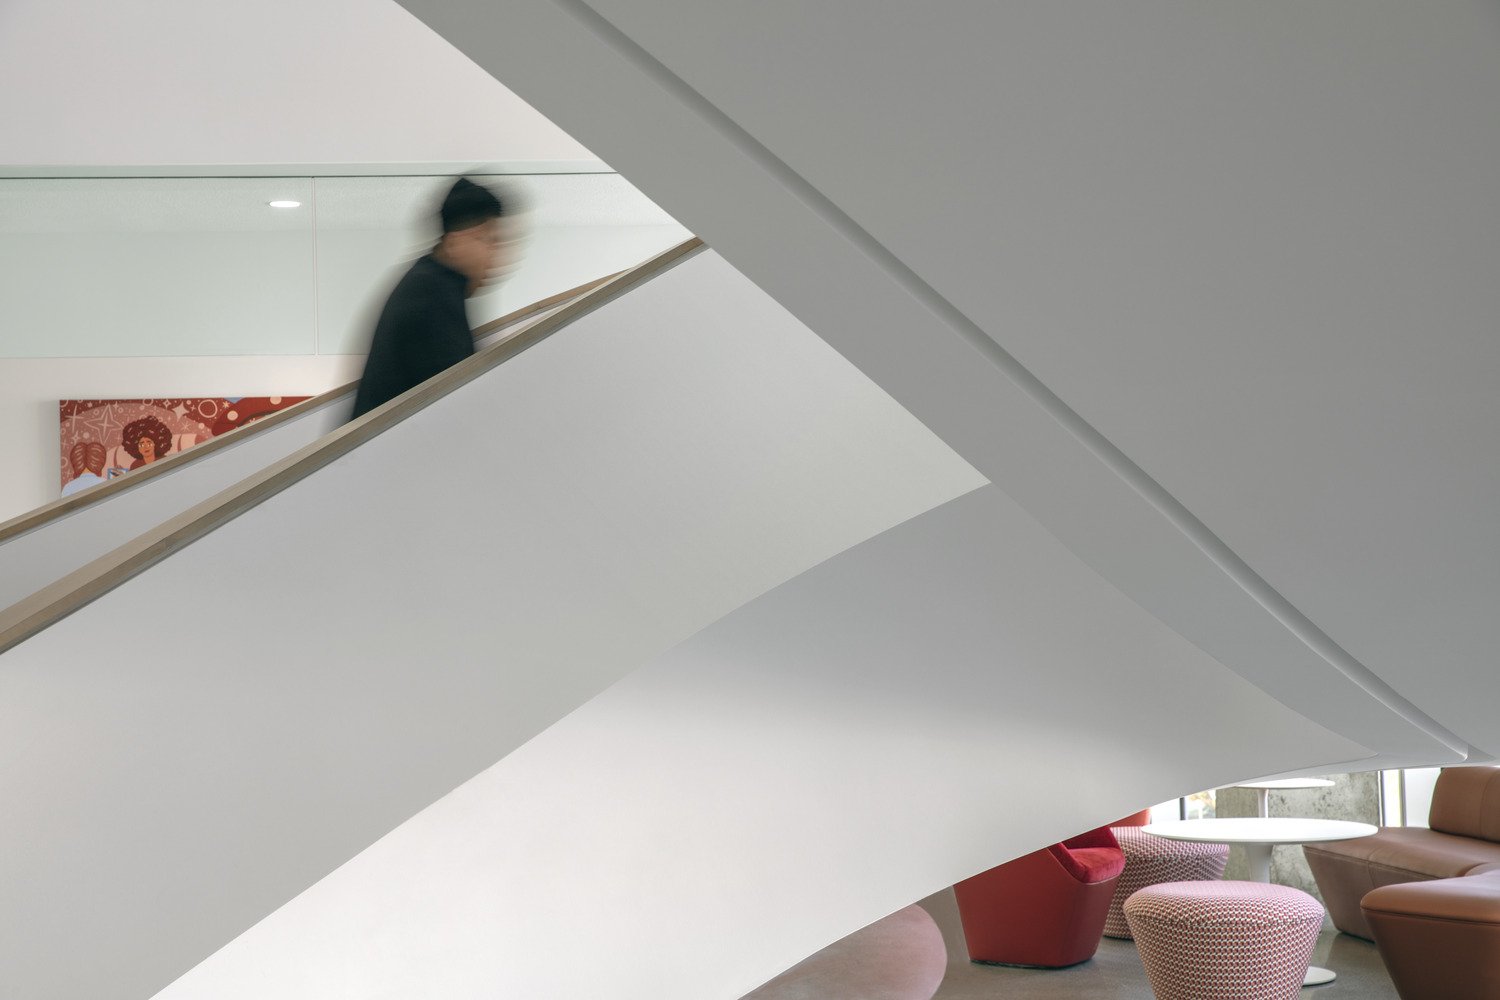
A triple height forum space was designed to bring users together and inspire connections. The curved lines are meant to lighten the feel of the space and move your eye inward and upward.
Wine and terra cotta colored accents, particularly in the furniture, brought a richness and timeless quality to the design of the space.
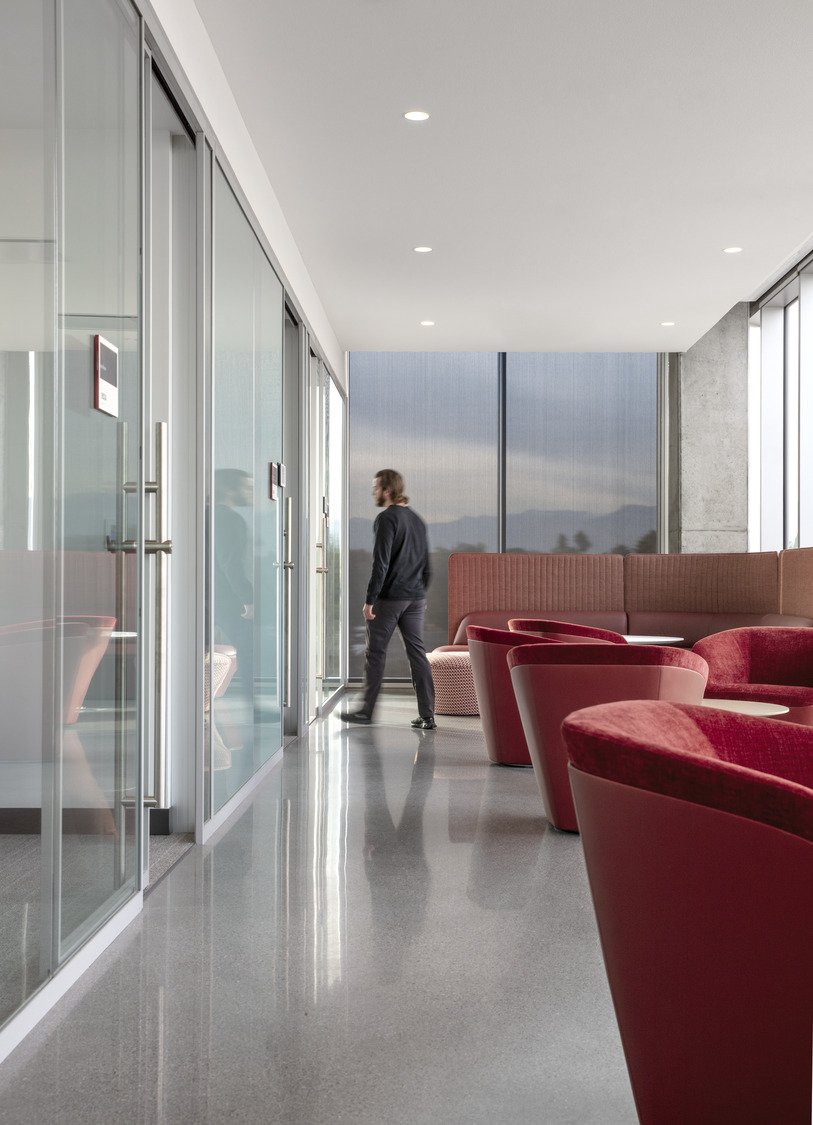
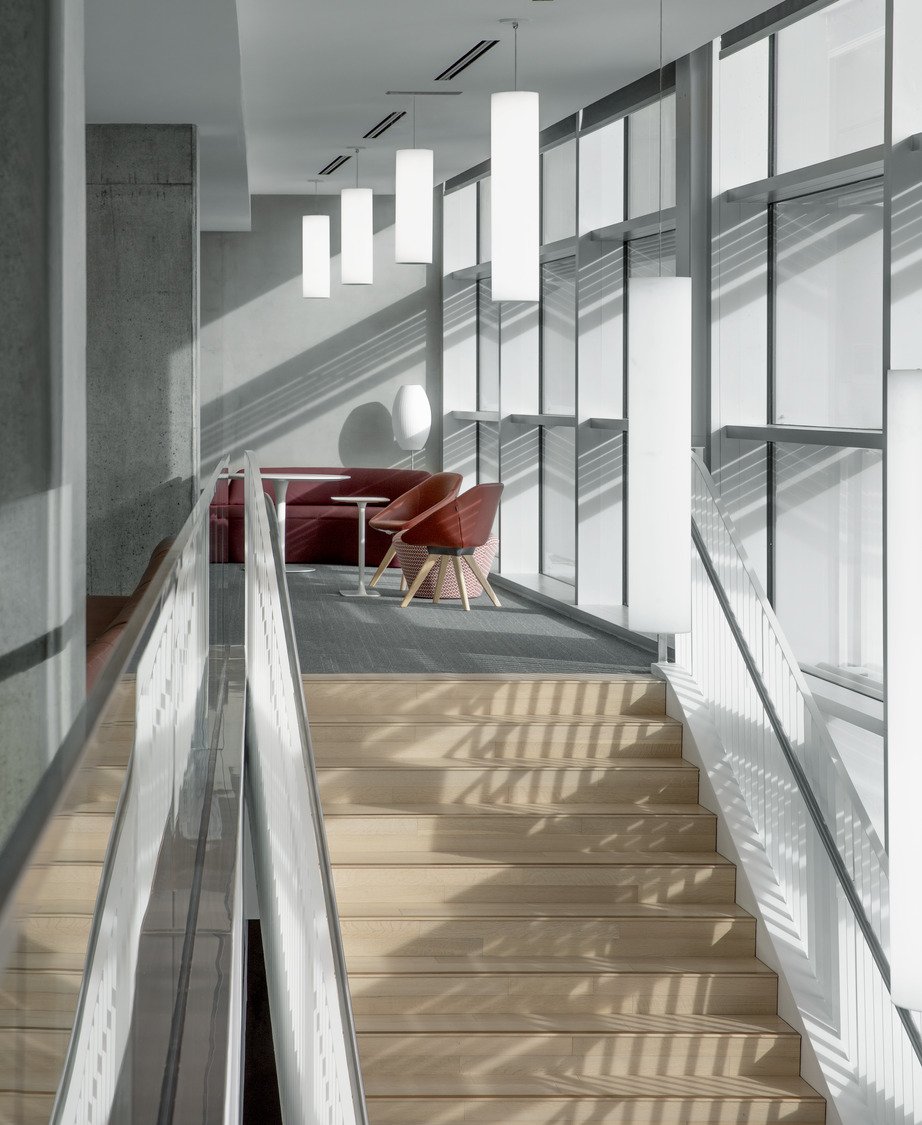
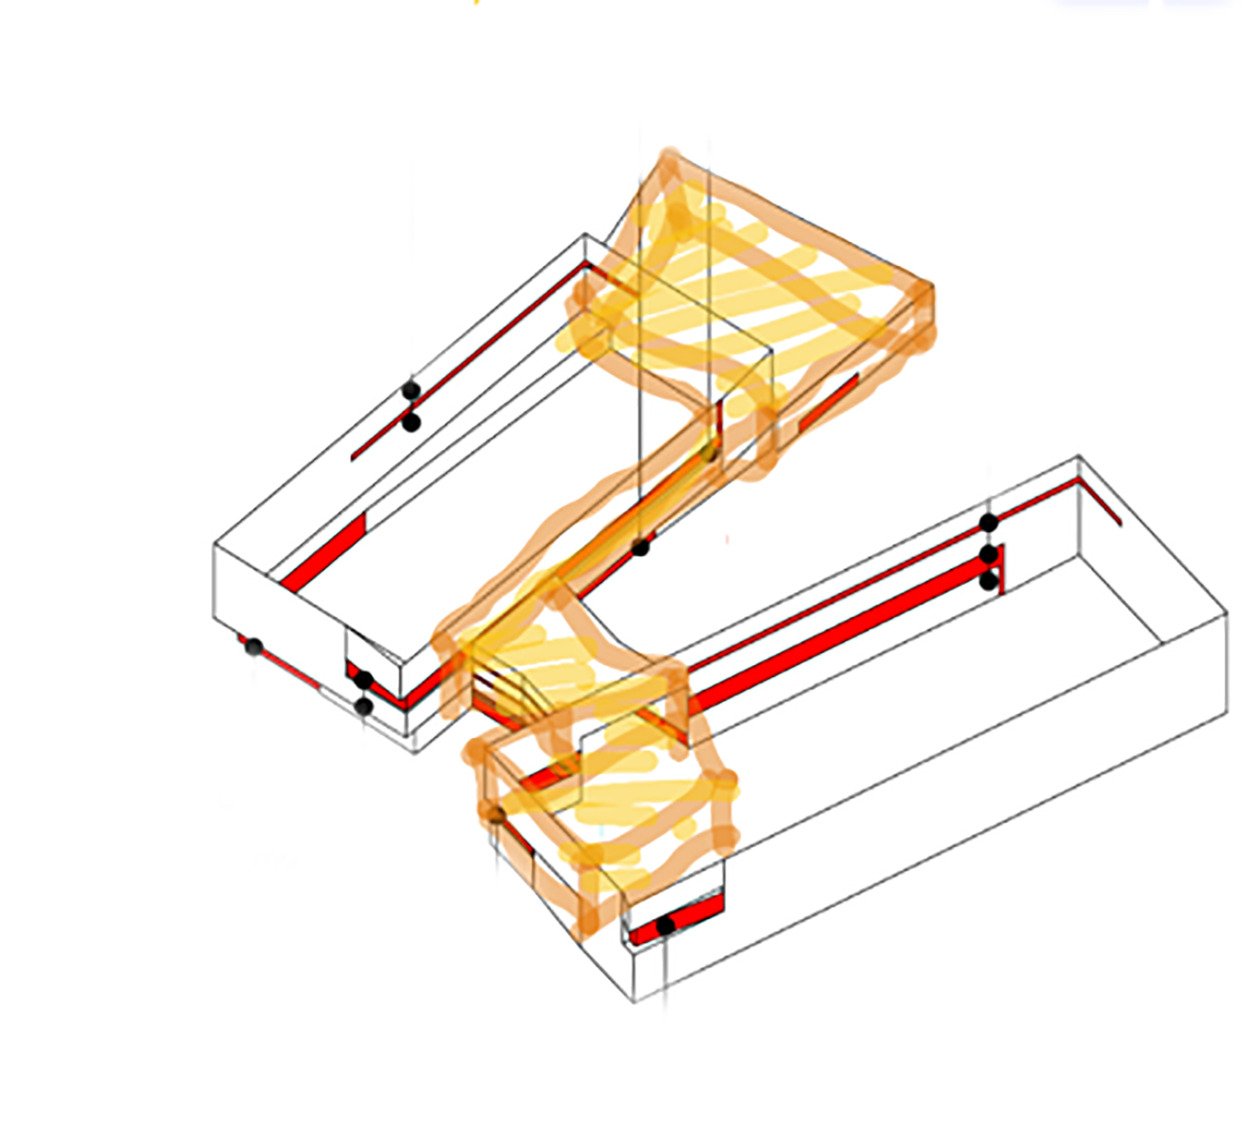
And although we didn’t design the exterior of the building, I have to admit, the light and shadows created as the sun moves across the sky, are something else. We did, however, create north-south and east-west axes on the interior to pull light into the corridors and create some pretty yummy sight lines to the desert landscape outside.

A variety of learning spaces were included, ranging from single one-person study rooms all the way up to Learning Studios accommodating over 100 students.
Spaces were often flexible, especially this sandbox space above, where countless configurations can be made depending on need. Office spaces were clean and classic, with neutral colors and calmer tones of blue.
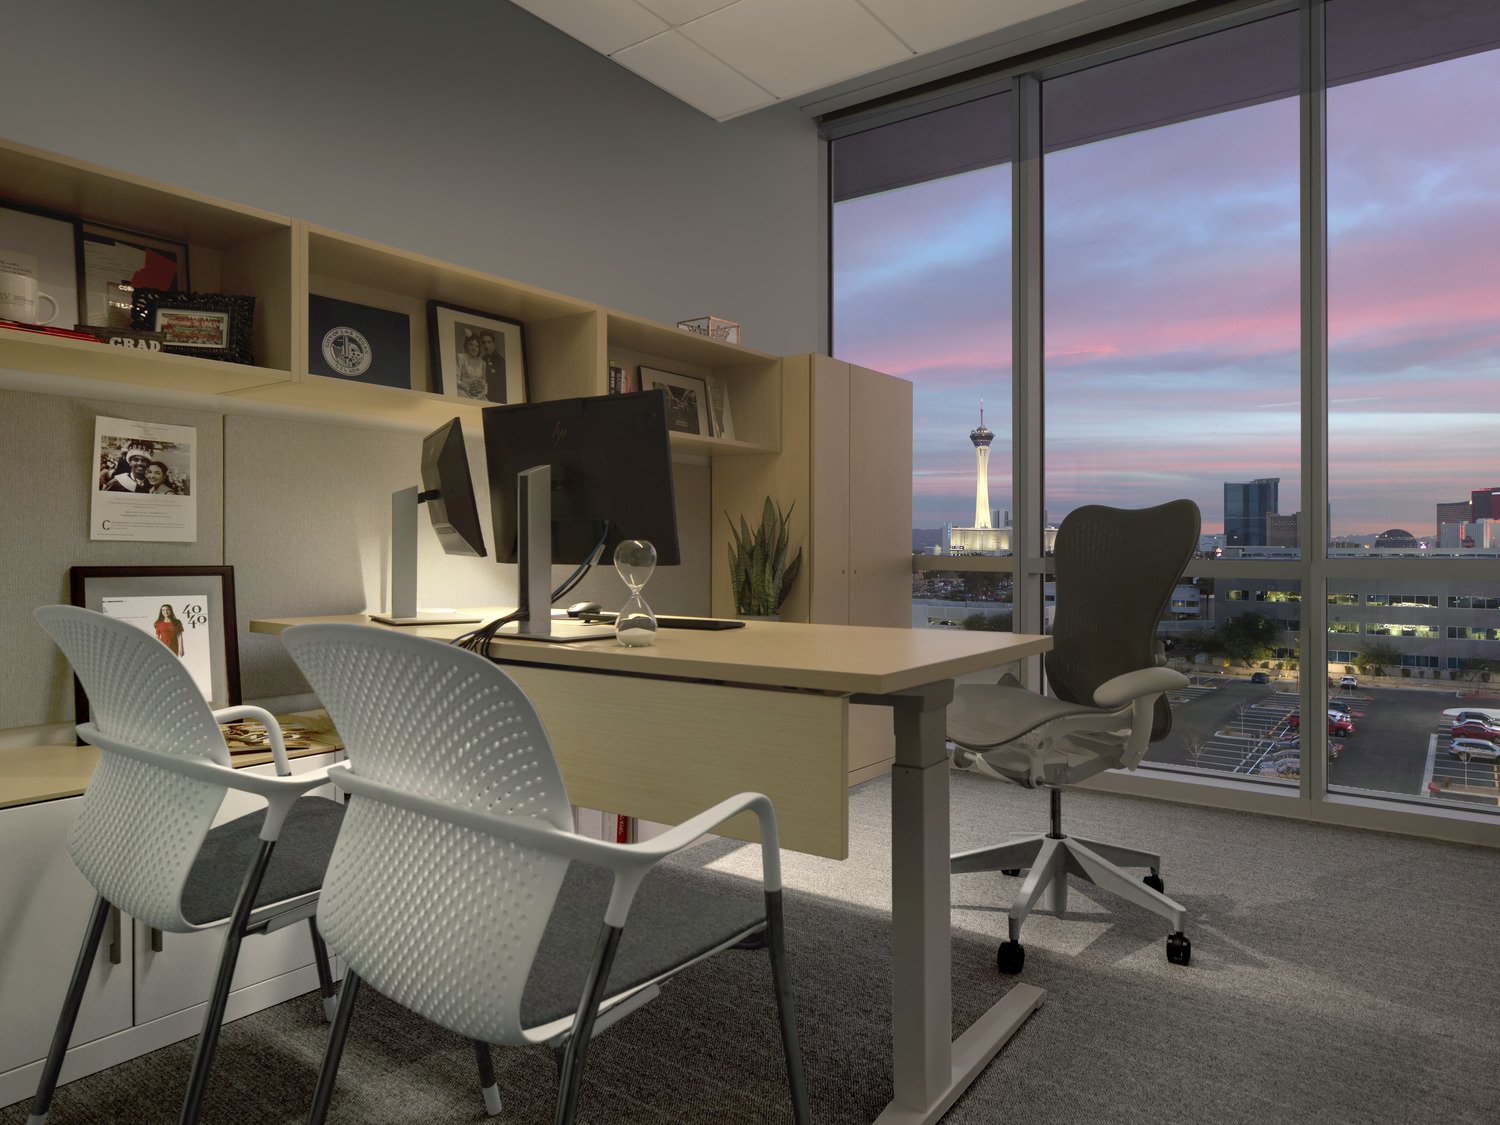
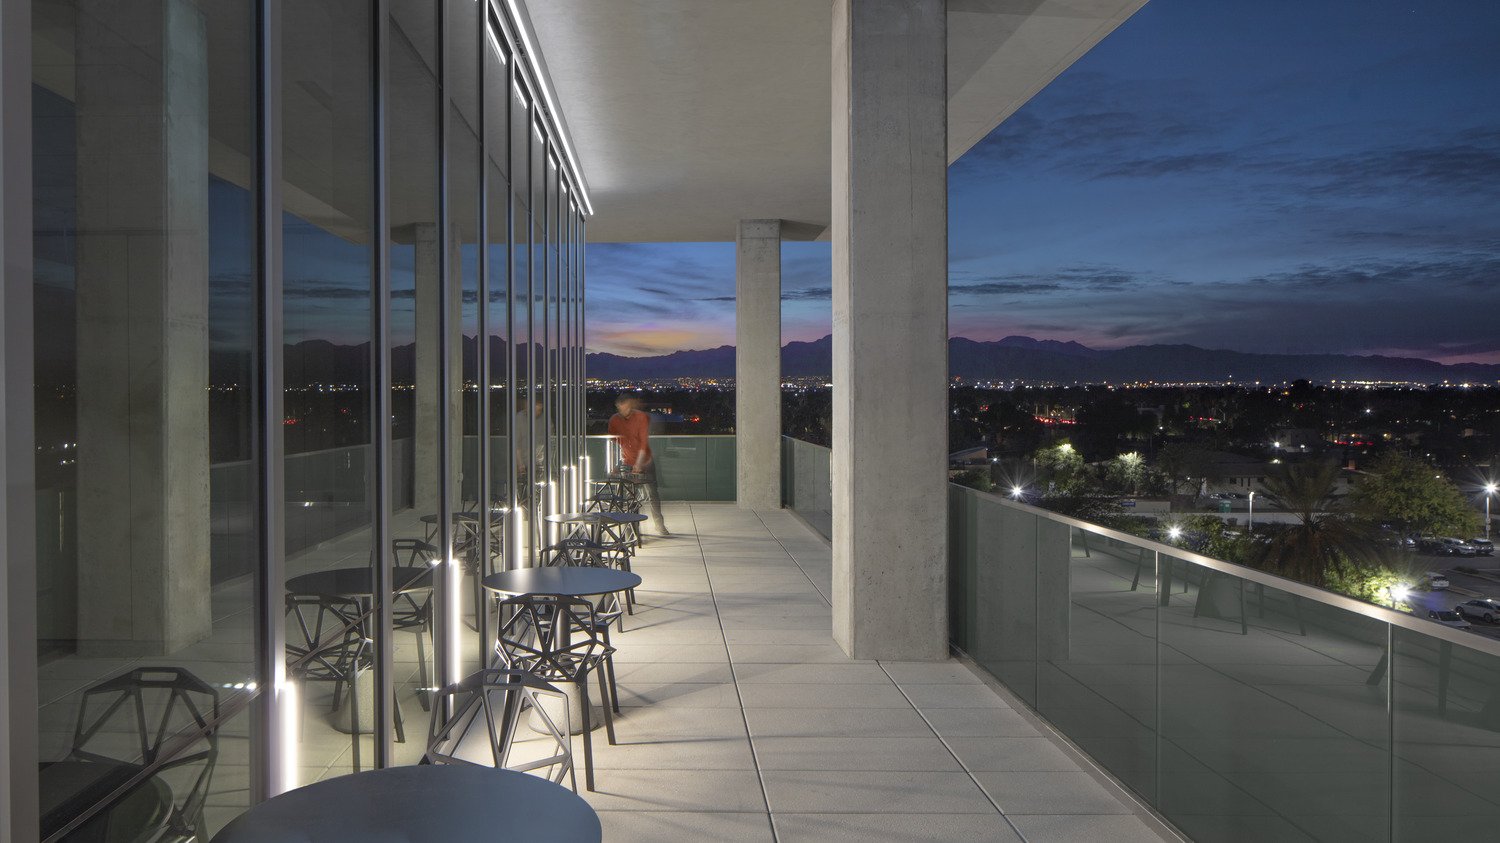
Exterior terraces were lined with stunning cafe style tables and chairs, heavy enough not to blow away, and perfect to enjoy the view.
Resources
Although, I personally work on commercial spaces, it’s always fun to dream and many of the products easily cross over into residential or similar spaces. Below are a few of my favorite manufacturers.
Architectural Finishes
Acoustics
Carpet/Rugs
Ceilings
Concrete & Tile
Glass
Lighting
Multi Product
Paint
Plastic Laminate, Solid Surface & Quartz
Textiles (Fabric & Window Curtains)
Wallcovering
Wood
Furniture
Many of the furniture lines are contract grade which means they are primarily used in public spaces and are constructed from durable materials meant to endure heavy use over an extended life. Residential furniture, on the other hand, is only meant for private use and may not last as long but will likely have a softer appeal.
Design Tips
When designing a space, move slowly and intentionally. Get things in your hands, draw, sketch, find concept imagery and order samples, if possible. Experiment, try things out. Then, sit with it until they feel right, adjusting as needed along the way. It’s okay to mix materials but make sure the story makes sense; there should be a framework in which a design sits. It could be a color story, specific style, mood or feeling, location, time of day or anything else you come up with.
“Just like people, spaces need balance and pieces within a space should be allowed to breathe. ”
For reference, my last apartment used Mexico City as an inspiration. After traveling there for the first time, I fell in love with all the natural materials like wood, stone and metal, combined with modern elements. I used rich saturated jewel-toned accents which contrasted nicely against the softness of those materials. Soft filtered light helped to create a mood and I filled the space with as much plant life as I could afford.
Use your inspiration as a guide but don’t be too literal and feel free to mix-and-match. Too much of one thing is never interesting. And don’t forget, before purchasing items, check the warranty, along with lead times, shipping fees and installation costs. Some of my favorite pieces to add, especially in homes, are textiles, think blankets, rugs and pillows, in various textures, mirrors, books, plants and unique artifacts. Because I travel a lot, I always pick things up as I go but there are also sites that offer interesting products like this one, Verve Culture. Happy hunting!


