Interior Design (More Than Just Decorating)
What exactly is Interior Design, anyway?

People always ask how I got into design but really it’s just been woven into my life from the start. My dad started out a medical student, took a detour into explosives engineering, then ended up working on airbags at General Motors — yet through every twist, he’s been a builder and an inventor at heart. He designed and built additions onto nearly every house we lived in, crafted kid-sized adventures like zip lines and go-karts and even built a full-size halfpipe in the backyard. Lately, he’s been smitten with his four-person Cessna, taking to the skies whenever the mood hits. Saying the smell of sawdust defined my childhood barely scratches the surface.
Then there are my four younger brothers, each carving out their own kind of magic. Brandon turned his love of wood into Well Made, a woodwork and home-goods brand that took off — so much so that you can even spot his pieces at Target. Jay took to the skies with aeronautical engineering and time at NASA, and these days he’s bringing that precision down to earth as he shifts into architecture. Jon started Big Twigs, a tree-trimming business he eventually sold and hasn’t slowed down — now he’s pouring that same grit into Decked Out. And Tim? He’s the hands-on fixer of the family, spending years in mechanical and metalwork before launching his own shop, Knowlden’s Garage.
I’ve always been drawn to the prettiest parts of design — the texture, color and atmosphere that make an object or space feel alive. As a kid, I was constantly rearranging my bedroom, experimenting with new layouts, slapping fresh coats of paint in whatever shade had captured me that week and nervously swiping my first credit card at Pier 1 for the perfect accent piece. Later, a Bachelor’s in Marketing left me restless, so I moved to South Korea to teach English and feed my creative itch in a new setting. When it was time to choose the next step, I went straight for design. Knowing I was a little older than the typical undergrad, I skipped another four years and enrolled in a two-year Master’s — a faster, bolder route to doing what I love.
What’s Inside | Roadmap
01 | Master of Fine Arts in Interior Design
02 | What is Interior Design? (and what it isn’t)
03 | Phases of the Interior Design process
Programming
Schematic Design
Design Development
Construction Documents
Construction Administration
04 | What tools do Interior Designers rely on?
Diving Into the World of Design
Trading in well oiled routines for color swatches and sketches — a delightful journey into the slow, joyful discovery that some dreams only arrive with the confidence to make them beautiful.
01 | Master of Fine Arts in Interior Design
After scouring Master’s programs around the globe, I discovered only a few two‑year options: one in Canada, one in Florence and one in Chicago. Florence tempted me but the loan logistics didn’t cooperate, so I wound up in Chicago at Harrington College of Design — a place that has since merged with Columbia College. A silver lining: I’d be closer to family in Michigan and my brother, who lives in the city.
The two‑year Master’s was a whirlwind — intense, fast and a little disorienting. It leaned heavily on design theory rather than day‑to‑day practice, which made breaking into the industry a bit of a scramble. Still, that’s often the tradeoff when you’re making a career pivot into a more technical field. Our curriculum covered the history of interiors and architecture, drafting basics, conceptual sketching, space planning, the design process, construction, sustainable design and building codes, all while introducing digital tools like SketchUp, AutoCAD, Rhino and Revit.
02 | What Is Interior Design? (And What It Isn’t)
Interior design is the personality of a place — the hush of a cozy nook, the crispness of a minimalist loft, the hum of an energetic café. It shapes how a room feels the moment you step inside: warm and inviting or cool and clinical, soothing or invigorating. A thoughtfully designed space can tell a story, guide your mood and make everyday moments feel intentional instead of merely functional.
Designers craft those feelings with a handful of trusty tools: light and shadow, scale and proportion, color and contrast, pattern and texture, rhythm and repetition and balance. Each element plays a role, like instruments in an orchestra, working together to create harmony.
Within the field, designers usually follow one of two broad paths. Residential designers focus on homes — apartments, condos, family houses — where personal comfort and lifestyle take center stage. Commercial designers have a wider stage: offices, retail, hospitality, healthcare, government and education. These categories often overlap. I, for example, design many medical education spaces that blend teaching environments with healthcare functions, offices and amenities — each requiring its own set of priorities while contributing to a cohesive whole.
Beneath the gleam of surfaces lies something quieter but just as vital: function. How a space works shapes both its interior and exterior — flow, adjacencies and proportions all bend to meet practical needs. When function fails, frustration follows: people invent awkward workarounds that rarely flatter a room’s appearance. That’s why interiors are sculpted by purpose, guided by the simple maxim “form follows function.” Coined by American architect Louis Sullivan — mentor to Frank Lloyd Wright and a key figure in early modernism — the phrase reminds us that a space’s shape should emerge from what it’s meant to do.
Interior design is the art of shaping how a space feels and functions — from the visible finishes underfoot and overhead to the hidden systems that make them possible. It’s about the textures, colors and lighting that greet you, and the plumbing, electrical, HVAC, AV, security and accessibility work that quietly supports them. While interior designers typically steer clear of a building’s core elements — like exit stairs, main restrooms and elevator shafts — and the exterior shell (usually the architect’s domain), great interiors never float in isolation. The most successful spaces are born from a close collaboration between designer and architect, where the inside and outside speak to one another in harmony.
All the while, these moving parts must be gently balanced against budget, timeline and client expectations. Sometimes the funding or the calendar won’t permit certain tweaks — especially once drawings are out for approval. And depending on the client, corralling a chorus of opinions can feel like hosting a wild dinner party. Usually, a general contractor coordinates the trades — plumbing, electrical, mechanical, lighting, AV — and gathers their bids. Those figures reflect chosen specifications, market conditions, product availability, labor rates, possible delays and the many little surprises that come with bringing a plan to life.
Imagine the designer’s dream tile is suddenly backordered in Italy for 16 weeks or the tile setter you counted on is simply unavailable — lead times stretch and costs creep up. Perhaps the designer must choose a different tile altogether. Either way, it falls to the general contractor to monitor every detail from start to finish, ensuring one trade doesn’t impede another and derail the schedule. On commercial projects that matters even more: hospitals must open on time, university terms begin as planned and office leases can’t be delayed.
Finishes are the parts of a room people notice first — the things you see, touch, and instinctively fall in love with. But good design goes deeper than surface beauty. Carpets, paint, glass, tile, terrazzo, fabrics, wood and stone must not only harmonize in color and tone, they need to meet in seamless, thoughtful ways (cue the small details that keep me up at night). On top of aesthetics, finishes have to fit the budget, arrive on time, meet safety standards for the space and stand up to daily life. Durability, availability and sometimes local sourcing are all part of the equation — because stunning finishes should look effortless and last.
FF&E — furniture, fixtures and equipment — covers the movable or easily removable items that give a space personality and purpose. Depending on the project, an interior designer may choose the furniture themselves or leave it to a specialist; either way, a savvy designer will anticipate what will occupy the rooms and plan the layout and infrastructure accordingly. Fixtures include things like light fittings, plumbing pieces and decorative elements such as artwork, rugs or curtains. Equipment tends to mean tools and appliances — electronics, kitchen gear or specialized items a client might need, from lab instruments to medical machines.
For projects big or small, designers can be invited in at different stages — but I always prefer they join from day one. When interior designers are involved early, they shape the layout and program of the space rather than being relegated to adding a few cosmetic finishes at the last minute. Thoughtful coordination and detailed planning are nearly endless; if a designer doesn’t have the time, expertise or care to oversee every element, items can end up in the wrong place, with the wrong finish or missing entirely. Those mistakes cost clients time, money and sometimes create results that are simply hard on the eyes. A good interior designer catches the little things and ensures every decision serves both function and beauty.
A thoughtful designer might begin by asking a few gentle, essential questions:
What story should the space tell and how should people move through that narrative?
Which rooms and objects should sit near one another to make daily life effortless and pleasant?
Which places crave sunlight and which direction should the windows face to catch the best light?
Are the materials and systems chosen kind to the planet, dependable and safe for everyone who uses the space?
How does the building’s height shape the character and function of each floor?
What is the arrival and departure experience — both for the building as a whole and for each individual room?
Which sight lines matter most, whether for a pleasing view or for ensuring safety?
What variety of spaces do we need to serve different needs — energetic activity, quiet retreat or something in between?
Do people want high privacy or a more open, communal feeling?
How important is adaptability — should the design anticipate future growth and change?
Which rooms are sensitive to sound and how will we manage acoustics to keep them comfortable?
What lighting levels feel right for each function and mood?
What technology and infrastructure must be woven in — screens, speakers, cameras, security, switches, outlets, room schedulers, card readers, signage and wayfinding?
What accommodations are necessary for accessibility, both physical and cognitive?
How can the design be inclusive of gender and other personal needs?
Framing design with these questions keeps the process human-centered, practical and a little bit magical.
03 | Phases of the Interior Design Process
Interior design unfolds in various stages, each one shaping your space with care and purpose: Programming, Schematic Design, Design Development, Construction Documents and Construction Administration. Think of it as a thoughtful journey — from understanding your needs and dreams, to sketching playful concepts, refining details into a cohesive plan, translating that plan into precise drawings and finally guiding the build so the vision becomes a living, breathing space. Each phase adds a layer of confidence and charm, turning ideas into a experience that truly feels like yours.
Programming
During the programming phase, the designer becomes a curious listener and a careful translator — asking questions, defining goals and turning ideas into a clear plan. This is when the client describes both needs and dreams: how the building should function, how it should feel. On a larger scale, programming maps out what spaces are required and how much of each.
Imagine a five-story education building — one of my recent projects. How many classrooms will it need? What sizes — cozy 10-person studios or generous 60-person lecture halls? What staff will support those students and what kind of workspaces do those staff require: open, collaborative offices or private ones? Will the building need a secure entry or a welcoming reception? What amenity spaces — lounges, study nooks, labs or cafeterias — will make the place hum with life?
Good programming teases these answers out, balancing practical requirements with the experience you want the building to offer. It’s the blueprint for both function and feeling.
Next, look at each space and imagine how it will actually work. Get specific. If it’s a classroom, where will the teacher stand or sit? What subject is being taught and does the layout need to shift for different activities? Will whiteboards or digital monitors be required and where will AV gear live? Consider lighting needs, acoustic treatment and how long students will be seated — are movement breaks or ergonomic seating necessary? Are potential distractions nearby that could interrupt learning?
Clients often complete surveys that feed into Room Data Sheets. These concise sheets capture the essentials for every room type: typical dimensions, furniture and equipment needs and preferred finishes. Think of them as the instruction manual that turns a good concept into a space that truly functions.
Programming can also mean carefully noting any existing conditions — measuring the room, photographing the space and recording what’s already there. We’ll dig into codes, restrictions and any legal considerations, then define the project’s scope. From there, a realistic schedule and budget are developed. Designers package all of this into clear, attractive documents that spell out the plan and await the client’s sign-off.
Schematic Design
Schematic Design is where the project begins to take shape. Ideas are sketched out into initial concepts, layouts and suggested materials, creating a playground for exploration and experimentation. As plans evolve, the scale and relationships between spaces start to reveal themselves — shaping circulation, function and adjacencies. We test a few carefully chosen options with the client to gauge their instincts; too many choices can feel overwhelming, so restraint is wise.
Tip | A helpful rule of thumb: never present something you don’t genuinely like — clients can unexpectedly fall for a concept you’d rather avoid.
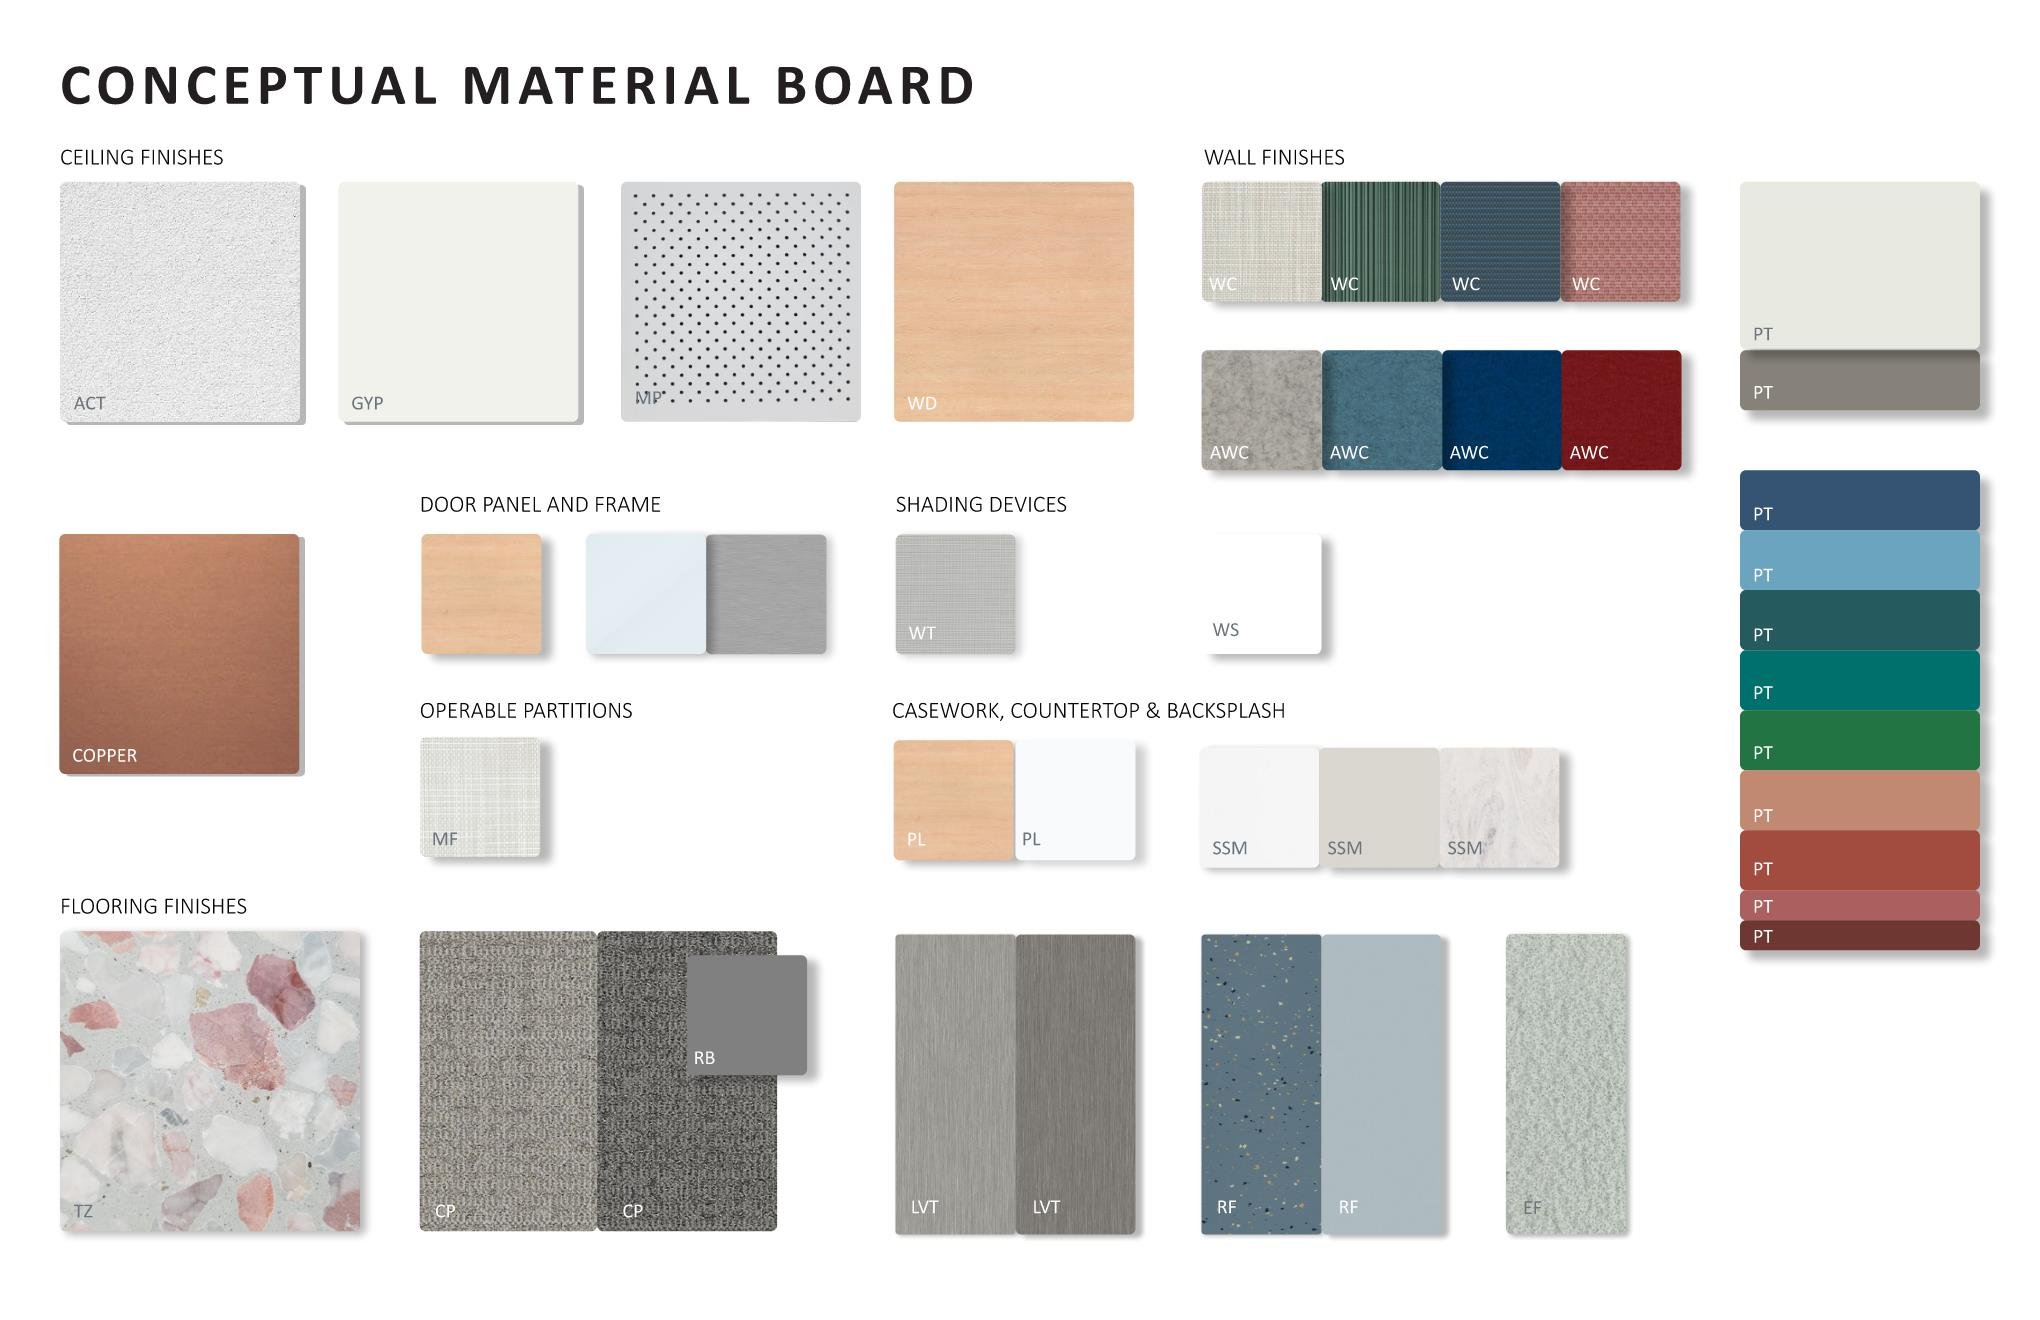
General interior finishes begin to be suggested — more as a mood than a rule. These early choices help shape both the look and the budget, giving the project its first gentle outline. As scope, budget and vision take form, they often shift and refine in response to discoveries along the way. Deliverables during this phase typically include concept layouts, initial 3D views and a curated selection of interior finishes. Each element is reviewed and signed off by the client, with the concept itself being especially crucial to lock in early — it sets the tone for everything that follows.
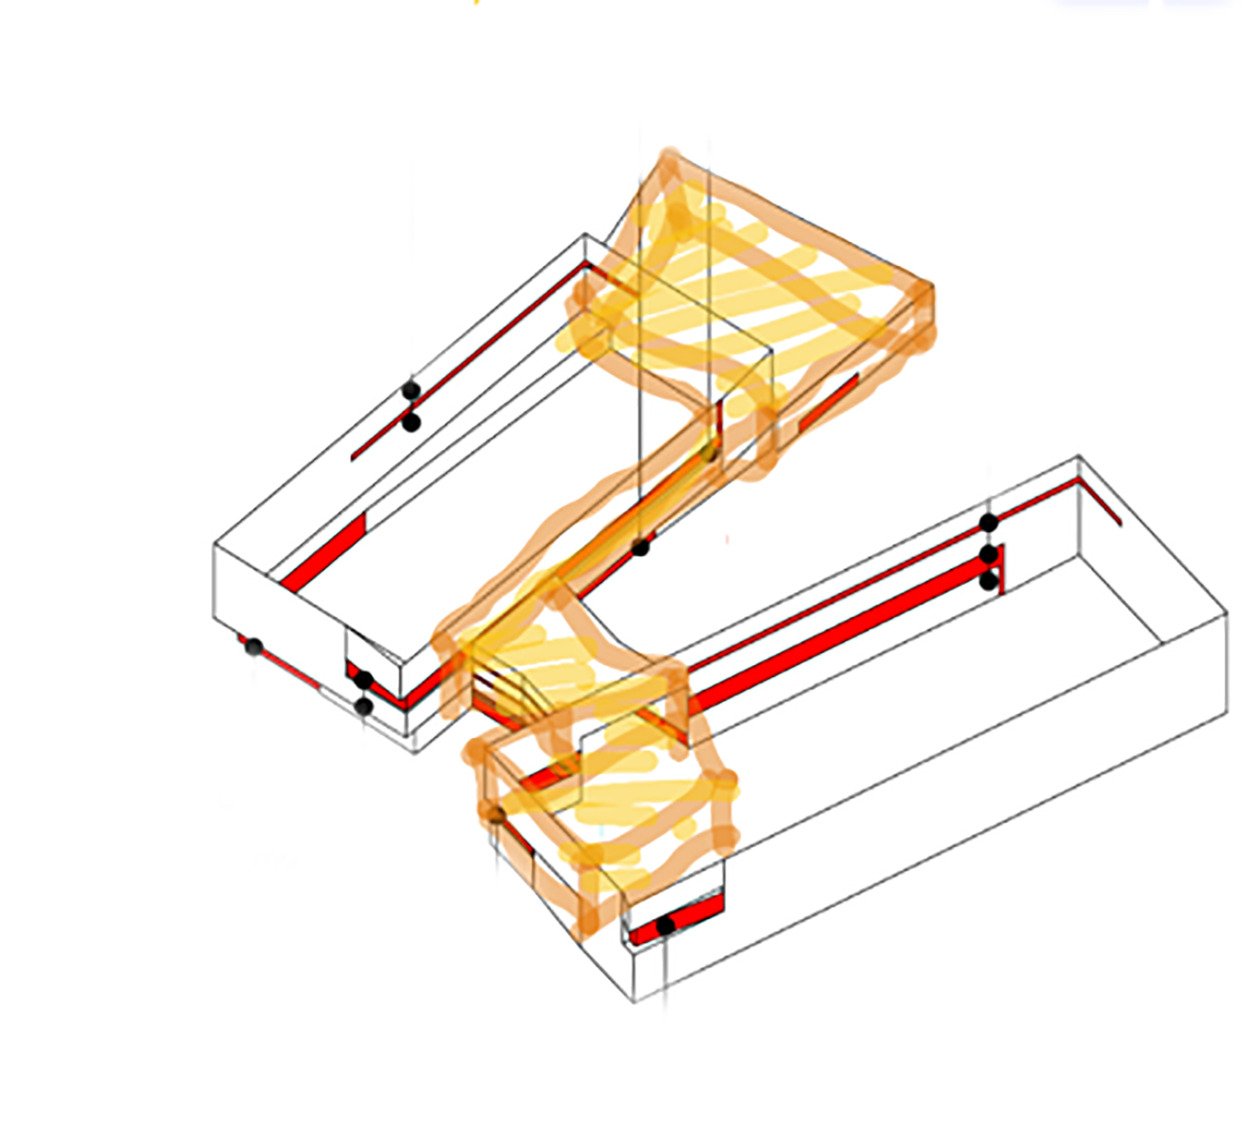
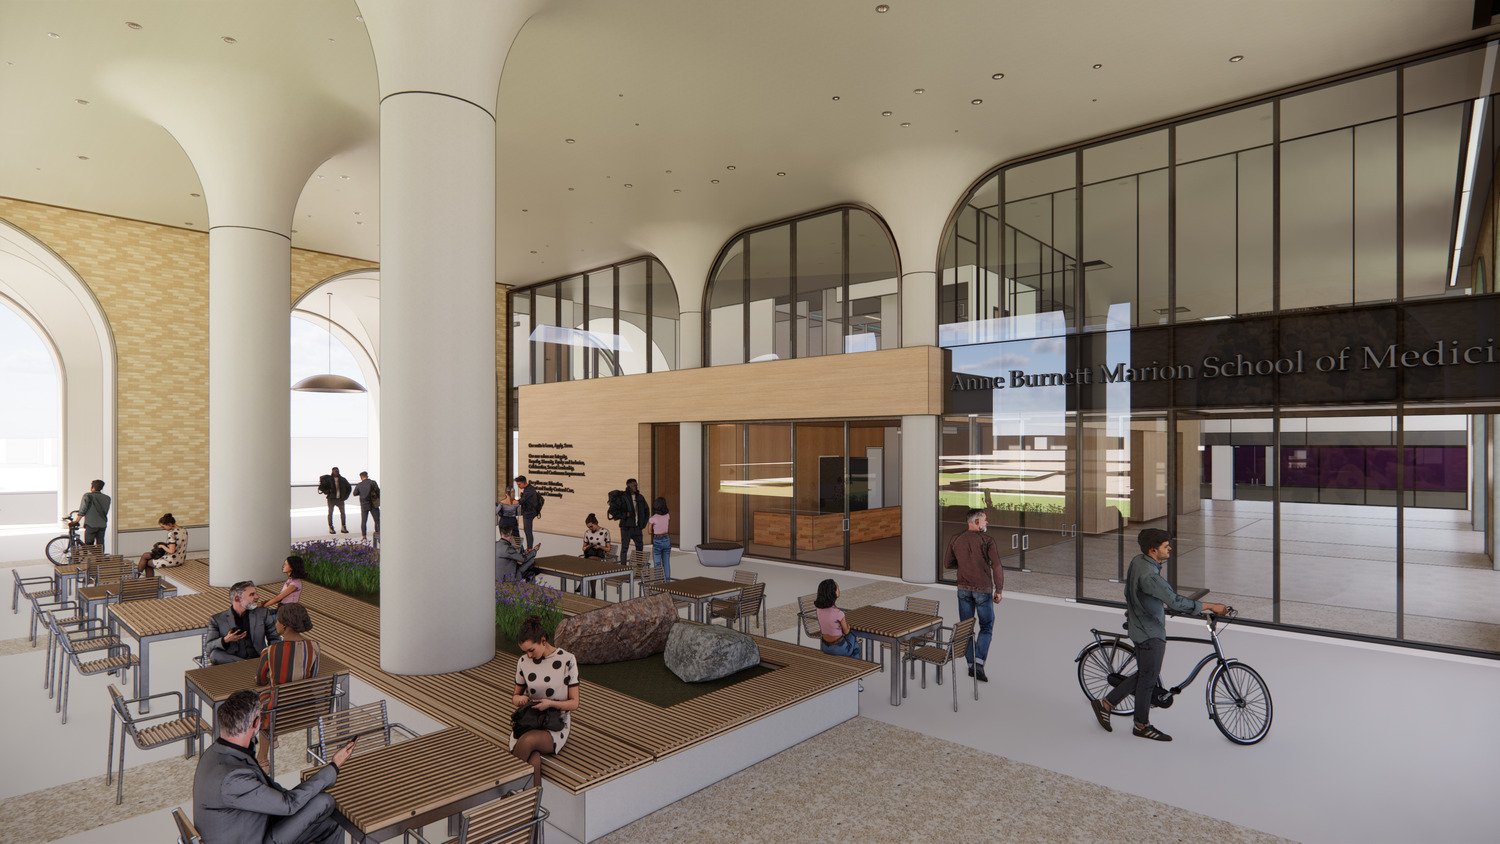
Below are four concepts developed at the start of the design phase for a client in Arizona. Each concept captures a distinctive mood and a complementary color story.
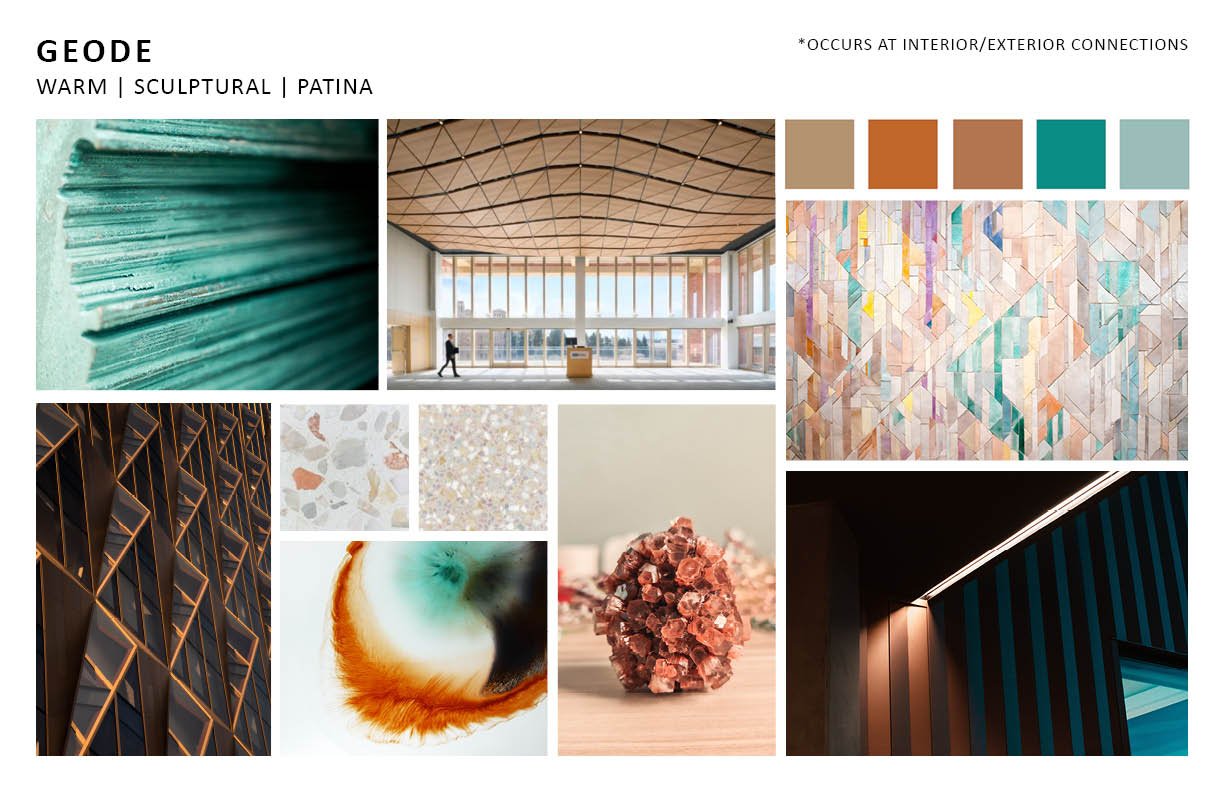
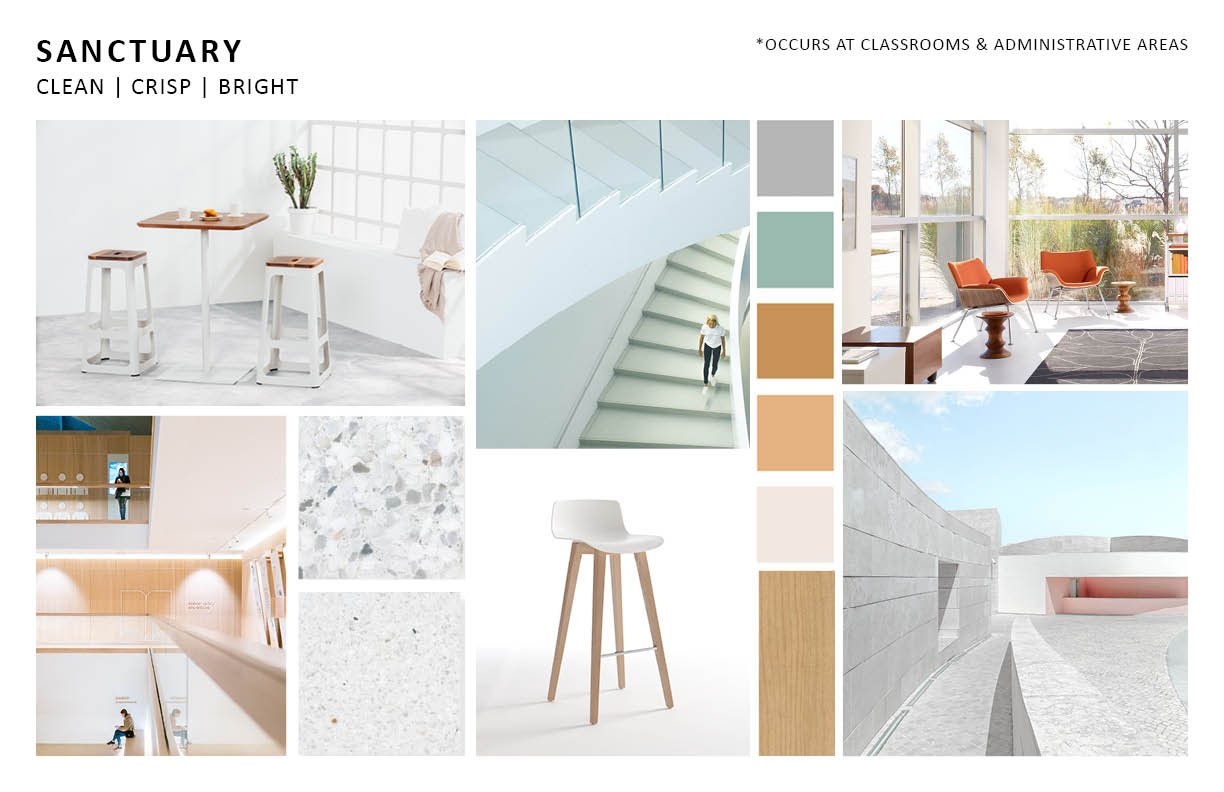
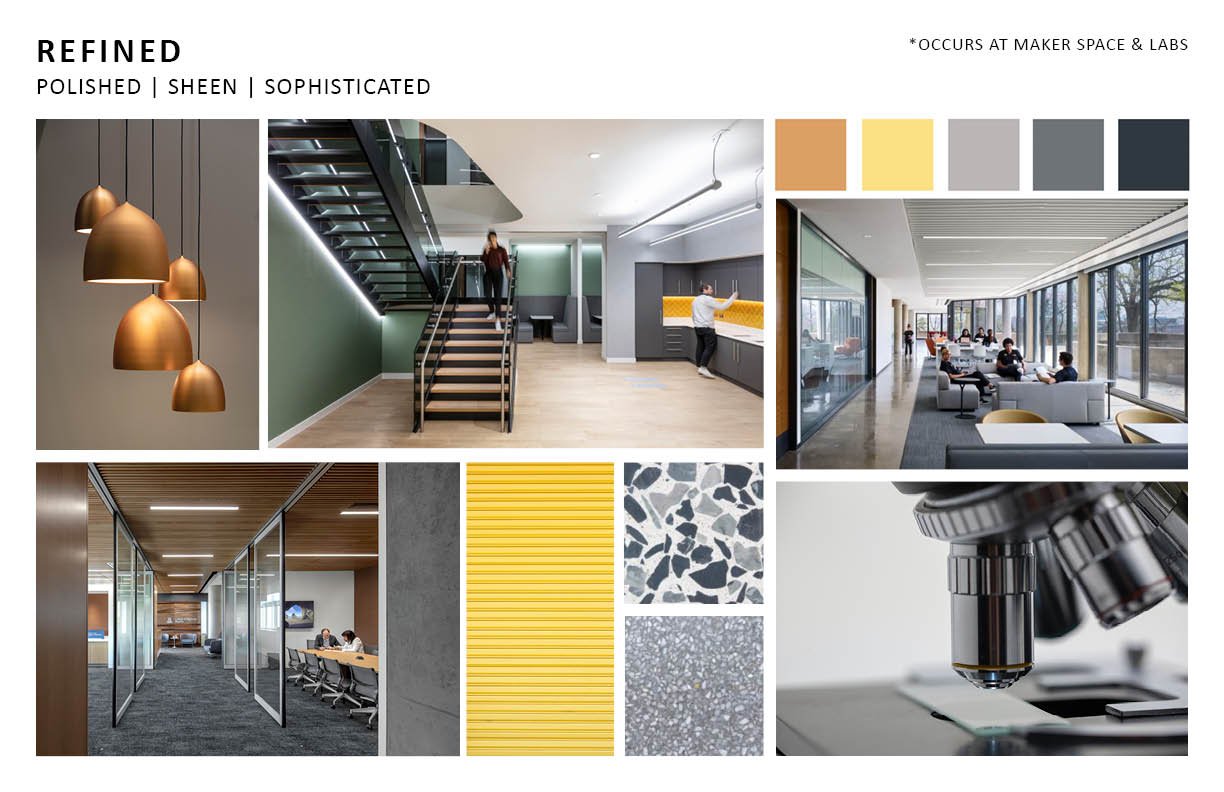
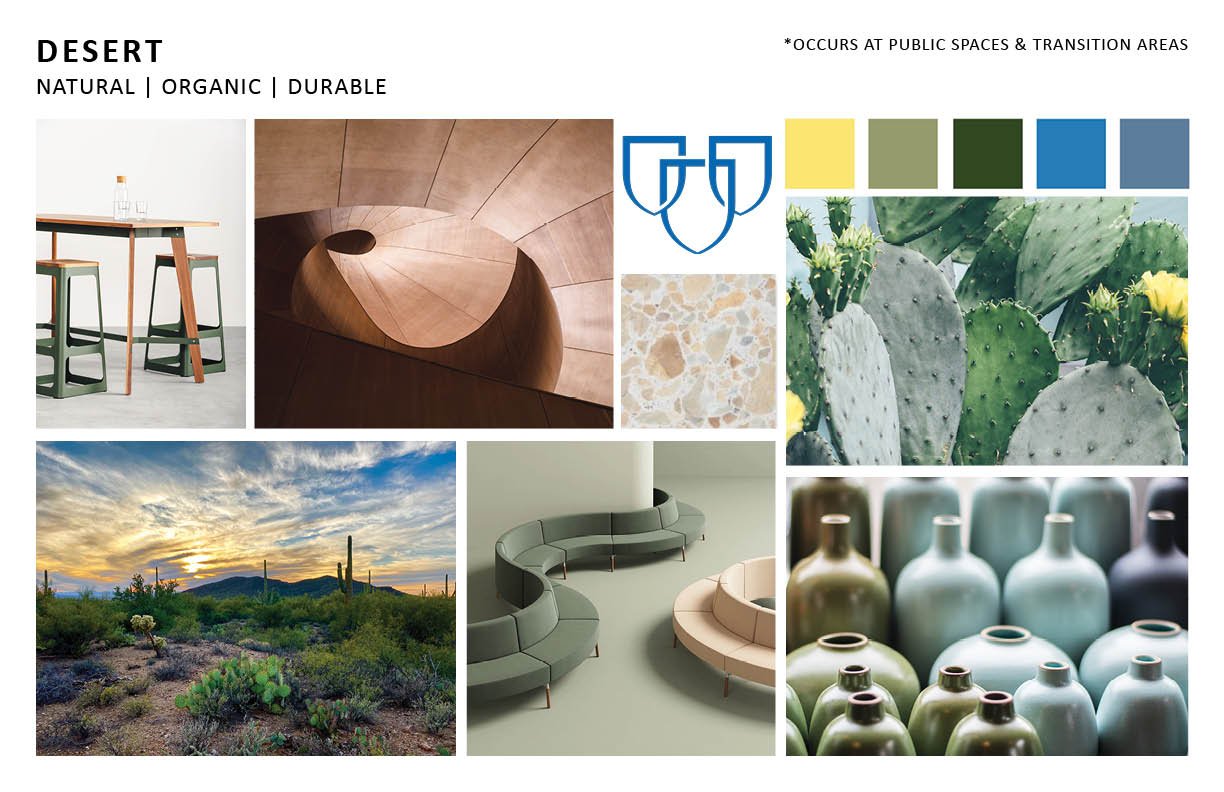
As is often the case, the client loved each concept for different reasons. We decided to weave them into one cohesive story — assigning each idea a distinct zone in the building and unifying everything with a single, harmonious color palette.
Design Development
Design Development is where a good idea starts to feel like a real place. The client has chosen a direction and the design team takes that spark and begins to give it shape. Rooms begin to settle into their roles as fixtures and equipment are picked out, even though exact measurements may still shift. The concept fills out in three dimensions — walls, ceilings and spatial flow come alive — and interior finishes start to tell a more specific color and material story.
At this stage, clarity is key: commercial drawings need to capture the project scope, even while some details remain tentative. The general contractor typically prices from a drawing set called the 100% Design Development. If an element isn’t included now, it’s hard to add later without it being treated as an extra cost. So, while there’s still room for refinement, this is the moment to nail down what belongs in the vision.
Designers pour countless hours shaping ideas and finding the best way to show them. At this stage, visuals — like renderings or lifelike 3D images — begin to bring the concept to life. Materials and finishes may be provisional but they usually convey the intended mood and overall feel. Establishing a clear point of view is key, since these images are often the client’s first real glimpse of the design. Clients can fixate on the smallest details, so it’s wise to avoid unnecessary layers or visual clutter — especially extra color — that might distract from the core idea.
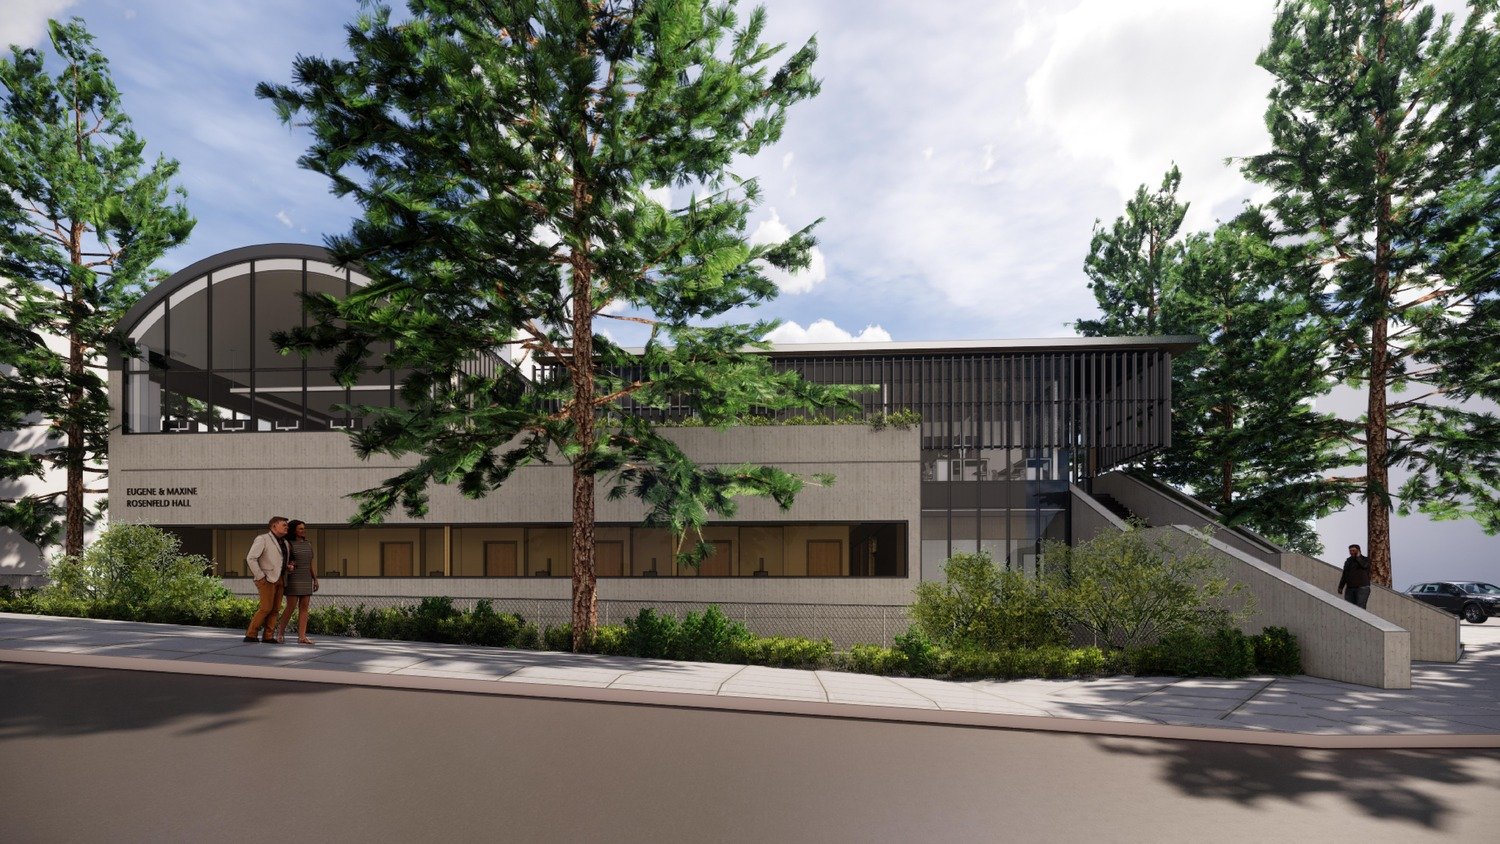
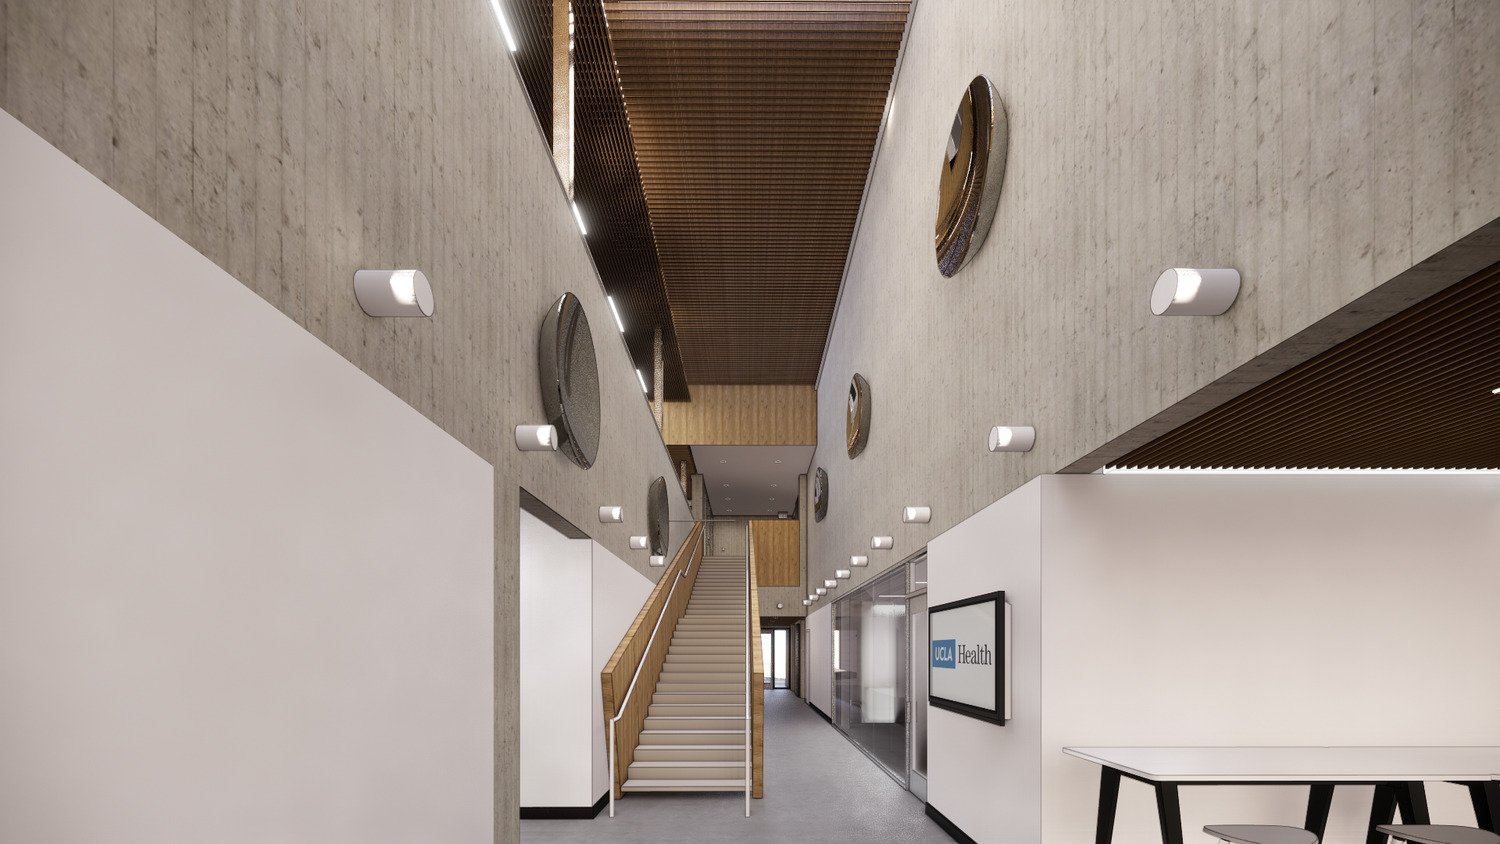
Designers select and refine key views of a space — the angles that best express the design’s story. Even when furniture isn’t part of the brief, sharing simple recommendations helps communicate scale, mood and intent. Close collaboration between interior designers and architects is essential so interior and exterior feel like one seamless composition. Sometimes, that teamwork happens under the same roof; other times it’s a nimble partnership stretched across cities or time zones.
Often, a material board begins its life as a digital collage — especially when clients are far away. It’s a lovely way to get to know their tastes and watch how they light up (or hesitate) at certain colors and textures.
Over time, finishes become something you can actually touch. I always favor an in-person client meeting: it lets you guide the conversation, explain design choices on the spot, and — best of all — run your fingers over each finish to feel how they’ll live in the space.
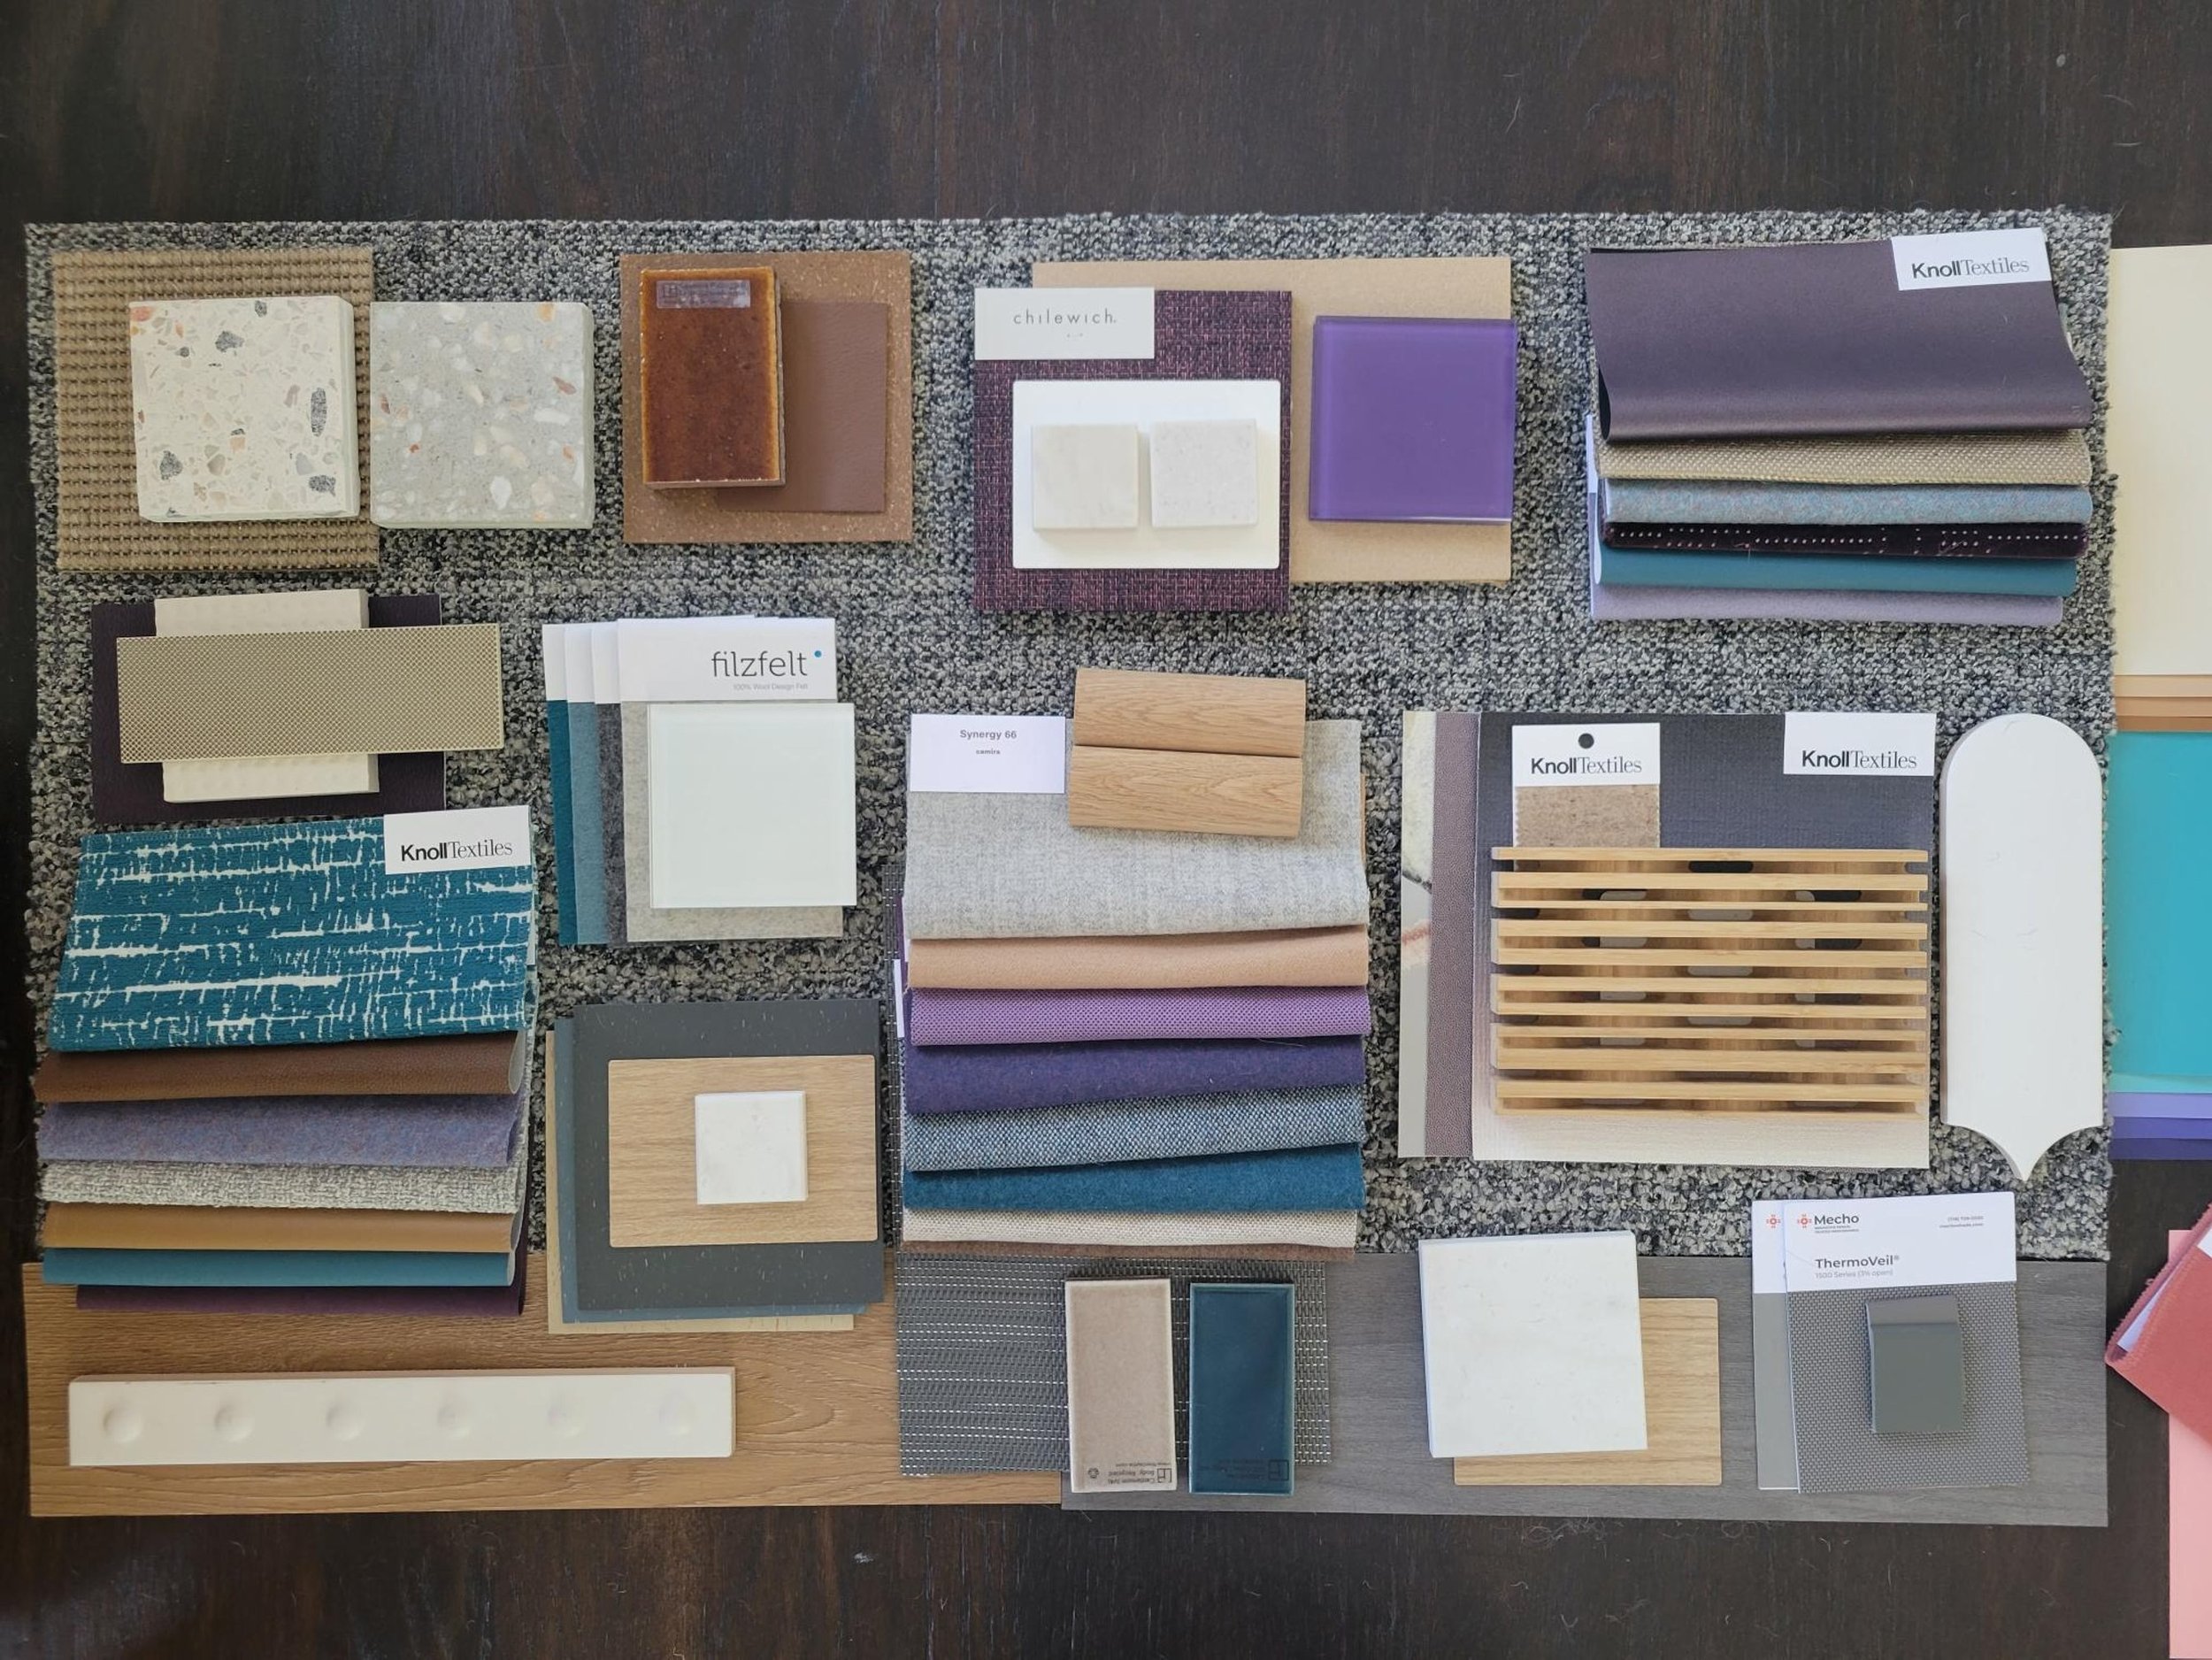
Keep choices tidy and the conversation on point. Know every detail about the products you suggest — price, sizes, lead time, materials, installation, cleaning and anything else that matters. If a question pops up you can’t answer, it’s better to follow up with the client than to guess or overpromise.
Construction Documents
Construction documents usually arrive in stages — think a 50% CD set, then a permit set around 90–95% complete. The permit set is the one sent to the city, so it must obey every safety code and ADA requirement. At this phase, the designer translates vision into buildable reality: floor plans, reflected ceiling plans and elevations are locked in and fully dimensioned. Details and finishes are chosen and approved by the client. Electrical, plumbing, mechanical and AV are coordinated and submitted alongside the interiors and architectural drawings, while structural drawings are wrapped up. A final contract document set is then issued to the client and the city for approval; any late additions require an addendum or change request. In short, the more you put into the documents, the more the general contractor is obliged to build — if it’s not documented, it’s not part of the job.
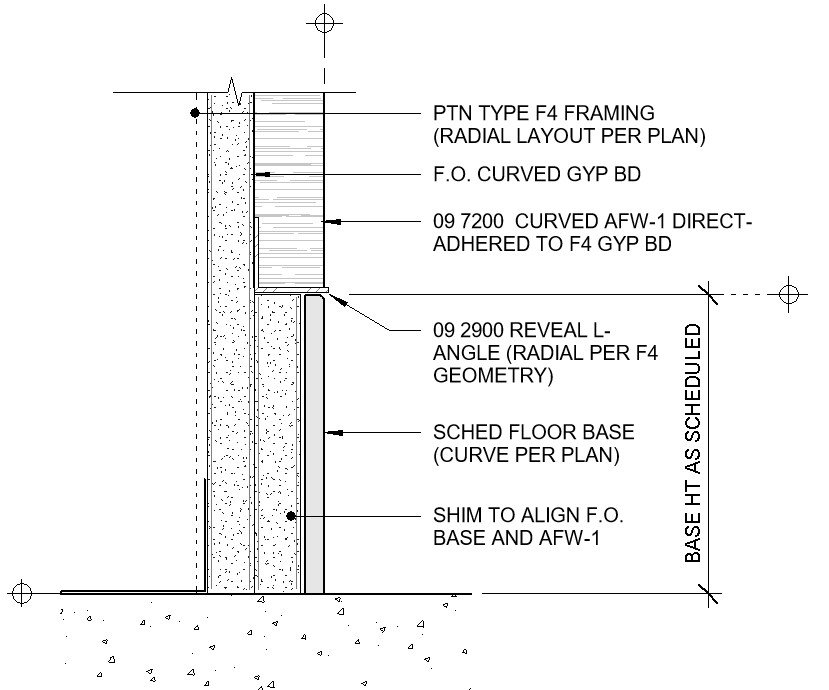
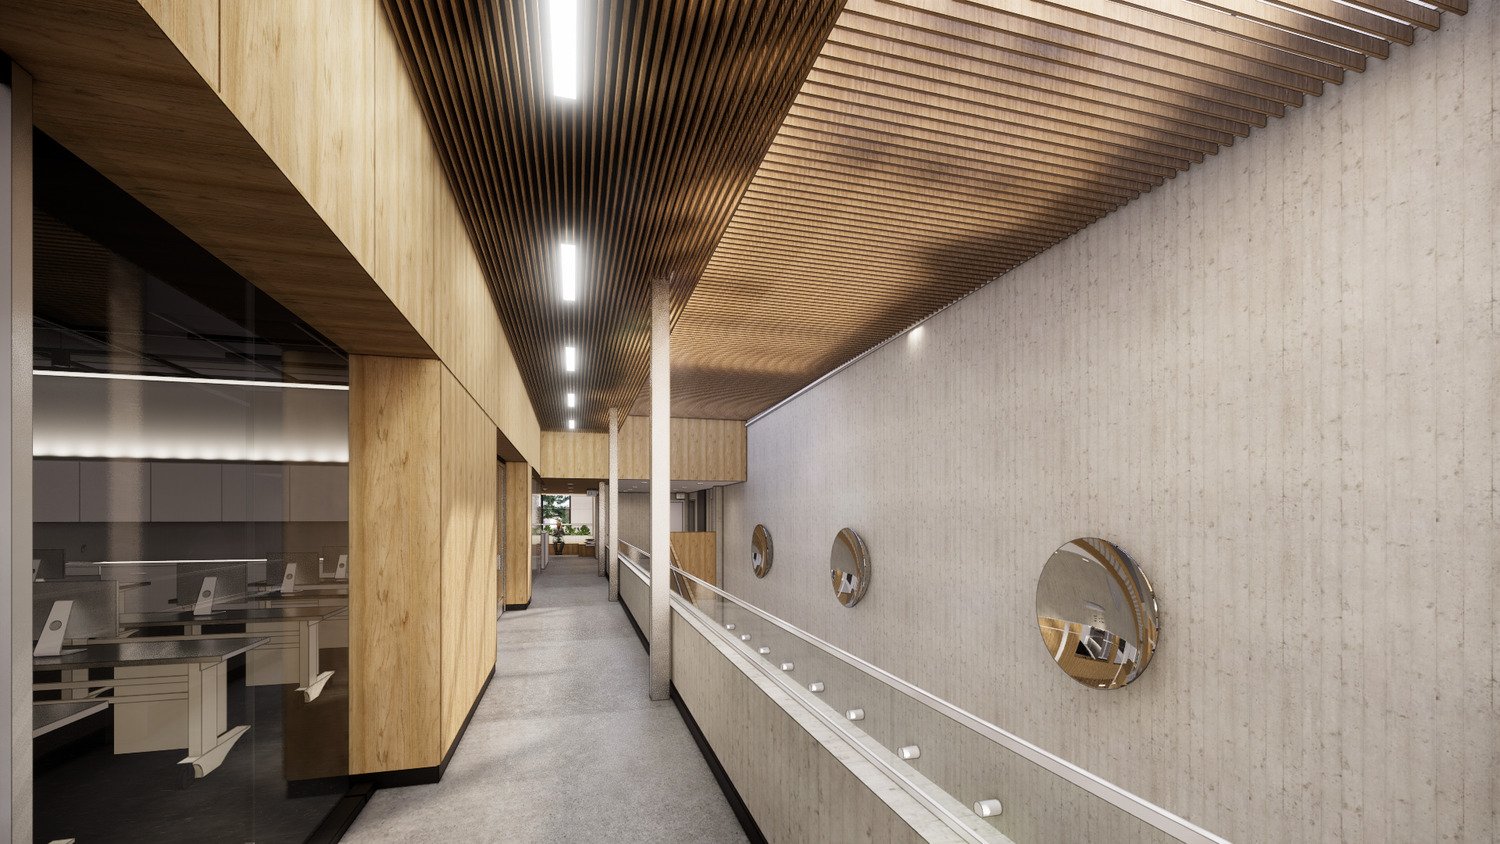
Document every condition in the building — especially where materials meet, at edges and corners. The photo above shows an acoustic wall panel meeting the wall base. Because the panel is thick, we added an L‑angle trim to support the bottom and give a clean, finished transition. It’s those small junctions, repeated throughout a project, that need clear detail drawings before submission to show scope and intent. The more precise the detailing, the higher the cost.
Construction Administration
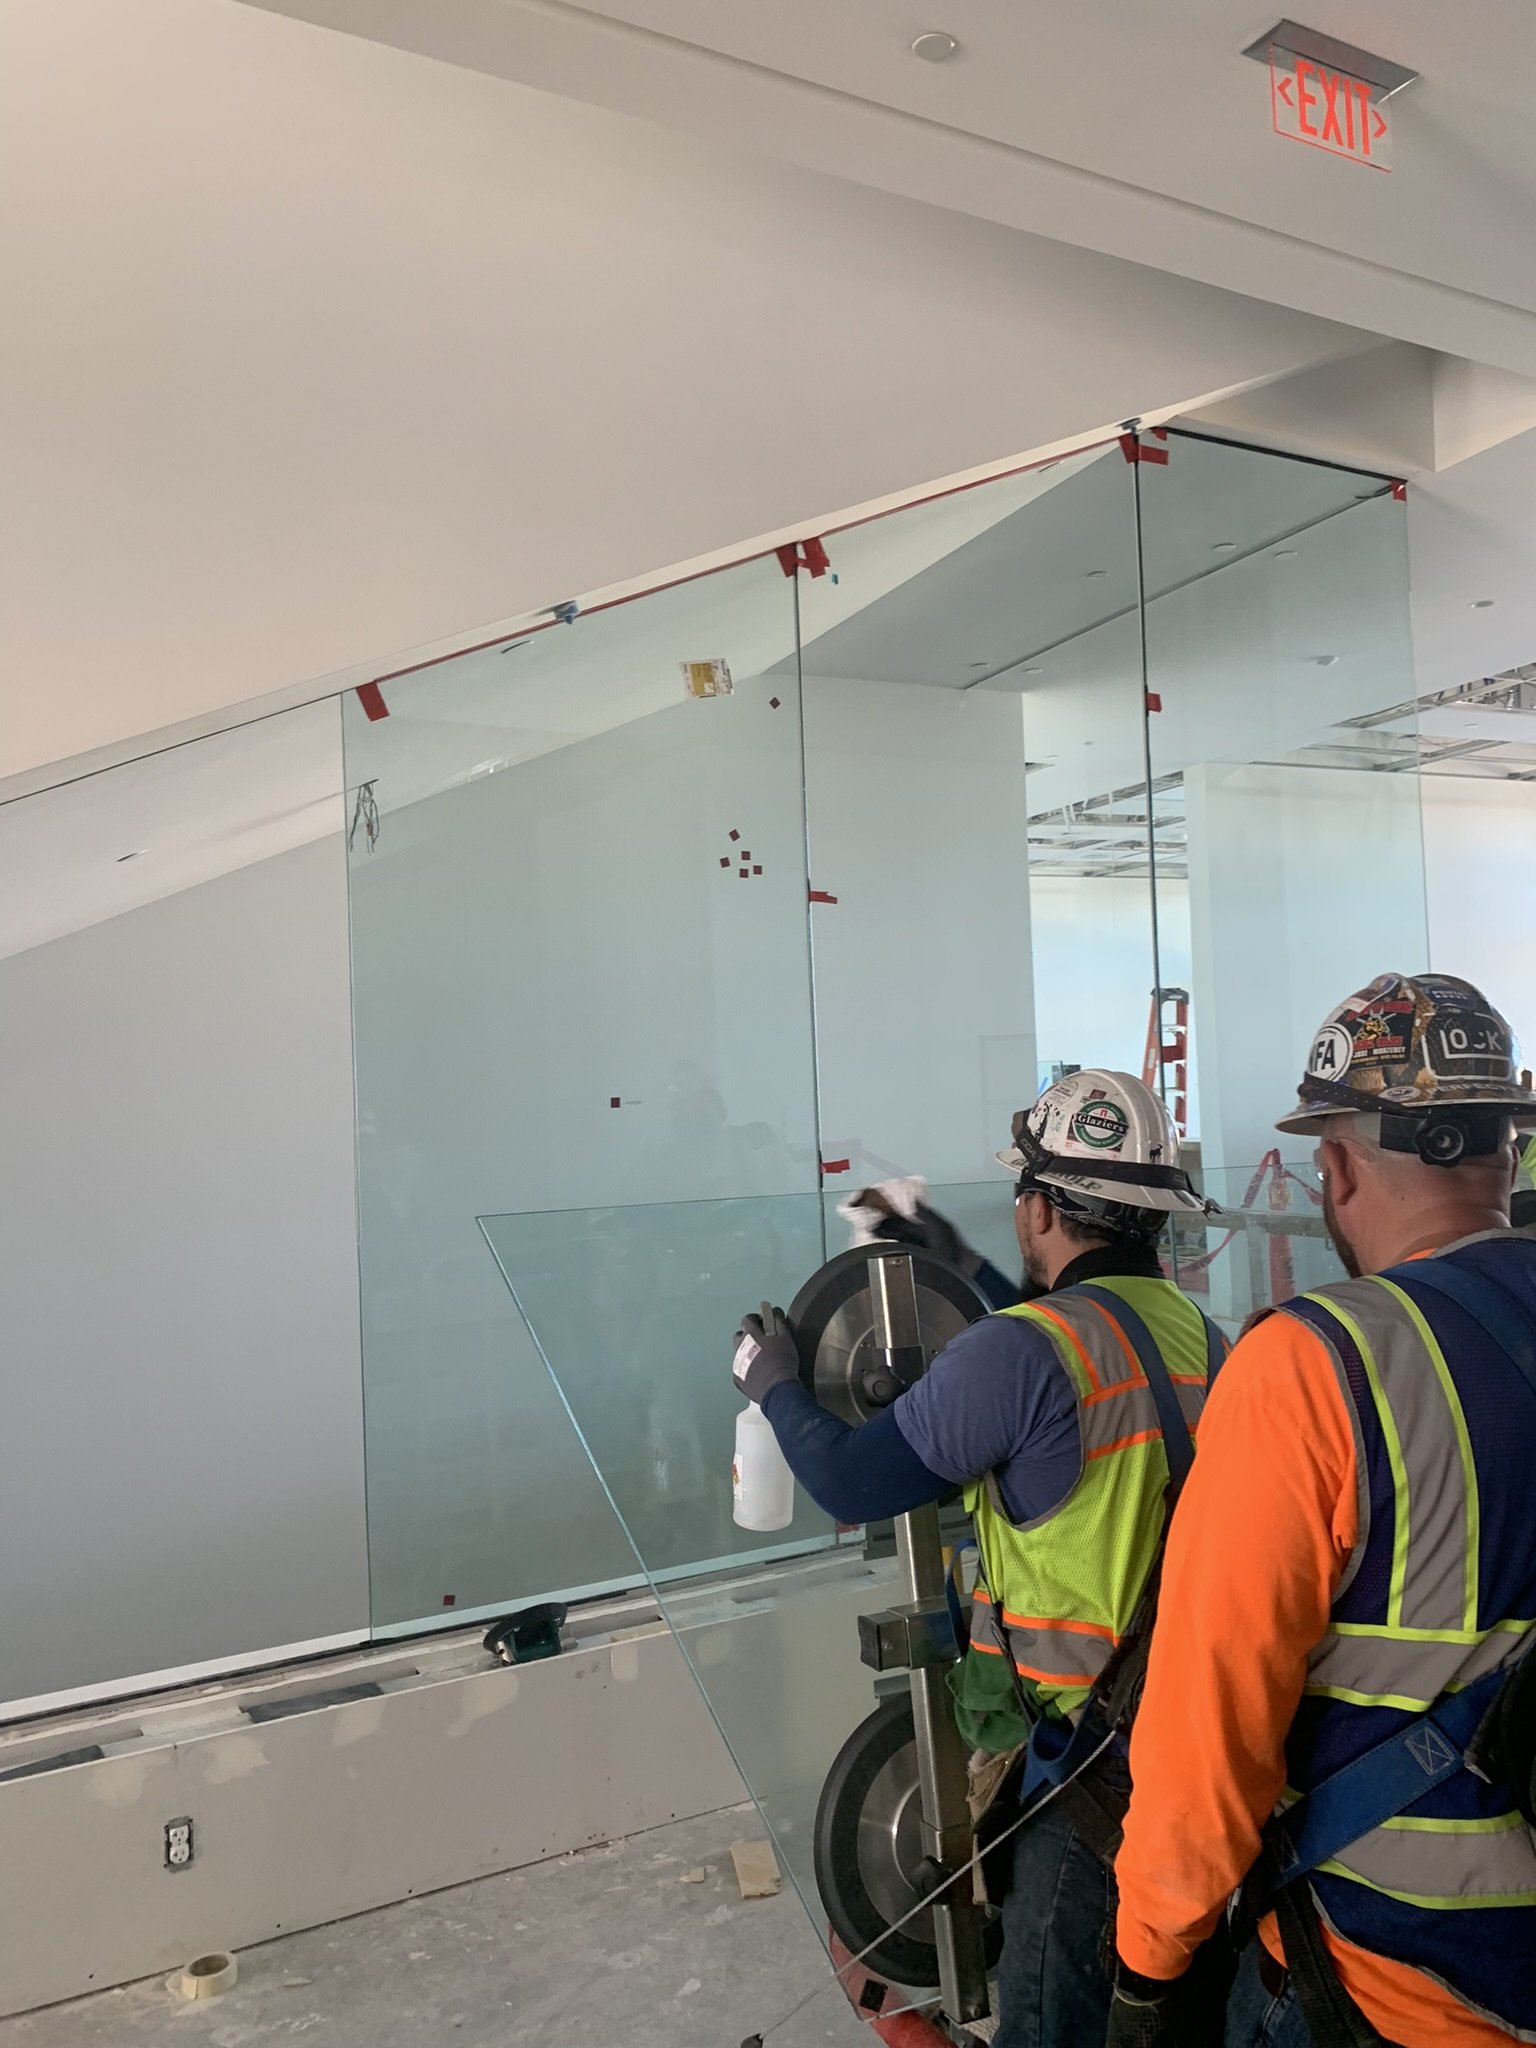
During Construction Administration, the project comes to life. Contractors submit bids and are selected, permits are pulled and fixtures — lighting, plumbing and furniture — are ordered, shipped, received and installed. Throughout this phase, shop drawings are sent to the designers for approval: these drawings show exactly what will be built, so they require a careful, line-by-line review. This is the final chance to catch anything overlooked or incorrectly documented before it becomes part of the finished space.
The general contractor and subcontractors are onsite regularly, conducting walkthroughs with the designers and client. These visits are prime opportunities for designers to stay alert, ensuring builders follow the plans and honor the design intent. At each stop, designers should document everything, calling out anything that isn’t up to standard. Catching and correcting mistakes in the field — and doing so promptly — keeps the project on track. Consistent site visits and careful documentation protect the space from errors or damage as construction progresses.
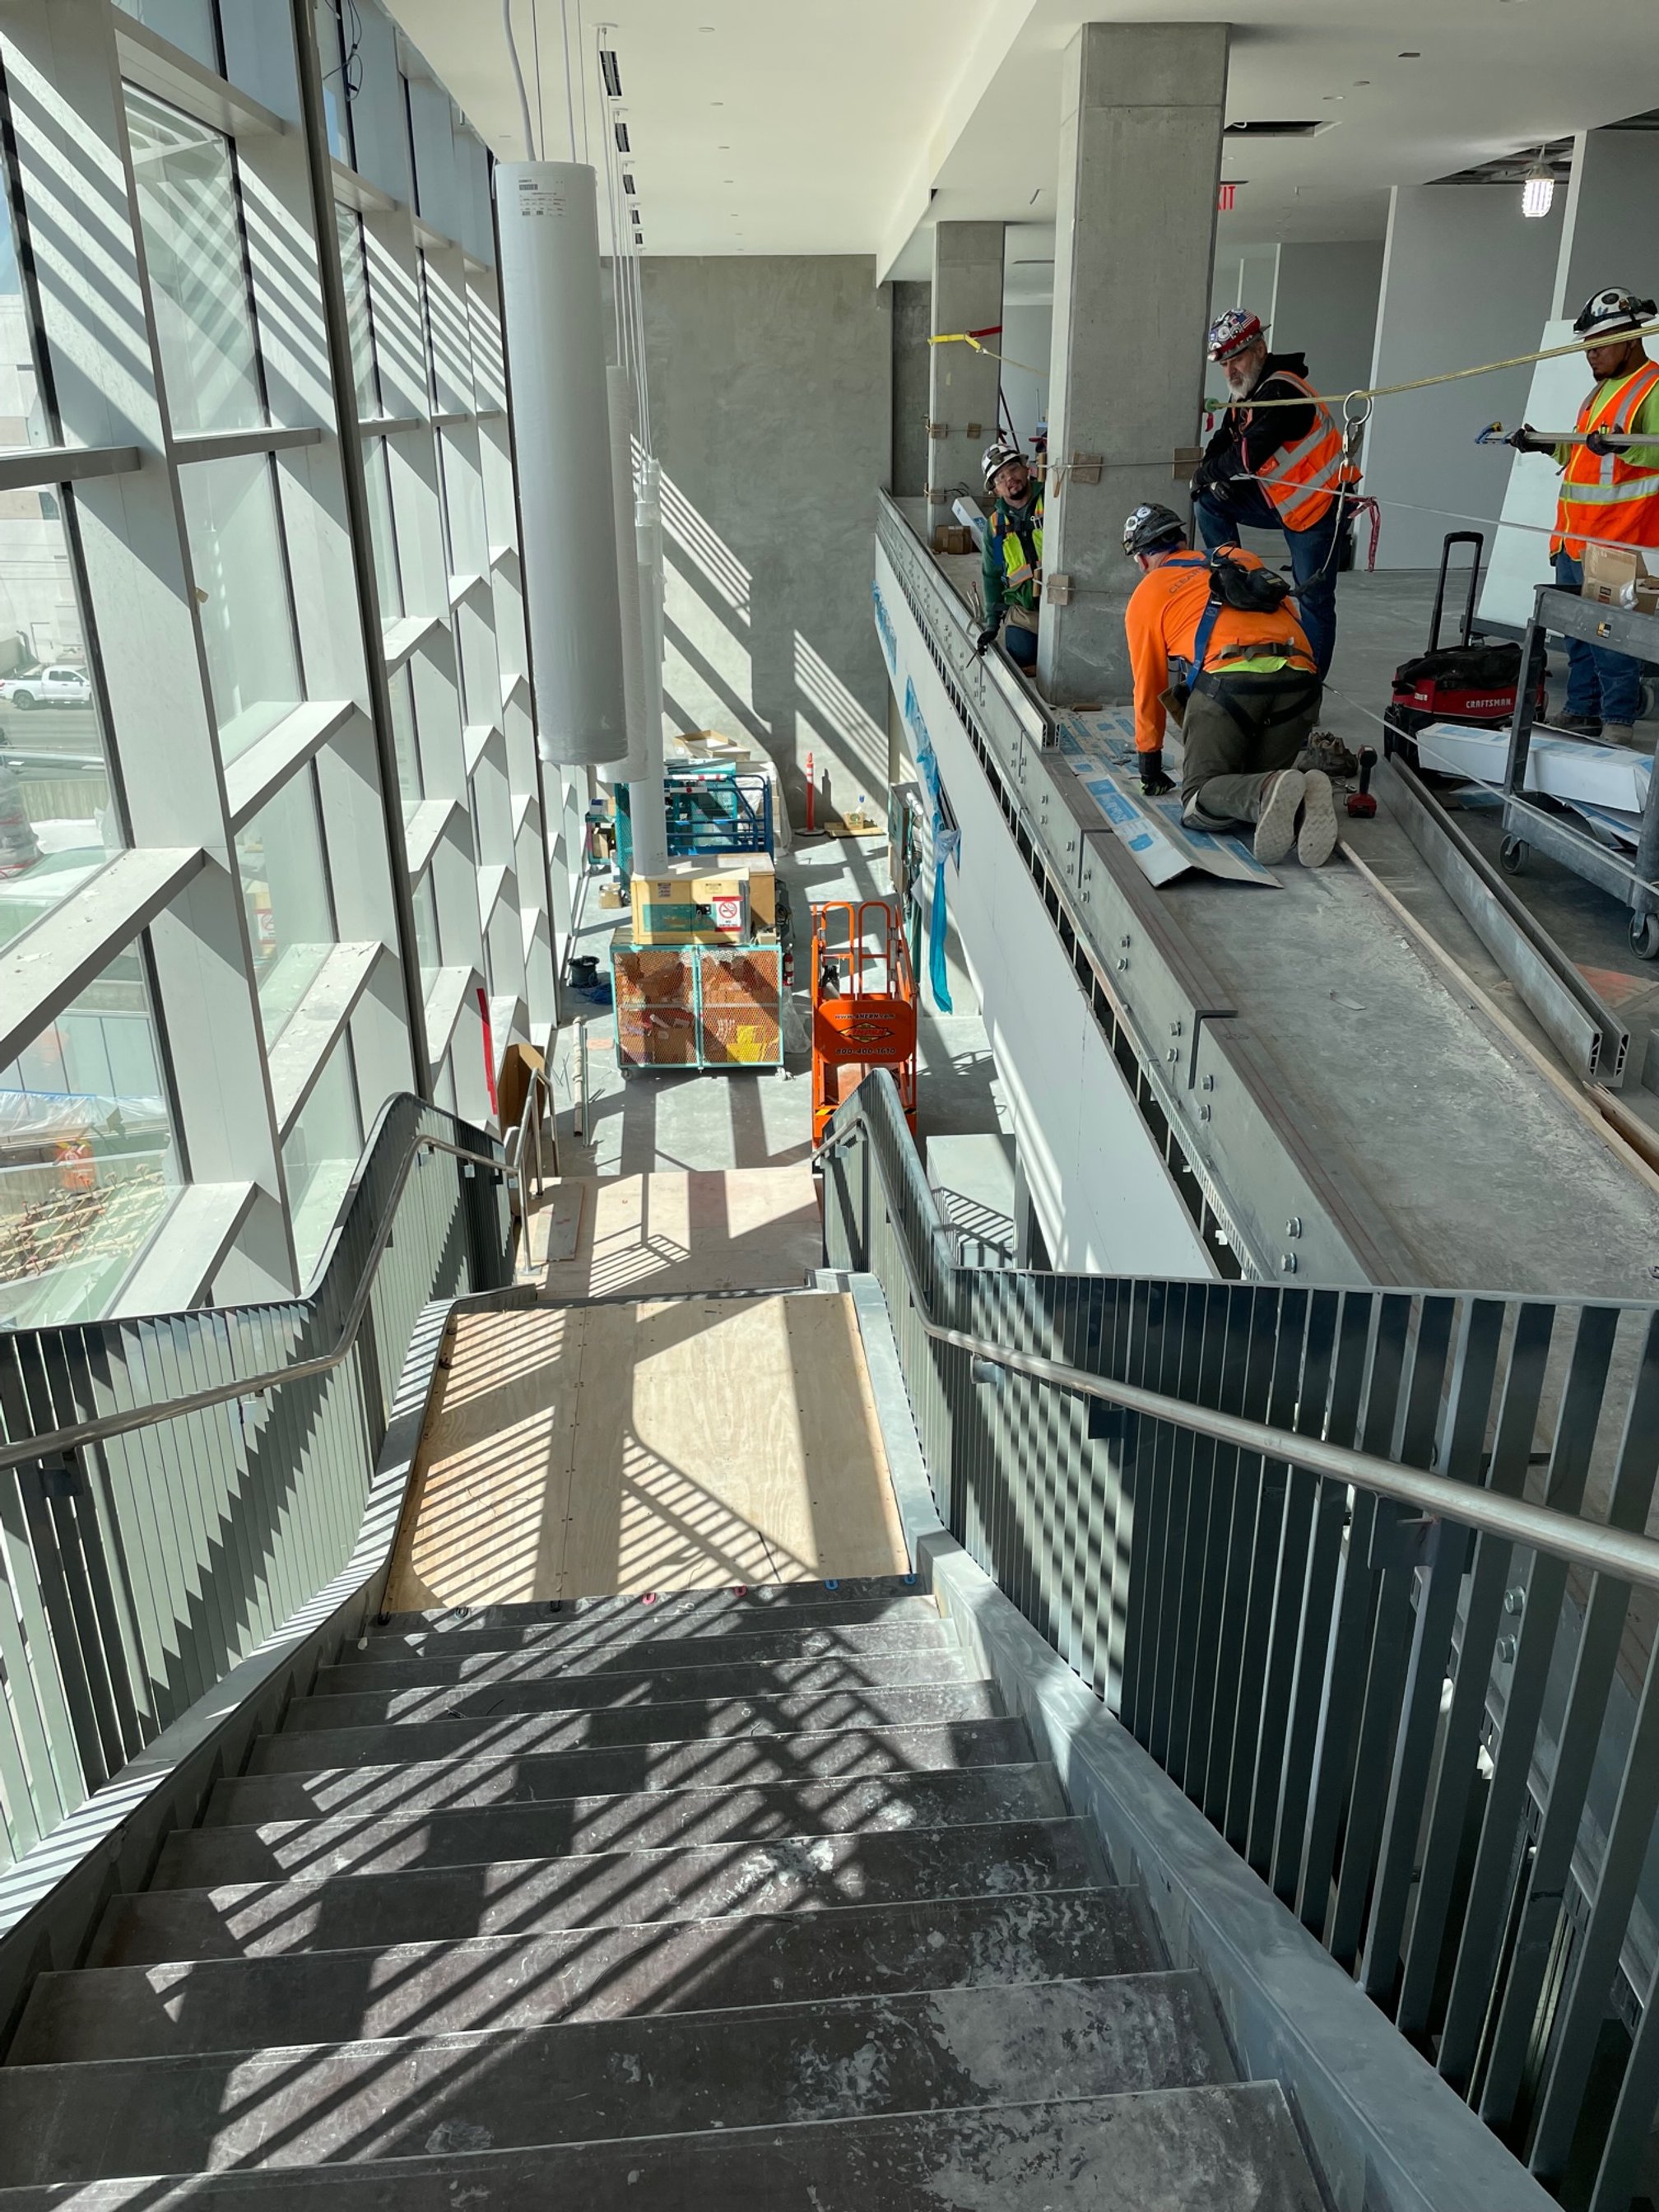
Early site visits can feel a bit blunt — they’re all about the big picture: walls in the right place, ceilings at the proper height and the structure coming together as planned. As the project progresses, though, designers turn into gentle sleuths, peering above, below and behind to uncover the small missteps that escaped earlier scrutiny. Sometimes the culprit is delightfully minor — a wood grain running the wrong way or a fabric tucked in upside down — but catching those tiny details is what elevates a build from finished to thoughtfully finished.
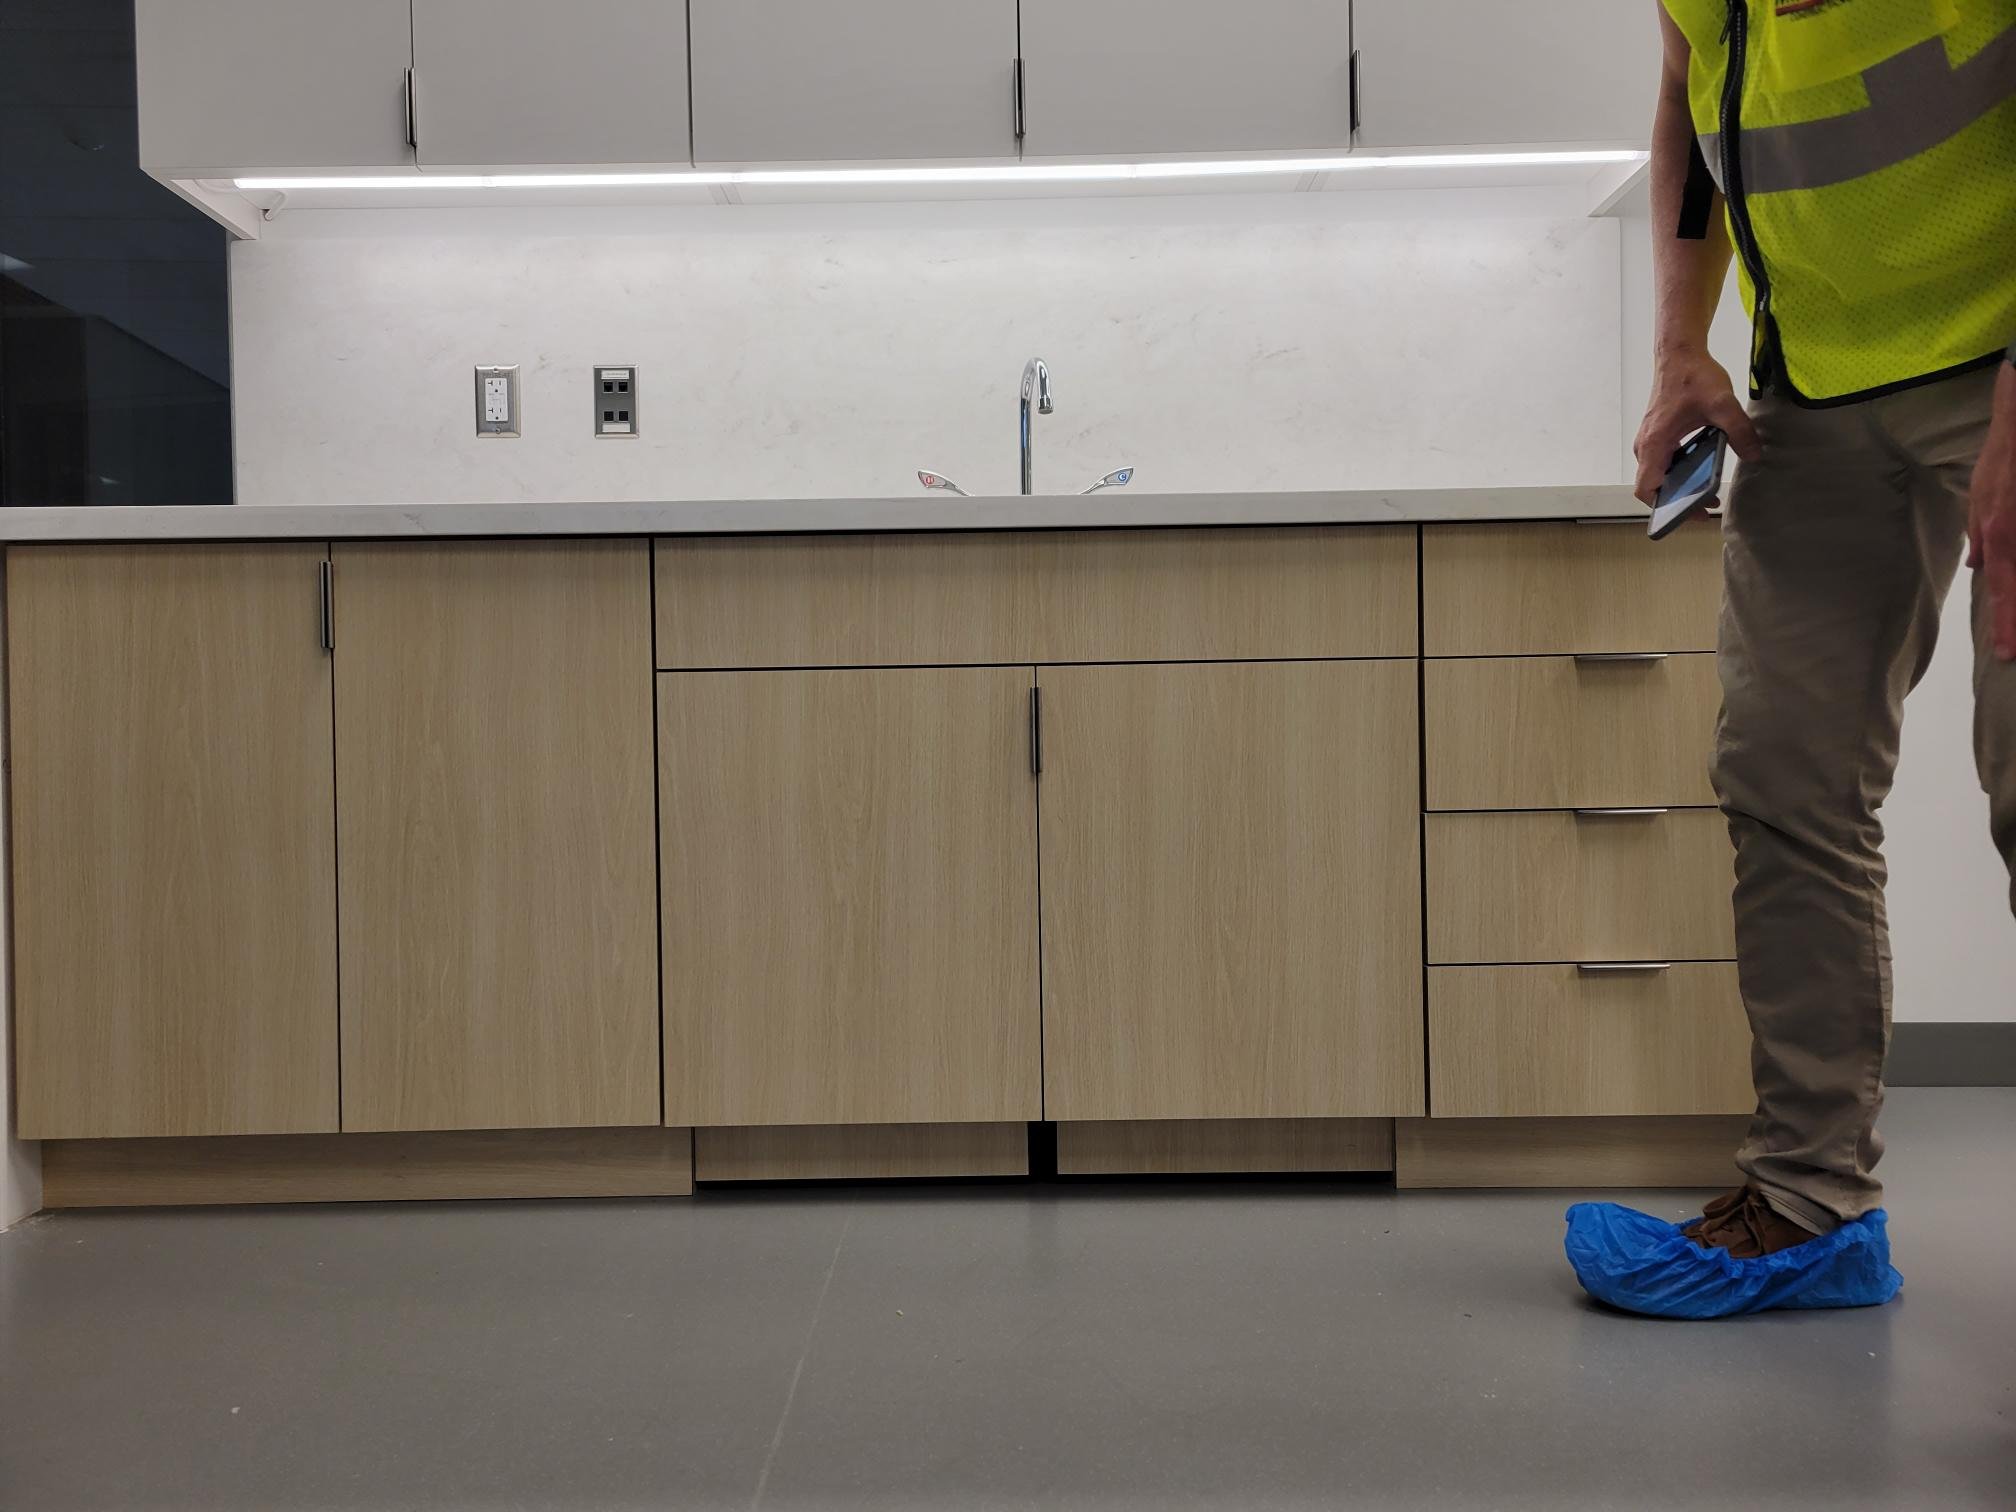

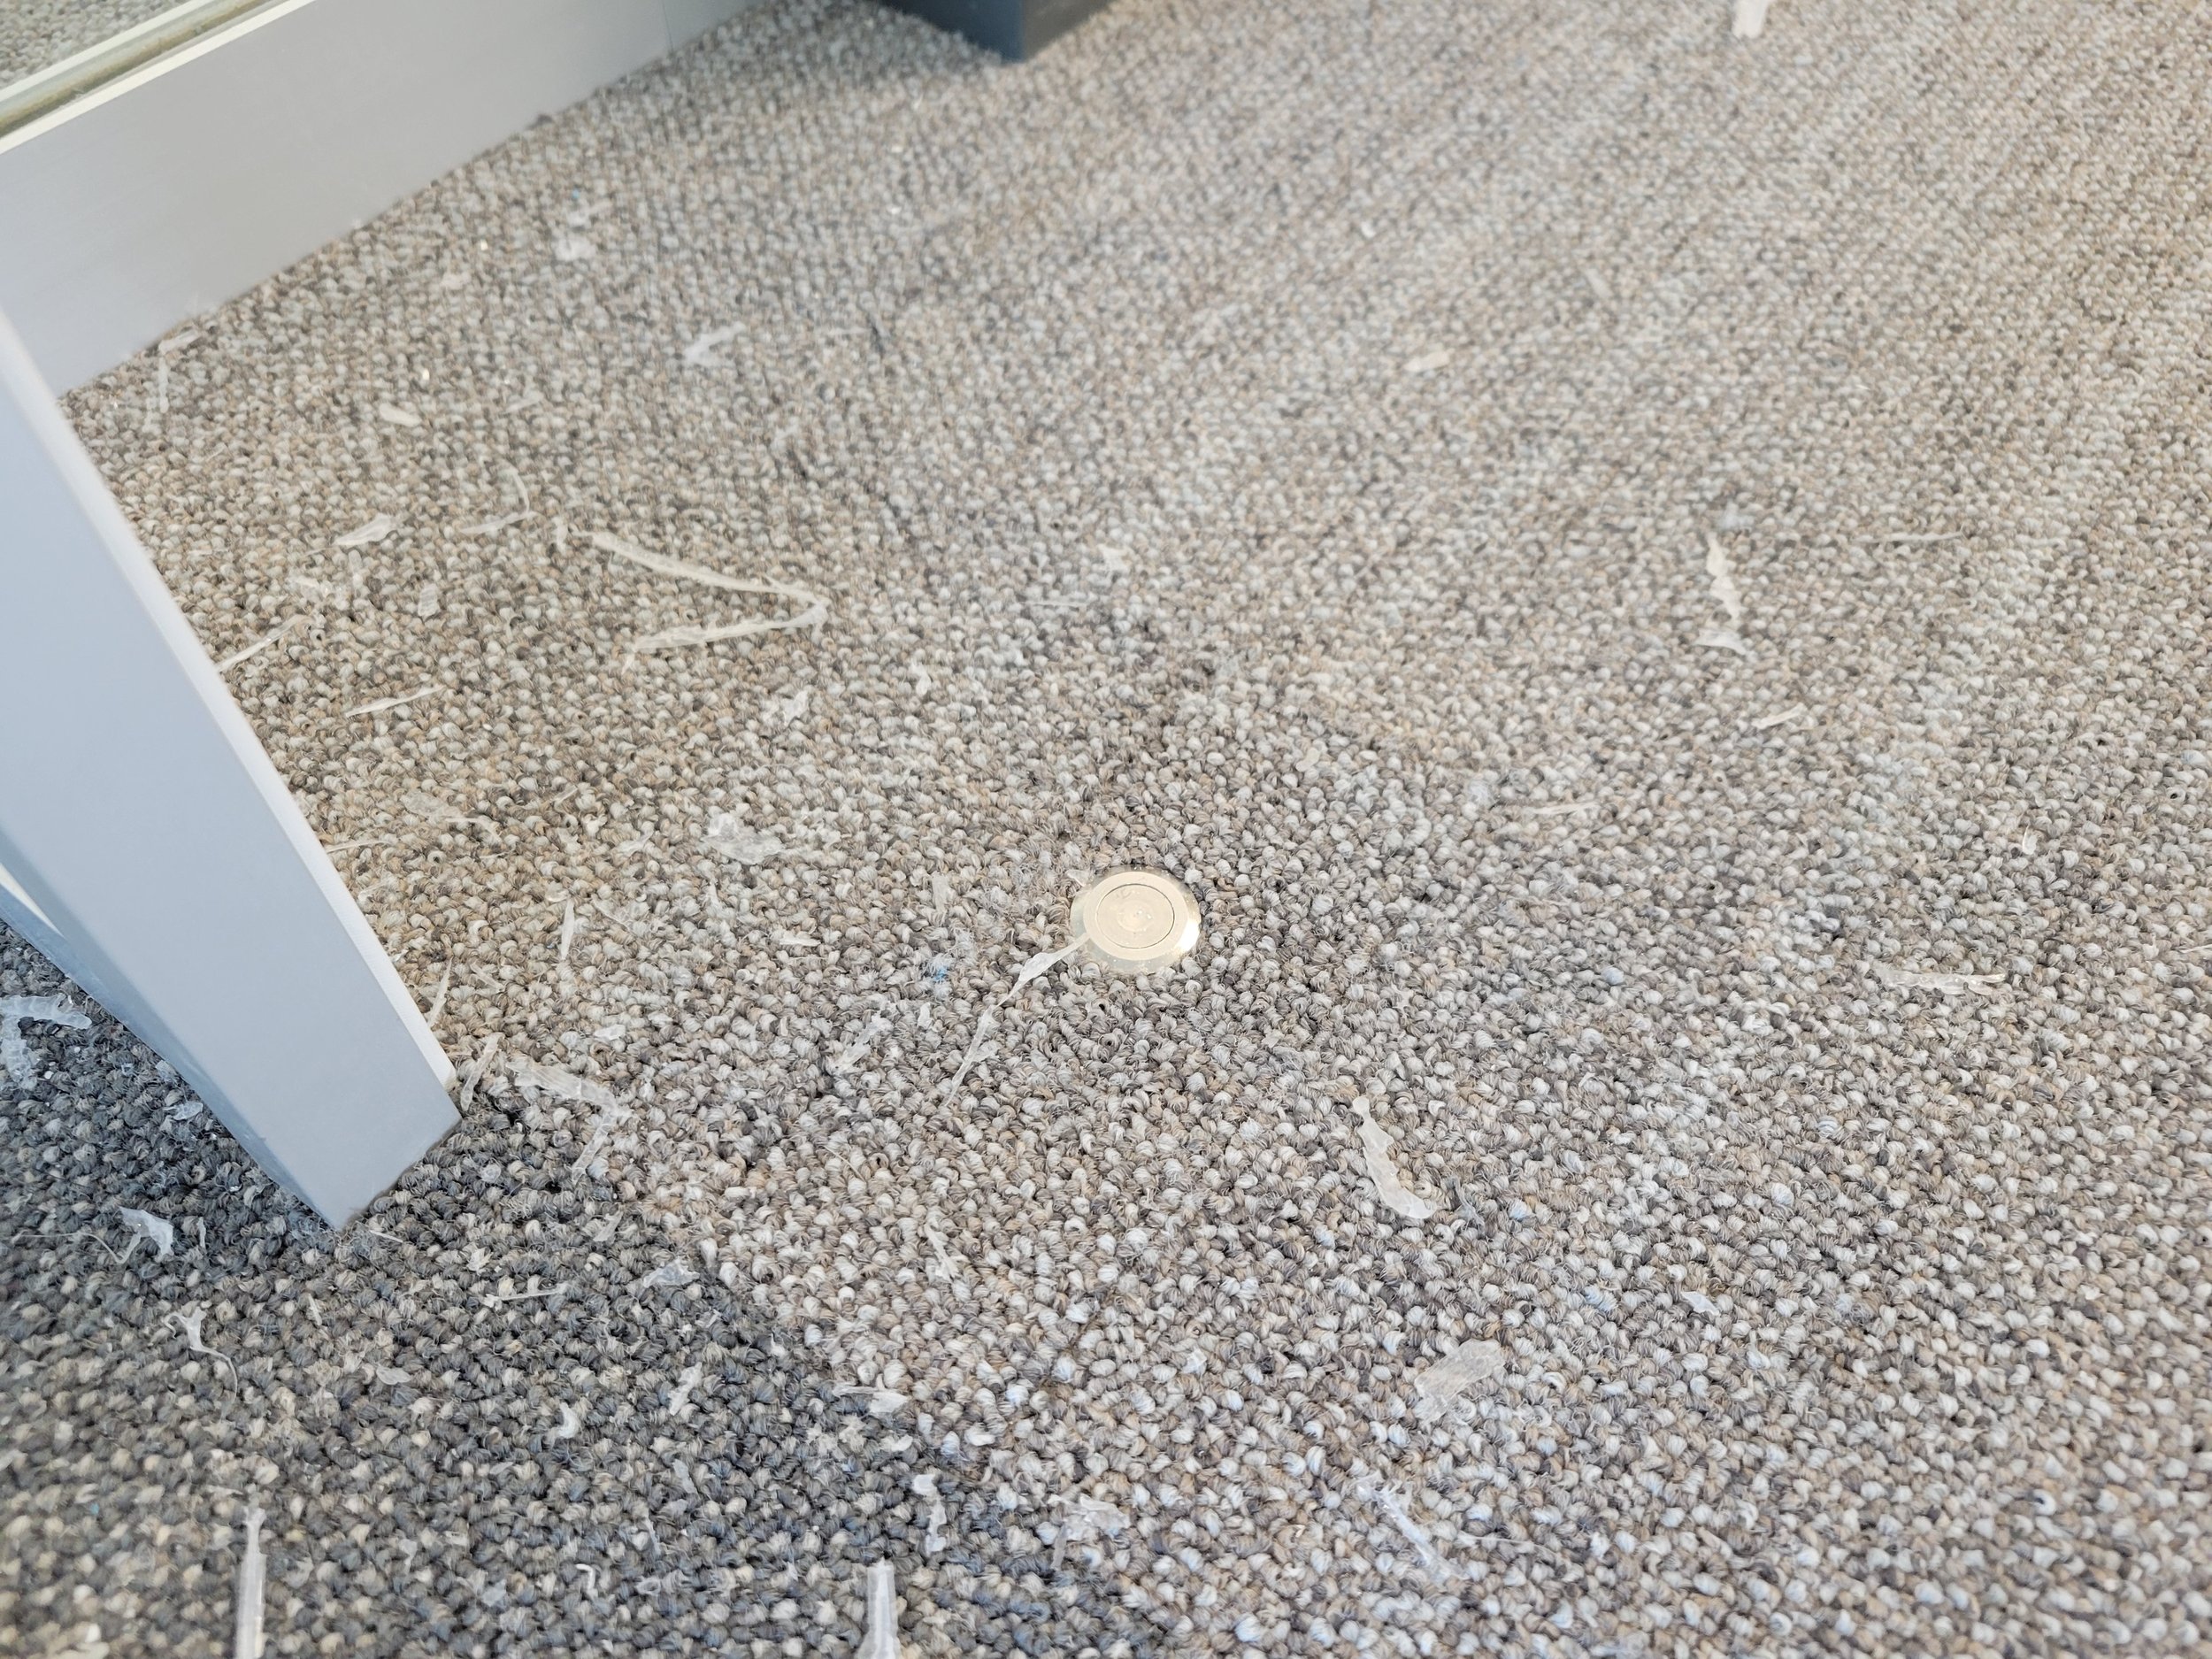

At the end of a project the designer usually does a final punch-list walkthrough, noting any remaining design fixes that need attention. Common finds include scratches, dents or gouges; misaligned architectural elements; incomplete installations; incorrect products; or items that simply don’t meet quality expectations. If a designer spots something they’d like changed that wasn’t specified in the original drawings, it can be a costly surprise — extras often become change orders.
The general contractor manages the installation sequence but protecting finished surfaces and newly placed furnishings is crucial. Workers aren’t deliberately careless, yet accidental damage can happen as work continues. It’s also smart to verify counts for fixtures and furniture so nothing is missing. For that reason, furniture is typically installed last — it reduces the risk of damage and gives one final chance to confirm sizes and layouts feel right.
04 | What Tools Do Interior Designers Rely On?
Once upon a time, drawings lived on paper and were born from careful hands and pencils. Then came AutoCAD: the 1980s-born staple from Autodesk that turned drafting into digital lines. It does what it promises — precise 2D and 3D lines — but in my view it can feel a bit literal and old-school: every line must be drawn exactly as it appears, rather than translated into an object with depth and presence. Draw a line in CAD and it’s just that — a line. Other programs will give you a wall with height, thickness and personality with far less trouble. Small firms or professionals trained in CAD often stick with it and architects sometimes cling to it more than interior designers do.
These days, most studios run on Revit. It’s a 4D building information modeler that manages a project’s whole life — from concept and construction to maintenance and even demolition. In Revit, you tell it “wall,” or “room” and it delivers a wall or a full room, floors and ceilings are just as easy and instant. That object-based workflow is a huge time-saver but it isn’t perfect: Revit leans rectilinear and strict. Because schedules are driven by modeled elements, everything has to be the right model, size and material to populate documentation correctly. In short, Revit is powerful and efficient — just a little less forgiving when you want to bend the rules.
There are a few other programs designers turn to for specific tasks. SketchUp is a favorite for quick studies — its simple extrusions and easy material application make it perfect for fast concepting, though it’s not typically used for city-submittal drawings. Rhino (Rhinoceros 3D) handles more complex geometries and intricate details — think flowing curves and unusual forms rather than straight lines; I never quite mastered it in school but many designers swear by it. And Enscape is a real-time rendering and VR plugin that pairs with 3D software to produce impressively lifelike imagery and immersive walkthroughs.
Alongside the design tools already mentioned, clear communication is just as important — whether between designers, with clients or in public-facing materials. For client presentations the Adobe Suite remains a staple: Photoshop polishes imagery from 3D views, elevations or floor plans, while InDesign organizes slides into a single PDF “deck” for a tidy, cohesive presentation.
Recently, my firm has also embraced Miro, a digital collaboration board that lets you drop in images, drawings and notes and share them anywhere, anytime. It’s more casual than a formal deck and works beautifully for clients who want to collaborate in real time rather than sit through a traditional presentation. And for day-to-day document review, Bluebeam is indispensable — teams can open a session on a set of drawings, invite consultants in and mark up files together, which makes coordination across disciplines smoother and faster.

